


Review of the iPhone 14 Pro Max

I am fortunate enough to be able to purchase a new iPhone every year since 2007 with the introduction of the original iPhone. In that time I have owned 16 different phones. Some years that are big changes, while other years there are some improvements but those improvements come with software. There are those times when it a combination of both hardware and software that ends up creating an overall better experience. The iPhone 14 Pro Max is an instance where the iPhone has both hardware and software changes that improve the overall experience.
Starting in 2019 with the introduction of the iPhone 11 line, Apple began to differentiate the phones into two different lines, the “non-pro” line and the “pro” line of phones. This started with the iPhone 11, iPhone 11 Pro, and iPhone 11 Pro Max.
Some years there was very little that differentiated the non-pro and pro lines. Once thing that has been a differentiator, at least since the iPhone 11, the two has been the number of cameras on the device. The non-pro phones have had a dual camera system while the pro line has a triple-lens camera system. This remains true through the iPhone 14 line. One thing that has not been the case is that all new models of the iPhone have received the same processor across the line. The exception to this was the iPhone 5c, which had an A6 while the other phone introduced that year, the iPhone 5s, had the A7. Beyond that, all new phones have had the latest processors.
This year though, that changes. Now the processors are different between the non-pro and pro lines. The iPhone 14 and iPhone 14 Plus have an A15 Bionic while the iPhone 14 Pro and iPhone 14 Pro Max have the A16 Bionic processor. This bifurcation is the first time where there is a clear delineation between the two lines. I suspect that this will continue to be the case in the future.
The hardware changes for this are exclusive to the iPhone 14 Pro and iPhone 14 Pro Max, but some of the features are also available in the iPhone 14 and iPhone 14 Plus. Before we dive into the actual device, the iPhone 14 Pro Max, let us look at my pre-order, pickup, and setup experiences.
Pre-order Experience
Pre-orders opened up on Friday, September 9th at 7am Central Time, or were supposed to start at that time, but as usual, due to caching and other issues, some were not able to order their devices in the first few minutes and up to 10 minutes after. My pre-order experience was a frantic one due to the many issues I had.
When the Apple Store app finally refreshed to allow me to order, it prompted me to complete the pre-order information that I saved. I went through the steps and attempted to complete the transaction with picking up at my local Apple Store. I initially chose 9:15am. Upon check out it indicate that my contact information was incorrect, even though it has not changed in years. So, I changed it and went back to checkout, but when it completed, it was changed it to shipping instead of pickup. This in itself would not be a problem, except the delivery date range was September 27th to 29th. If the delivery was for launch day, I might have kept it.
When I placed the order that would have been delivered late, I also ordered a Midnight case. I opted to just cancel the entire order and I re-ordered the Apple Midnight MagSafe case separately. That did arrive early, as iPhone cases tend to do. The next thing that happened was the wait for pickup day, so let us look at that.
Pickup
The pickup for the Apple Store could not have bee smoother. I got there at 9:50, stood in line for 5 minutes, got helped and was out. I left the Apple Store at 10:12. It might have even been quicker, but I also wanted to pick up a couple of Apple Watch bands while I was there and it took a little bit of time for another Apple employee to bring them out. After I left the Apple Store I drove home and did the setup on the iPhone 14 Pro Max, so let us cover that next.
Setup and Transferring Phone to Phone
The iPhone 14 Pro Max is the 16th iPhone that I have owned, so I am no stranger to having to move between devices. My typical approach is as follows:
- Unpair Apple Watch to perform a backup to my current phone.
- Plug iPhone into my Mac.
- Perform encrypted backup using Finder
- Plug in my new iPhone.
- Restore from encrypted backup.
- Pair new watch using Apple Watch backup from encrypted backup.
However, this time I did something a bit different. Instead, I decided to do a Phone to Phone transfer. Last year, as mentioned in my review of the iPhone 13 Pro Max, I intended to do an iPhone to iPhone transfer, but canceled that because the amount of time was up to 7 hours and stayed there. So last year I went with my tried and true approach. This year, I decided to do the device to device transfer and let it run its course.
As with many other device setups with Apple you bring your new iPhone next to your old iPhone and tap on the “Setup New iPhone” popup. After this you enter in your Apple ID credentials. Once this has been done you walk through the transfer. You will need to enter in your iPhone’s passcode during the transfer.
The iPhone 14 Pro Max, along with the other iPhone 14 devices, do not have a physical SIM card slot, at least not in the United States. Instead, all iPhone 14 models in the United States have an electronic sim, or eSm. iPhones have had an eSim option since the iPhone XS, except in China where physical SIMs are mandated by law. I have not used an eSim previously, so this has been my first experience doing so. Some people have used eSim previously, and a few have preemptively converted their physical SIM to an eSim before they got their iPhone 14s.
Converting Physical Sim to eSim
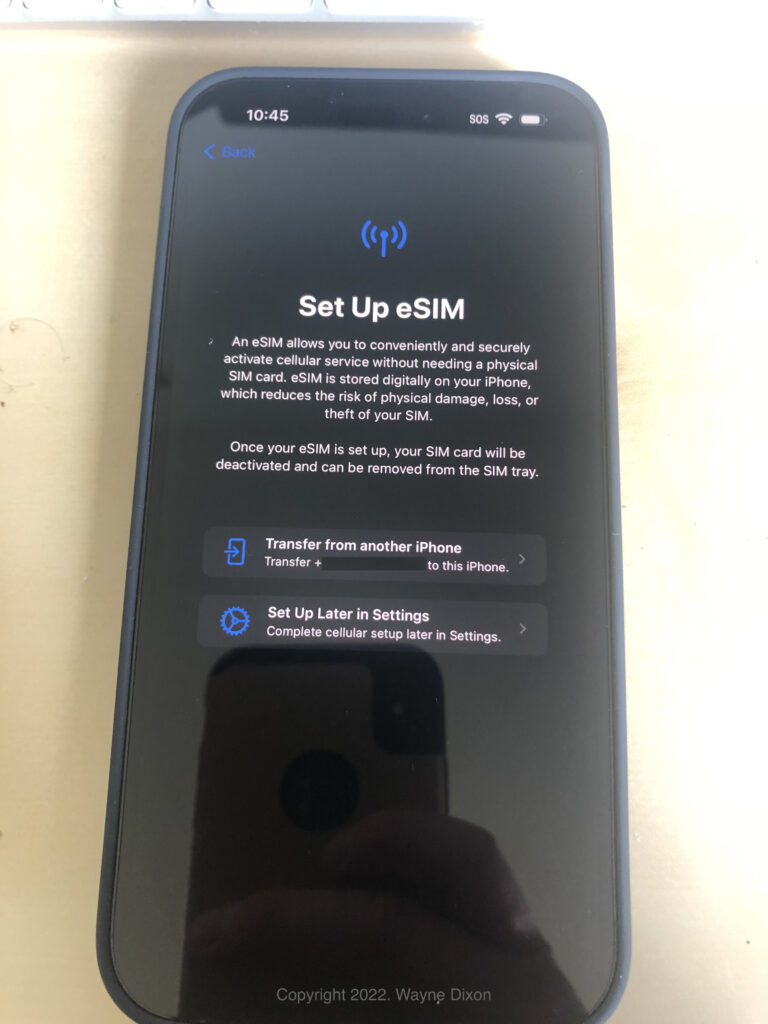
The setup of my eSim was fairly straight-forward, well it is supposed to be. During the setup there is a screen titled “Set up eSim”. The screen is supposed to allow you to transfer your phone number from a physical SIM on your old iPhone to the eSim on your new phone. However, it did not go as smoothly as you might expect.
The first time that I tried to do the transfer it came back as “Failed, could not transfer the number”. When this happens there are three options, Back, Try Again, Setup Later in Settings. I was going to set it up later, but I decided to go back and try it again. The second time it was able to successfully transfer my phone number.
I know I am not the only who had this exact experience. Friend, and editor of my books, Barry Sullivan also got two iPhones on launch day and he let me know that he had the exact same experience when trying to activate his phones. The trick of going back and doing it again allowed both of his phones to transfer properly. It was a simple fix, but still a very odd one. I am not sure if the issue was an AT&T one or an Apple one. Regardless of the ultimate cause of the issue I hope Apple and AT&T are able to figure out the issue and correct it for future versions of iOS and people who are trying to convert their physical sims to an eSim. After this step the actual transfer began.
Remaining Device to Device Transfer
Once transfer was finished, which took just about an hour and 45 minutes, there was the last screen. I tried to wake up the screen, but the backlight would not fully turn up to a correct brightness. It was super difficult for me to see the screen. I had to hold the iPhone 14 Pro Max at an angle to see what was on the screen. I entered in my passcode and the phone restarted. Once that was done, my phone was ready to go with the next step, downloading everything.
The phone to phone transfer is intended to transfer over all data, like app data, photos, and other similar data. What is not transferred is apps or downloaded songs. Once the data has transferred over then your apps and songs will be downloaded again. At one point while doing this, my phone was consuming a good 92% of all of my internet bandwidth by downloading at 277 megabits per second.
The downloading of apps and songs went perfectly, as did most of the phone to phone data transfer. There was one thing that did not transfer over, my Apple Watch. It never prompted me during setup either, even though I specified to transfer it over on the first step.
Since it did not transfer over, When I opened the Apple Watch app on my iPhone 14 Pro Max, it kept saying “Pair Existing Watch” and when I tried to say “Pair Existing Watch” it would constantly fail. I contacted Apple, and the genius suggested unpairing the Watch from my iPhone 13 Pro Max. In itself un-pairing and re-pairing an Apple Watch is not a big deal. The problem I had is that given the length of time that the restore took, I got three standing hours in and I had burned 100 more calories. My Phone finished early enough in the day where I could finish closing my standing rings. In reality, it was not really a problem, but an annoyance none-the-less.
What was really odd, is that I went back and checked my activity information, those missing standing hours showed up on my watch, as did the missing calories and steps. What would be really nice would be if there was a way to force the Fitness app to synchronize data up to iCloud and then trigger a download, but Apple seems opposed to these types of things. Instead, “it just works”, except when it does not.
Looking back there are two things that I could have done. The first would have been to unpair the watch entirely before beginning the transfer. This would have provided a backup to the iPhone and then it would have likely transferred that data over to the Apple Watch. However, it likely would have resulted in me missing those two hours of stand time, as well as any other calories and steps earned during that time, due to the data not being transferred over.
The second thing I could have done, which now in hindsight might have been the correct answer, would have been to just setup my new Apple Watch Series 8 and not worry about the missing data, because it would eventually synchronized. Again, I was not worried about the time of the day, because I had plenty of time to get the standing hours back, but it was a bit annoying. There is one downside to using the device to device transfer.
Downside to Phone to Phone
One of the biggest downsides to using the “Phone to Phone” transfer method is that you cannot use either device while it is transferring data. This meant that the two devices were just sitting there the entire time. An hour and 45 minutes was long enough, but if I had even more data it likely would have taken longer. There has to be some other sort of solution, like possibly even using a wired connection. I suspect that using a wired connection would have make the process faster because it could have used more bandwidth. I am guessing that I am an outlier by using this process. I am presuming that most people just use iCloud for backing up their iPhone and then restoring it. But there is just something to using a wire to do a transfer that makes it more reliable, at least to me anyway.
Color
When I purchase a new iPhone I have always gotten the “gray” variant of a phone. For the early iPhone this was not a problem, because there was only two choices, Black or White. The white iPhones always had a white bezel, and I did not like the look of those, therefore I ended up selecting the black or space gray option. With the introduction of the iPhone X the choice of color became less relevant, because all of the bezels on the Face ID phones have a minimal bezel, which is black. The one exception to this was with the iPhone 12 Pro Max where I got the Pacific Blue.
There was the Deep Purple option for the iPhone 14 Pro Max, but I opted to go with my standard and ordered the “Space Black” iPhone 14 Pro Max. As you can see in the image below, there is a distinct color difference. The Space Black is a much darker than the Graphite of the iPhone 13 Pro Max.

Now that we have covered the setup, let us look at the actual features of the iPhone 14 Pro Max, starting with the biggest change, the Dynamic Island.
Dynamic Island
Back in 2017 Apple revolutionized the iPhone by introducing a whole new form factor for the iPhone. Gone was the home button, Touch ID, and most of the front bezel. Instead of the Home Button and Touch ID sensor, Apple replaced it with a new technology called Face ID. In order for Face ID to function a brand new set of sensors was needed, called a True Depth sensor.

The True Depth sensor contains an infrared sensor, the actual Face ID infrared camera, and the FaceTime camera. When FaceID was introduced on the iPhone X, the top of the iPhone’s screen was where the Face ID sensor housing was placed. Over the last five years, Apple has shrunken the size of the notch. Now with the iPhone 14 the notch has been moved to an area slightly below the top of the screen, that is entirely surrounded by pixels, hence the use of the term ‘island’. In the photo below you can see the notch on the iPhone X as compared to the notch on the iPhone 13 Pro Max and the Dynamic Island on the iPhone 14 Pro Max.

Now that the sensor array is not attached to the top of the screen, so it creates a cutout near the top of the screen. With the notch not being attached to the top of the screen, it needs a new name. The new area is called the “Dynamic Island”.
The Dynamic Island will now look a lot like a pill, most of the time. The pill is not an actual pill, but it is two different sensors that are actually separated by a bit of spacing. A majority of the time this will appear as a single pill with the area between the two cameras being filled in with black pixels, thus making it look like a pill.
The term “Dynamic Island” is an accurate name because the Dynamic Island will change based upon what you are doing at any time. For instance, if you are listening to audio, whether it be a podcast, audiobook, or music, it will be minimized to the Dynamic Island, as will all other audio apps. When an audio app is minimized to the Dynamic Island you will see a small version of the cover art on the left and a wave form of the playing audio on the right. This straddles the Dynamic Island.
When an item is minimized to the Dynamic Island, the animation for the minimization will differ slightly depending on which direction you push the app. Here is a video showing various animations.
As mentioned above the Dynamic Island will be a pill, most of the time. There is one exception to this. If there are multiple items that can be minimized to the Dynamic Island, the lower priority item will be moved to its own icon to the right of the Face ID sensor array. There will be some pixels shown between the two islands.

When there is an audio app, or other app, minimized to the Dynamic Island, you can perform two different actions. You can either tap or you can tap and hold. When you tap on the item it will open the corresponding app. However, if you tap and hold on the Dynamic Island it will display a miniature interface. For an audio app it will just appear just like it would look like on the Lock Screen. For an app like the Timer, you will see the timer countdown with a pause and cancel button.
I have been going back and forth on whether these two gestures are the right ones or not, and I think they should be reversed. I think tapping should bring up the miniature interface and tapping and holding should open the app. I think this is a more natural interaction to tap on the Dynamic Island and see the miniature interface. Even a toggle for allowing this would be sufficient, so then people can decide how they want to handle the interactions.
Uses of the Dynamic Island
There have been some interesting interactions created with the Dynamic Island. There are two apps in particular. The first is a game called “Hit the Island”, which is a breakout-type game where you try and hit the Dynamic Island with a ball. “Hit the Island” is not only limited to iPhone 14 Pro and iPhone 14 Pro Max, but it also works on any Face ID-enabled iPhone as well.
The second is within the Reddit app called Apollo. There is an option to add a cat that walks back and forth, as well as rests, on the top of the Dynamic Island. This does not have any functionality, but it does provide a bit of ambiance while browsing Reddit. I do not use Apollo, nor Reddit in general, but I saw it cross my twitter feed.
Adjustments Needed
One behavior that might take some adjustment is using the area below the notch to try and scroll up. With the Dynamic Island this does not work. You can still tap off to the left or right of the Dynamic Island it will scroll, but not directly underneath it. This is a minor thing that will take some time to get acclimated to, but it is something to be cognizant about.
It will be interesting to see what developers do with the Dynamic Island in the future once the Live Activities APIs are available for all to use. Next, let us look at another new hardware feature, the Always-On Display.
Always on Display
Modern phones can differ in a variety of ways. These differences could be in size, storage, operating system, authentication mechanisms, and even cameras. One thing that has been same across all phones, at least since 2007, is that they all have a screen that takes up most of the front of the device. Depending on the size of your iPhone this can range from a 4.7-inch screen on the iPhone SE (2nd Generation) up to a 6.7-inch on the iPhone 14 Pro Max.
If you needed to check something while your phone was locked you could hit the sleep/wake button or raise your phone to actually show your Lock Screen. Starting with the iPhone X you could tap on the screen to wake it up. This approach certainly does work, but having to constantly wake your screen to check for new information can become tiresome after a while. What would be even better is if there was a way of quickly glance at your screen and see if there is any new information without needing to do anything. This is now possible with the new “Always On” display.

You might be wondering how the screen can always stay on, given that the screen is a huge use of battery power. The reason that the screen can always stay on is because the Always On Display on the iPhone 14 Pro Max works similarly to the Always On Display on the Apple Watch Series 5, and newer. This means that the screen is always on but it will be dimmed when not in use. Beyond dimming, the refresh rate of the screen will drop its refresh rate down to a rate of 1Hz, meaning it will refresh once every second. This is is comparison to the iPhone 13 Pro Max where it can refresh up to 120 times per second while the screen is on. The combination of the backlight not being at full brightness and the refresh rate being so low, it should not interfere too much with battery life.
Even though the screen is an “Always On” display on the iPhone 14 Pro Max, this does not mean that the screen will be on 100% of the time. In fact there are some instances when the screen will turn off. The situations are:
- When the phone is off (obviously)
- During wind down. As soon as it starts the screen turns off.
- When you are in a sleep focus.
- If your iPhone is face down on a surface. There is no need to have the screen on at this point.
- When you walk away from the iPhone and you are wearing an Apple Watch. Once the distance is far enough away the phone screen will turn off.
- When you are using your iPhone as a continuity camera on your Mac. The screen is not needed for this.
You can simply tap on the screen to have it activate again and interact with it as you normally would. If you do tap on the screen it will return to its dimmed state after 7 seconds. This is the same behavior as the iPhone 13 Pro Max.
Disabling Always On Display
If you find that you do not like the way that the Always On Display functions, you can easily turn it off by using the following steps:
- Open Settings.
- Scroll down to Display & Brightness.
- Tap on Display & Brightness to open up the Display & Brightness settings.
- Scroll down to “Always On”.
- Tap the toggle next to “Always On” to disable the Always On functionality.
When you do disable the Always On Display, it will act just like all previous iPhones, if that is more of your style. Next, let us now turn to another area that has seen some improvements and needs to be covered, the Cameras.
Camera
With each new iPhone Apple tends to improve the camera year over year, and there have been some improvements of the iPhone 14 Pro Max over the iPhone 13 Pro Max. I will go into most of the camera specifications in a bit, but let us look at a couple of the biggest changes, starting with the TrueDepth camera.
The TrueDepth camera has gone from a 12megapixel ƒ/2.2 aperture to a 12megapixel camera with an ƒ/1.9 aperture. As with all photography, the lower the number means that even more light will be captured when using the FaceTime camera. In practice what this means is that you should be able to get better pictures when using the FaceTime Camera, including the ability to have more than one person’s face be in focus, even when using the FaceTime camera. The TrueDepth camera is not the only camera that has seen some improvements. The rear camera sensor has seen some improvements. Specifically, the Main camera has been significantly improved. The second item to talk about when it comes to specifications is the Wide camera.


If you were to look at Apple’s specifications pages or the iPhone 13 Pro Max you may notice that there are three cameras, Wide, Ultra Wide, and Telephoto. Now, if you compare these to the iPhone 14 Pro Max there are actually four, but more on the fourth one in a moment. What you may notice is that on the iPhone 13 Pro Max specifications page there is no “Main” camera. Previous models called the Main camera the “Wide”. While the name of “Wide” was technically accurate, most people never called it the Wide camera, and instead just called it the Main, or primary, camera. Hence, it is now called the “Main” camera. Before we delve any further, let us look at the specification comparisons between the iPhone 13 Pro Max an the iPhone 14 Pro Max.
For the first time Apple has listed the actual size of the sensors. Here are the sensor sizes, apertures, and zoom for the iPhone 14 Pro Max.
| Lens | Zoom | Megapixels | Length | Aperature |
|---|---|---|---|---|
| Ultra Wide | 0.5x | 12 Megapixels | 13mm | ƒ/2.2 |
| Main | 1x | 48 Megapixels | 24mm | ƒ/1.78 |
| Telephoto | 2x | 12 Megapixels | 48mm | ƒ/1.78 |
| Telephoto | 3x | 12 Megapixels | 77mm | ƒ/2.8 |
For comparison, here are the iPhone 13 Pro Max Camera specifications
| Lens | Zoom | Megapixels | Length | Aperature |
|---|---|---|---|---|
| Ultra Wide | 0.5 | 12 Megapixels | 13mm | ƒ/1.8 |
| Wide | 1 | 12 Megapixels | 26mm | ƒ/1.78 |
| Telephoto | 3x | 12 Megapixels | 77mm | ƒ/2.8 |
When you look at a the specifications you may notice a few things that jump out right away. The Main camera has gone from a 12 Megapixel ƒ/1.5 aperture camera to a whopping 48 Megapixel 24 mm, ƒ/1.78 aperture camera. This is four times the number of pixels. However, you do not get 48 Megapixel images, most of the time. Instead pixels are grouped into a set of quad-pixels. Each set of quad-pixels will allow more light into each photo, which should provide even cleaner and more crisp pictures.
One of the complaints about the last few iPhones is that they had three optical zoom options, 0.5x, 1.0x, and 3x. These are all great options to have, in particular if you do want to zoom in and have a super crisp picture, the 3x zoom would deliver that. However, there is a wide range between the 1x and 3x. What was missing is 2x. With the iPhone 14 Pro Max, you now have 2x zoom in addition to the existing 0.5x, 1.0x, and 3x options.


When you use the 2x zoom, what is doing is it is actually using the central 12 Megapixels of the Main 48 Megapixel image. The image is still being taken at the standard 4K resolution, so you will still get the 12megapixels that you are expecting. There are no controls for which part of the sensor is used, it will use the central pixels. There is one use case when you can use the full 48 Megapixels within the sensor. That is when you use the ‘Raw’ mode in the Camera. When you do this you will get the raw information off of the sensor in Apple ProRes Raw format. This can then be used by various photo editing applications to tweak and get the images that you want.
Note: The above image is scaled. You can see the full resolution image. The image that is linked is a JPG, but it is the full 48 Megapixel dimensions.
Be warned though, Raw images are rather large. As an example, I took two pictures using my iPhone 14 Pro Max. The processed HEIC photo is 998 Kilobytes, while the Raw image is 45.7 Megabytes. This should not be a surprise, but it is something to be aware of.
One of the other photo-related changes to the iPhone 14 Pro Max is a new dedicated engine that will help process photos. That feature is called the “Photonic Engine”. Apple has not clarified if this is a set of hardware, software, or a combination of both. The purpose of the Photonic Engine is that that it will take your photos that have been captured in non-ideal lighting conditions and it can use the additional Focus Pixels to gather more light, and then use machine learning to help improve the lighting on your photos. According to Apple:
“Through a deep integration of hardware and software, Photonic Engine improves mid- to low-light performance for photos across all cameras: up to 2x on the Ultra Wide camera, 2x on the TrueDepth camera, and an impressive 2.5x on the new Main camera. Photonic Engine enables this dramatic increase in quality by applying the computational benefits of Deep Fusion earlier in the imaging process to deliver extraordinary detail, and preserve subtle textures, provide better color, and maintain more information in a photo.”
You cannot really get a feel for the Photonic Engine through words, so here are a couple of photos for comparison.


Overall, the cameras on the iPhone 14 Pro Max are a huge improvement. The return of the optical 2x zoom is a very welcome feature that will allow people to take photos that are at the right distance. The addition of the new Photonic Engine means that pictures will be even better, particularly in low light. Ultimately though, which camera you are going to use depends on the current situation, but you should be able to get the picture you want from one of the cameras. No photo that you take with your iPhone is exactly what the sensor sees unless, of course, you are using the Apple ProRes Raw format. Now, let us move to the obligatory benchmark comparison.
Obligatory Benchmarks
As with all of my reviews I include some benchmarks for general comparison. All of the items below are based on Apple Silicon, in some manner. This could be the A-Series or the M-Series. I used Geekbench for all of these comparisons. Here are the results of the benchmark tests.
| Device | Single Core | Multi-Core | Compute |
|---|---|---|---|
| iPhone X (A10) | 917 | 2462 | 3776 |
| iPad mini (6th Generation) (A15 Bionic) | 1594 | 4523 | 11960 |
| 5th Generation 12.9-inch iPad Pro (M1) | 1673 | 6455 | 21007 |
| Mac mini (Late 2020, M1) | 1743 | 7619 | 21646 |
| iPhone 13 Pro Max (A15 Bionic) | 1746 | 4410 | 14460 |
| Mac Studio (2022, M1 Max) | 1765 | 12467 | 62662 |
| iPhone 14 Pro Max (A16 Bionic) | 1902 | 4543 | 15106 |
Closing Thoughts
Each new release of an iPhone is not a huge leap in standards as compared to the immediately previous model. Even though it is not a gigantic change the iPhone 14 Pro Max is a big upgrade. There have been both hardware and software changes. Many do use their iPhones as a phone, but many also use their iPhones for all other tasks. One of the biggest uses is taking pictures. The iPhone 14 Pro Max bring a whole new main 48 megapixel camera. While it will only provide 12 megapixel images, the amount of light let in will be four times as much, meaning better low light photos. Low Light photos will look better with the new Photonic Engine, which is a combination of hardware and software that will enhance low light images and make them sharper.
Beyond the camera, there is the new Always On Display. This display will allow you to easily see updated information on the Lock Screen including any widgets that you have configured on your Home Screen. The Always On Display can automatically reduce its refresh rate down to 1Hz, or only refresh the screen once a second, which will reduce the battery usage. If the Always On nature of the screen is not to your liking, you can disable it within Settings.
The biggest change to the iPhone 14 Pro Max is the new Dynamic Island, which is currently exclusive to the iPhone 14 Pro and iPhone 14 Pro Max. The Dynamic Island is a progression of the notch that began with the iPhone X in 2017. The Dynamic Island is an area in the display that is surrounded by pixels. Apple could have chosen to just leave this as is, but instead they created a whole new way to interact with applications that uses the fact that the Face ID sensor is surrounded by pixels to its advantage. If you tap and hold on the Dynamic Island while there is an application
As of this review the current version of iOS is iOS 16 and third-party applications cannot create custom interactions with the Dynamic Island, but it will be available in iOS 16.1 and it will be interesting to see what uses third-party applications create with the Dynamic Island. The Dynamic Island is the biggest change to interaction methods since the iPhone X.
Overall, the iPhone 14 Pro Max is a solid upgrade, should you want, or need, the 6.7-inch screen. If you want a bit smaller screen the iPhone 14 Pro may be the right option for you. If you have an iPhone 12 or iPhone 13, it might be worthwhile to wait for the iPhone 15 Pros before upgrading your device.
