It may seem a bit odd that Apple released a new battery pack for the iPhones a full 10 months after introducing the devices, but that is what they have done. In fact the MagSafe Battery Pack was quietly released just over a week ago. The world is opening up a bit more and people are beginning to travel, so it may actually be the right time to release it.
The MagSafe Battery pack is reminiscent of the older Battery Cases that Apple created for the iPhone XS in that it will provide some extra power for your iPhone. The biggest difference with the battery pack, as compared to the battery case, is that it is magnetic and does not need to be attached to your phone all of the time.
The MagSafe Battery Pack is designed to be able to change any MagSafe iPhone. This includes the entire iPhone 12 line from the iPhone 12 mini, to the iPhone 12 Pro Max.
The MagSafe Battery Pack
The editor of my books, Barry J. Sullivan, provided a review and it is short and to the point. His review is: "The battery magnets are strong and the phone and battery aren’t going to separate easily. The battery and phone combined is heavy."
In reality, that is probably the best summation of the MagSafe Battery Pack. The magnets are indeed strong, and the battery pack and iPhone it is on will not separate during normal use, and the combination is indeed quite chunky.
The MagSafe Battery Pack has only one port, a lightning adapter, to plug in the lightning cable to charge. The MagSafe Battery Pack also has a light indicating whether the MagSafe Battery Pack is charged, or charging. If it is charged it will be green, otherwise it should have an orange light.
The MagSafe battery pack has a matte finish to it, which does provide a bit of grip. And when it is connected to the iPhone 12 mini, it will go edge to edge. However, with the iPhone 12, or iPhone 12 Pro, and iPhone 12 Pro ax, the battery pack will be within the edges of the device.
Even though it does not go edge to edge, it can actually be an advantage. This is because it can provide a bit of a lip so you can rest your finger underneath the battery pack while holding it.
Using the Battery Pack
If you are charging your iPhone from the MagSafe Battery Pack you will only get 5-watts of power. The reason for this is likely to minimize the heat and provide the maximum change of your device. This is because any excessive heat will cause the battery to drain faster, resulting in less of a charge overall.
It should be noted that the MagSafe Battery Pack is not a pass-through charger, meaning that you cannot charge the phone, charge the battery pack, and then charge something else. There is no MagSafe charger on the back of the battery pack that would be needed to make this possible.
However, if you are charging the battery pack itself, that is a different story.
Charging the Battery Pack
The MagSafe Battery Pack has a lightning port on it. This is designed to allow you to charge an iPhone. However, the MagSafe Battery Pack itself needs to be charged. There are two different ways of changing the MagSafe Battery Pack. One is to charge it by plugging a lightning cable into it directly. The second is to plug in an iPhone with the MagSafe Battery Pack attached.
Either method will charge the both the iPhone and the MagSafe Battery Pack, provided that you use a 20-watt power adapter.
When you charge the MagSafe Battery Pack through an iPhone, it is possible that your iPhone will charge to 80% before the MagSafe Battery Pack begins to charge. This is to make sure that your iPhone has enough charge before the MagSafe Battery Pack.
When you are charging your iPhone with the MagSafe Battery Pack, it will charge at a maximum of 15 watts when plugged into a powerful enough power brick, meaning that the small 5-watt charger just is not going to cut it.
Checking the Charge
While the MagSafe Battery Pack does have a light to indicate whether or not it is charged, there is no way to see the percentage of charge on the battery pack itself. Instead, you will need to use your iPhone. This is done by checking the charge by using the Battery Widget on the iPhone.
The Battery Widget will show you the charge of the MagSafe Battery Pack and whether or not it is currently charging.
Possible Tip
The MagSafe Battery Pack is designed to attach to the back so there is none of the battery pack showing. However, given that it is magnetic, and the magnets are strong, you can technically attach the MagSafe Battery Pack at a 90-degree angle so it sticks out one of the sides. When in this configuration, you can technically use your iPhone with one hand.
It should be noted, that this is not the designed behavior and is likely not recommended by Apple.
A second thing to note is that the MagSafe Battery Pack is indeed a MagSafe charger, meaning that you can charge other Qi-enabled devices, like AirPods. While the MagSafe Battery Pack is quite useful, it does have a couple of downsides.
Downsides
The MagSafe Battery Pack is not perfect, and it does have some flaws. The chief amongst these is that it cannot provide a full charge an iPhone 12 Pro Max. You would think that a battery pack that is designed for the entire iPhone 12 line would be Abel to provide one full charge to the entire line, but that is not the case.
The second downside is the limited color choices. You can have any color you want, provided it is white. Do not get me wrong, if Apple is going to provide only a single color, it will absolutely be white, but it does seem like a lost opportunity to at least match the iPhone colors that are in the iPhone 12 line.
There is one last thing that is not directly related to the MagSafe Battery Pack, but also applies to many of Apple's other devices. On the battery pack there are the required registration markings. The problem is not that these are there, in reality, it makes sense that they are where they are, because they are hidden most of the time. The problem, as I see it, is that there is absolutely no contrast between the gray used for the battery pack and the gray used for the text is effectively non-existent. While in most cases this is not a problem, it can become one should you ever need service and you cannot read the text on the battery pack.
Closing Thoughts
The MagSafe Battery Pack is great idea in concept and has been executed pretty well. The fact that it only charges at 5 watts can be problematic if you just needed a quick charge. If that is the case, then you might just want to plug your iPhone in using a cable.
The MagSafe Battery Pack is primarily used to charge an iPhone, but since it is a MagSafe charger it can be used to charge other Qi-compatible devices. When charging an iPhone it will not full charge an iPhone, but it can provide enough charge to get you through the day, if you need it.
The MagSafe Battery Pack is $99, or the equivalent in your local currency, and is available now. It is only available in one color, white.
It is odd to think that the iPad has been around just over 11 years now. In the intervening time, the capabilities of the iPad have significantly improved. Not every iteration of the iPad hardware has been a giant leap, but they have all had some sort of improvement. It is now well known that Apple began working on the iPad before the iPhone. However, that project was put on hold because the technology was not yet ready. Once ready, Apple decided to show it to the world.
Unlike the iPhone, I have not personally owned every new model of the iPad. I have owned seven iPads. Here are models that I have owned:
32GB Original iPad - Wi-Fi Only
32GB iPad 2nd Generation - Wi-Fi Only
32GB iPad 3rd Generation - Wi-Fi Only
64GB iPad Air 2 - Wi-Fi + Cellular
128GB 12.9-inch iPad Pro (1st Gen) - Wi-Fi + Cellular
256GB 12.9-inch iPad Pro (2nd Gen) - Wi-Fi + Cellular
256GB 12.9-inch iPad Pro (3rd Gen) - Wi-Fi + Cellular
As you can see, as time has gone on I have increased the amount of storage that I have purchased as well as including cellular on the later models. Some of this comes with the amount of storage increasing over time. Apple has not always provided the ideal amount of storage for the base models. This is, of course, by design. Apple tries to generate additional revenue by using the “good, better, best” approach to pricing, where you provide a variety of price points. For some, the base model is sufficient, while most will buy the “better” model, and those who want the most will go for the “best” model. The way that Apple typically does this is by providing different storage sizes.
The storage is not the only way that can provide choices for users. A second way is by providing options for cellular. Cellular models always have an additional cost to them, but being able to use your iPad anywhere, can be a major benefit for some users. While I do not use cellular that often, it is a nice to be able to use cellular in those cases when internet goes out at home or if I am out and about and want to use the iPad for something.
As you may have also noticed, while I have owned a fair number of iPads, I have not purchased one for each generation. In particular, I did not buy a 4th Generation iPad Pro. The reason for this is because the upgrade was not enough of an upgrade to justify buying one. I also did not upgrade to the 4th generation iPad when Apple released the that in September of 2011. In that instance, while it would’ve been a bigger upgrade, I had just purchased the 3rd generation in March of 2011, and I could not justify spending the money to purchase another iPad so soon.
With Apple releasing a new iPad Pro, I have decided to upgrade my iPad to a 5th Generation 12.9-inch iPad Pro. As mentioned earlier, I do not go with the base model. The same continues this time around as well. The last two iPads that I have purchased have had 256GB of storage. On my 3rd generation iPad, I have about 78 GB free, so I am not really in need of a larger iPad.
However, I did buy a 512GB 5th Generation 12.9-inch iPad Pro to replace my 3rd generation 12.9-inch iPad Pro. The reason I went for the larger size was for future proofing. While I may not need additional storage now, I might need it in the future and I would rather spend a bit more on the extra storage now instead of replacing the iPad or having to manage the storage. Before we dive into my thoughts and information about the latest iPad Pro, we need to look at a short history of the iPad.
Brief History of iPad
The first iPad was announced in January of 2010 and released three months later in 2010. Prior to the release of the iPad, there was speculation on the price of the iPad. At the time, many suspected it would cost $999. However, Apple shocked everyone with a price of $499. By today’s standards the original iPad was woefully underpowered, yet at the time, the iPad worked quite well and did exactly what it said.
The second generation iPad, released in March of 2011, improved a bit on the original, mostly in design. Gone was the hump in the back. In its place, a flat back and a faster processor. The first significant change was the 3rd generation iPad. Besides being slightly faster, it had a significant improvement, a Retina screen. The Retina screen allowed for higher fidelity of video as well as better graphics for the system and apps.
A mere six months after the release of the 3rd generation iPad, Apple released the 4th generation iPad. The changes were better graphics processor, because many complained about the jittery scrolling when using graphics heavy apps and games. The bigger change was the connector. Gone was the 30-pin connector and in its place was the new connector. A smaller and reversible connector that Apple called Lightning.
For the first three versions of the iPad, they all had the same screen size of 9.7 inches. At the same event where Apple announced the 4th generation iPad, they also made another change, a new device, the iPad mini. The iPad mini used the same internals as the 4th generation iPad, but in a smaller size of 7.9 inches, and it was still a retina screen.
In 2013, Apple decided to append a suffix to the name of the regular 9.7-inch iPad. They called it the iPad Air. The iPad Air was named such because the weight of the device was significantly reduced, by 25%. This made it the lightest and easiest iPad to hold and use.
The iPad Air’s successor, the iPad Air 2, was released in October of 2014. The device maintained the same light design, but was even thinner than its predecessor. The original iPad Air was 7.5 mm, or 0.3 inches, thick whereas the iPad Air 2 was 12% thinner at 6.1 mm or 0.24 inches thick. Despite being introduced in 2014, the iPad Air 2 is still supported by the latest version of iOS, as of this writing, iOS 14.
Apple unveils the newest version of the operating systems at their World Wide Developer Conference, or WWDC. At the WWDC following the release of the iPad Air 2, Apple unveiled iOS 9. The biggest change with iOS 9 was two new way of interacting, called SplitView and Slide-over. These two interactions allowed you to run multiple applications at a single time.
Throughout its 4 year life, the iPad was primarily a consumption device. However, the additional of Slide-over and SplitView allowed the iPad to be used for even more of a creation device. As much as the iPad Air 2 was capable of being a creation device, the device for which iOS 9 was created was released in November of 2015. That device, was a whole new iPad, called the iPad Pro.
iPad Pro (1st Generation)
The iPad Pro was a significant improvement over the iPad Air 2. The first of these was the size of the screen. The iPad Pro has a 33% larger screen at 12.9-inch. This sized screen allowed for two full-size iPad apps to run side-by-side, and a third with SlideOver. Being able to use multiple applications at a single time is great, you can definitely be more productive. However, there is one addition to the iPad Pro that allowed you to be even more productive and create even more on the iPad Pro. That item was a new iPad Pro accessory called the Apple Pencil.
The Apple Pencil is a Bluetooth device that allows for precision drawing including pressure sensitivity and it can even sense which angle the pencil is being held at and adjust accordingly. Six months after the release of the 12.9-inch iPad Pro, Apple released another iPad Pro, this one was the same size as the original iPad, at 9.7-inches. The 9.7-inch iPad Pro had the same internals as the 12.9-inch version, and supported the Apple Pencil. The main difference is that the 9.7-inch iPad Pro could support two full-size iPad apps, but only in landscape.
iPad Pro (2nd Generation)
The iPad Pro was followed up by the 2nd Generation iPad Pro. The 2nd Generation iPad Pro was released approximately 18 months after the first iPad Pro, specifically June 2017. The 2nd Generation iPad Pro improved on the original iPad Pro, just like the 2nd generation iPad improved on the original. The 2nd Generation iPad Pro kept the same screen size, but the device was thinner. The 2nd generation iPad Pro also came with another iPad Pro, but not with a 9.7-inch screen. In order to differentiate the iPad Pro from other iPads, it had a 10.5-inch screen. Along with the different size, there was a new screen technology called Pro Motion. Pro Motion is a 120 Hz screen that provides even smoother motion and allowed for improved Apple Pencil support.
iPad Pro (3rd Generation)
The 3rd Generation iPad Pro was been the biggest change to the iPad Pro line. Apple unveiled the 3rd Generation iPad Pro in November of 2018, approximately 18 months after the 2nd Generation model. The 3rd Generation iPad Pro was not a small update. The first change with the 3rd Generation iPad Pro was that it has a much smaller bezel. The screen used a new edge-to-edge display.
The smaller bezel allowed a consistent edge around all of the edges. With the bezels being smaller, and consistent, the home button was removed. In its place is the Face ID sensor. The Face ID sensor was first introduced with the iPhone X in 2017.
The new bezels also supported a new shape. The 3rd Generation iPad Pro took its design cues from the iPhone 5. By this, the sides of the device are square, as opposed to tapered as the previous models had. This allowed for a few other changes.
The chief amongst these is a revision to the Apple Pencil, the Apple Pencil (2nd Generation). This version of the Apple Pencil still connects via Bluetooth, but there is no connector on the Apple Pencil. Instead, it charges via magnets that are on one of the edges of the iPad Pro. Placing the Apple Pencil on the top of the iPad would perform two things. First is that it would pair the Apple Pencil to the iPad Pro, and it would begin charging of the Apple Pencil.
The next change is the type of connector. With the introduction of the 3rd generation iPad Pro, the lightning connector was removed and replaced with a USB-C connector. This connector allows for faster connectivity and also allows for additional devices to be connected directly to the iPad.
The last change was that the 10.5-inch iPad Pro was no more. In its place was an 11-inch model. This had the same exact features as the 12.9-inch model, just smaller.
iPad Pro (4th Generation)
The 4th Generation iPad Pro, as well as the 2nd Generation 11-inch iPad Pro, were more minor upgrades. These were introduced in March of 2020. There were only two changes with this model. The first is that the processor was slightly upgraded from an A12X in the 3rd Generation 12.9-inch iPad Pro to an A12Z in the 4th Generation model. The difference with the processor was that there was one additional graphical processing unit core, 8 in the A12Z as opposed to the 7 in the A12X.
The second change was a bit more of a change. This one is around the camera. There is a whole new camera system. This one includes a LiDAR Scanner. Over the last few years Apple has been pushing augmented reality, and the LiDAR scanner allows for faster calculations and object detection. The LiDAR camera system appeared in the iPad Pro before coming to the iPhone 12 line.
Now that we have covered the history of the iPad Pro line, it is time to discuss the latest in the line, the 5th Generation 12.9-inch iPad Pro.
5th Generation 12.9-inch iPad Pro
The 5th Generation 12.9-inch iPad Pro was introduced at Apple’s “Spring Loaded” event. Many suspected that Apple would introduce a new iPad Pro, and they most certainly did. The 5th Generation 12.9-inch iPad Pro has made a significant set of improvements to the iPad. Some of these include, the internals, the screen, and connectivity changes. It is difficult to decide which upgrade is the biggest change to the iPad Pro, but let us start with the screen.
Screen
There are a variety of different ways to interact with an iPad. You can use the Apple Pencil, a Magic Keyboard, or even Siri. Each of these has its own positives and negatives. The primary interaction surface for almost any iPad is the screen. The screen on the 5th generation 12.9-inch iPad Pro is a whole new display technology. Apple calls this display the "Liquid Retina XDR display”.
The Liquid Retina XDR display is currently exclusive to the 12.9-inch iPad and uses a newer technology called Mini-LED. mini-LED. Mini-LED is a newer technology that takes standard LEDs and shrinks them. On the 12.9-inch iPad there are 120x smaller than previous LEDs. The iPad Pro has 10,384 individual LEDs that are grouped into 2,596 local dimming zones.
These dimming zones allow the iPad to provide even more precise color control. In fact, the screen has a standard brightness of 600 nits, which is the same as the previous models. However, the full brightness is 1000 nits when the screen is at full brightness. If you add in the High Dynamic Range capabilities, the maximum brightness of 1600 nits. This is the exact same specs as Apple 32-inch Pro Display XDR monitor.
What this results in is that people can have the same XDR experience across all of their devices. No longer will you need to use an XDR device only at the end, in order to fix any color differences. Instead, you can use the iPad Pro to get the proper coloring throughout your entire workflow. The Liquid Retina XDR display will still support Pro Motion and run at 120Hz, as well as True Tone and the P3 Color gamut.
It is not easy to articular in words the differences between the new screen and the old screen. It is much easier to show in pictures. So, here is a picture of the 5th generation 12.9-inch iPad Pro as compared to the 3rd generation 12.9-inch iPad Pro.
The screen is a significant improvement over the previous models. There is another item that is an improvement, but may not be as noticeable to many users, and that is changes to the connectivity.
Connectivity
There are a few different types of connectivity on the iPad Pro. This includes a physical connector, Bluetooth, Wi-Fi, and if you opt to get it, Cellular. Let us start with Wi-Fi and Cellular.
Wi-Fi and Cellular
Each model since the first iPad back in 2010 has had the option of either purchasing an iPad with Wi-Fi only or with Wi-Fi + Cellular. The 1st, 2nd, 3rd, and 4th Generations of iPad all had 802.11 a/b/g/n and optional 3G connectivity in either CDMA or GSM models.
Starting in 2013, with the iPad mini 2, the cellular models came with support for LTE, which provided even faster cellular connectivity over the 4G connectivity.
The original 12.9-inch iPad Pro brought 802.11AC connectivity, which would allow for faster connections over Wi-Fi. Each subsequent iPad has has the same, until the 4th Generation iPad Pro. The Wi-Fi connectivity was upgraded to Wi-Fi 6, also known as 802.11AX. The benefit of Wi-Fi 6 is that you can connect wireless connectivity speeds up to 3.5Gbps, in ideal conditions. This is accomplished by aggregating multiple connections to the same base station.
The 5th generation iPad Pro has improved the cellular connectivity beyond LTE. The cellular models now support 5G connectivity, just like the iPhone 12 line. The 5G connectivity can, again in ideal conditions, provide a maximum speed of up to 1Gbps. If you connect to a millimeter wave, or mmWave, service then you are more likely to get faster speeds.
While you may not see much difference in speeds between LTE and 5G in many places, it is likely over the next few years that 5G will become even faster and more ubiquitous. Given that iPads generally last longer and are kept longer, investing in 5G now could pay off down the road.
Physical Connectivity
No iOS or iPadOS device has ever had more than two physical ports. These have been a headphone jack and the power connector. Starting with the 3rd Generation iPad Pro, the headphone jack was removed and the lightning connector was replaced with a USB-C connection.
Even though there is as physical connection on the iPad Pro, a vast majority of users will almost never physically connect anything to their iPad. However, the iPad Pro, as the name implies, is aimed at professional users. Professional users are one group who might actually connect items to their iPad Pro. The 3rd and 4th Generation iPad Pros had USB-C connectors.
On the 3rd and 4th Generation iPad Pros you were able to connect a variety of items via the USB-C connection. This could include thumb drives, card readers, and cameras. Furthermore, you could also connect a powered, or non-powered, USB Hub that has a USB-C connection, so that you could connect multiple drives at the same time.
The USB-C connection on the 3rd and 4th generation iPad Pro utilizes USB 3.1 Gen 2. This protocol has a maximum speed up to 10 Gbps. In most cases, this is sufficient in terms of speed. However, if you are working on 4K video and want to be able to do work on a large video directly from a drive, it may not be sufficient.
The 5th Generation 12.9-inch iPad changes this arrangement up a bit. The device still has a USB-C connection, however it is no longer strictly USB. Instead, it is a combination Thunderbolt/USB4 connection. The connector is till the same USB-C type of connector and you can still connect the same USB devices as before.
The speed that these will be able to connect at depends on the connection type. Most current devices are USB 3.1 Gen 2, or earlier, so these devices will have a maximum speed of 10Gbps. If they are USB4 devices, then you will be able to connect at speeds up to 40 Gbps.
The fact that the port supports Thunderbolt means that you can connect any thunderbolt device, provided it can connect using a USB-C connector. When you do connect a Thunderbolt device, you ill be able to have connectivity of up to 40 Gbps. This is a significant speed increase over most USB devices.
You might think it is a bit odd to have an iPad with Thunderbolt, because why would Apple want to include Thunderbolt on the iPad. It is possible that Apple wanted to further differentiate the iPad Pro from the iPad Air, but Apple was able to provide it because of the bigger change to the iPad, the processor.
Processor
Each of the previous iPads has had an A-Series processor. The original iPad had an A4, and the 4th generation iPad Pro had an A12Z. You could not be faulted if you were to suspect that the iPad Pro would use the slight variant of the processor as the latest iPhones. The iPhone 12 uses the A14, so it would make sense that Apple would include an A14X. However, Apple did not do that. Apple decided to go a different direction.
At their World Wide Developer Conference in 2020 Apple announced that were creating their own processors for the Mac. Apple was able to take what they learned from developing the iPhone and iPad to be able to tailor the processor to provide an overall experience. In November of 2020, Apple announced the first devices to use their new Apple Silicon processor. Apple called the processor the M1. The M1 is a faster processor compared to almost anything else on the market, and significantly faster than the Intel processors that were used in the Macs.
The M1 is not just a processor. Instead it is a System on a Chip, or SoC. The M1 is not Apple’s first custom SoC. In fact all iPhone, iPad, and iPod Touch devices that have been equipped with an Apple A-series chip have been an SoC. This is also the case for the Apple Watch, Apple TV, and HomePods.
For the M1, the SoC consists of more than just the central processor. In fact it includes the processor, graphics, and a 16-core Neural Engine. Along with this, comes the Unified Memory Architecture, or UMA. In traditional computer configurations, you have memory that is a separated from the rest of the system and on their own dedicated chips that connect to the system on the motherboard. A Unified Memory Architecture is one where the the processor, graphics, and in Apple’s case, neural engine, all share the same memory.
In a traditional computer, each subsystem would have its own memory. For instance, there is the main system memory, which is accessed by the central processing unit, or CPU. The graphical processing unit, or GPU, has its own dedicated memory. There are some tasks that are better suited for a graphics chip while others that are better suited for the CPU. In order to be the most efficient and process things most efficiently, different segments of the memory need to be transferred between the two processors. This transfer, while it takes very little time in reality, it can still take some time.
With the M1, this processor, graphics processor, and neural engine all share the same memory pool. What this means is that there is no delay in switching between using the CPU, GPU, and Neural Engine. This results in the system processing items significantly faster.
The M1 chip is an 8-core chip, with four performance cores and four high efficiency cores. When you do not need top performance the efficiency cores will be utilized. However, when you need speed those processors will be used. This is beneficial for all Macs running the M1, but there is a specific benefit for portable systems. While this is not the case with the iPad, it still has the same "all day" battery life, which is approximately 10 hours, it is absolutely the case for the Macs running an M1 processor.
As of right now, I have not really noticed any significant difference in the overall speed of the 5th Generation 12.9-inch iPad Pro, as compared to the 3rd Generation 12.9-inch iPad Pro, in every day usage, at least how I use the iPad Pro. That may change as time goes on, depending on the advances in iPadOS.
Physical Size
The physical measurements of the iPad Pro are almost the same as the 3rd and 4th generation 12.9-inch iPad Pro models. The have the same height of 11.04 inches, or 280.6mm, and a width of 8.46 inches, or 214.9mm. There is a slight difference in the depth. The older iPad Pro models had a depth of 0.23 inches or 5.9mm; whereas the 5th Generation iPad Pro is 0.25 inches or 6.4mm.
The 0.5mm difference is needed to accommodate the new Mini-LED screen and the 2596 local dimming zones. It is likely that future models will possibly be thinner again, but it cannot be guaranteed.
This is a slight difference, which most users will not notice in day to day usage. However, for certain accessories this will become a problem. For example take the Kensington StudioDock that was just released in January of 2021. This device allows you to connect your iPad and also charge your other devices, like the iPhone, Apple Watch, and AirPods using the base of the device. Due to the thickness change the new 5th Generation iPad Pro is not compatible with the StudioDock.
The Kensington dock is not the only accessory that might have this issue. Apple’s own Magic Keyboard, which was just released a year go, in May of 2020, also has the same issue. If you try to put the 5th Generation 12.9-inch iPad Pro into the 2020 Magic Keyboard, it will fit. However, the Magic Keyboard will not close all the way. Trying to force the Magic Keyboard to close will likely cause either the Magic Keyboard to break, or it will cause damage to the iPad Pro.
Neither of these devices is cheap. The Magic Keyboard is $349 and spending an additional $349 when you just bought one last year might be a bit much for some people to spend. The StudioDock is is not an inexpensive accessory either.. For the 12.9-inch Model, the Kensington StudioDock is $399.
I am a bit irritated by this. I understand that the increased thickness is a limit of the current technology, but with Apple knowing that this might have happened, the first generation Magic Keyboard could have been a bit thicker to accommodate future products, but that is not the way of Apple.
Storage
Apple offers the iPad at various price points. There could be a variety of ways to differentiate prices for an iPad. Unlike the Mac, the iPad only has one processor option. Apple uses storage size as a differentiation in their pricing. Over time Apple has added additional size options. Each generation of iPad Pro Apple seems to make a change to the storage options available.
The 1st Generation iPad Pro had three storage options, 32GB, 128GB, and 256GB. The 2nd Generation 12.9-inch iPad Pro kept the same number of storage options, but they were doubled to 64GB, 256GB, and 512GB. The 3rd Generation 12.9-inch iPad Pro added a fourth option, a 1TB option.
The 1TB option in the 3rd Generation 12.9-inch iPad Pro came with more RAM than the other models. It had 6GB instead of the standard 4GB. The additional RAM was needed to accommodate the larger file system tables needed by the 1TB SSD.
The 4th Generation 12.9-inch iPad Pro and 2nd Generation 11-inch iPad Pro doubled the base storage again to 128GB. The options were 128GB, 256GB, 512GB, and 1TB. One additional change was that all of the 12.9-inch models came with 6GB of RAM. This additional memory was needed to accommodate the LiDAR sensor and its processing.
Staying with the previous trends, the 5th Generation 12.9-inch iPad Pro, has added yet another storage tier bringing the total to five. These options are:
128GB
256GB
512GB
1TB
2TB
There is one thing that Apple does not generally do when announcing iPhones, iPod touches, or iPads and that is provide the amount of RAM within the devices. The reason provided is that the amount of RAM does not need to be known to end-users. For the 3rd Generation 12.9-inch iPad Pro Apple did not specify the RAM, instead users went looking and found out it had 6GB of RAM.
While this has not been the case in the past, this actually changes with the 5th Generation 12.9-inch iPad Pro. Apple has actually provided the amount of memory in each iPad. The 128GB, 256GB, and 512GB models each have 8GB of RAM, while the 1TB and 2TB options each have 16GB.
There is a lot of speculation as to why the difference. My guess is that the additional memory is needed on the larger sizes. My speculation is that additional memory is needed for the same reason to accommodate the additional file system table for 1TB and 2TB models. The reason that it is 16GB instead of say 12GB is because Apple is already manufacturing M1 processors with either 8GB or 16GB of RAM, so instead of created a wholly separate processor just for the iPad, it is probably cheaper, and simpler, to use the existing processors that they are already making.
Pricing
When the original iPad was released, it was widely rumored that the cost would be $999. Apple surprised the world by having the base model cost $499. Since then, there have been various price points for various models.
The original iPad Pro, introduced in 2015, had a price of $799 and would have a maximum price of $1299. While the base price has remained the same, this is for the 11-inch iPad Pro, and not the 12.9-inch iPad Pro. Over the years, the 12.9-inch iPad Pro has increased to a starting price of $1099.
One thing that has remained consistent is that the Wi-Fi + Cellular models have cost more. This is because there is a cost for the cellular modem. While this has typically been $130, that has changed with this latest iPad. Instead, the cellular models now cost $200 more.
Here is the breakdown for the 12.9-inch iPad Pro based on storage size, and Wi-Fi only compared to Wi-Fi + Cellular:
Size
Wi-Fi Only
Wi-Fi + Cellular
128GB
$1099
$1299
256GB
$1199
$1399
512GB
$1399
$1599
1TB
$1799
$1999
2TB
$2199
$2399
As you can see, there is a wide range of pricing. Once you get above 256GB there is a $200 additional cost to go to the next tier of storage.
These are the most expensive iPad Pros that Apple has ever produced. However, it may be justifiable due to the inclusion of the M1 and the new and improved screen, yet it might be a lot for someone to spend on an iPad.
This is particularly noticeable if you were to compare it to the MacBook Air. A MacBook Air with the same specs of 16GB of memory and 2TB of storage is $2049. This means that the largest iPad Pro with 2TB of storage and 16GB of memory is $150 more expensive.
Issues
I did run into some small issues, specifically with one of Apple’s Arcade games, Sping. The graphics for this game seems to stutter a bit. The problem with this is that the game requires precise tapping in order to gather the gems and bounce the collection gems. I presume that the game isn’t optimized for the M1 iPad and that is the cause of the stuttering. I presume that there will be additional games that are in the same state. Beyond Sping, I also noticed the same issue with MobilityWare’s Solitaire app with the animations.
The second issue that I experienced had to with the backlight on the iPad Pro. Specifically, at some points the screen would dim, but once I touched a key, or tapped the screen, the screen would not come back to the expected brightness. Even adjusting the actual brightness would not return.
It should be noted that this did not happen all the time, nor even consistently enough to be able to say what was the cause. There was a simple enough to fix though. Once I put the iPad to sleep and then woke it up again, it went back to normal. I am sure that I am not the only one experiencing this, and it will likely be fixed in an update.
Next, let us look at the software that runs the iPad Pro, iPadOS.
iPadOS
The iPad needs an operating system to power the iPad. Throughout the life of the iPad, there have been instances when it seemed like Apple knew which direction to take the iPad. this was particularly true in 2010 when the iPad was first released, and then again in 2015 with the release of the iPad Pro. However, it does seem as though the iPad has not always received the attention that it deserves.
The hardware for the iPad Pro has outstripped the software since 2018, with the release of the 3rd generation iPad Pro. Apple hinted at big changes at their WWDC 2015 with Split Screen and Slide Over. These features were supported on the iPad Air 2, which was the latest iPad at the time, but were designed for the iPad Pro, released in 2015.
I am writing this review just a couple weeks before Apple unveils iOS 15, and iPadOS 15. While I am hopeful that Apple has a lot in store the M1 iPad Pro in iPadOS 15, I cannot guarantee that it will provide any meaningful improvements. Because of this, it is not a good idea to buy a product based upon its future usage, but what it is capable of, at the current moment.
Benchmarks
No review is complete without a bunch of obligatory benchmarks. For previous reviews, it was straight forward to compare the current model with the previous model. However, in this case it is not so simple. The reason it is not simple is because there is a significant processor change. Even with this significant processor change, the benchmarks below will still show comparisons to as many different machines, and devices, that I have access to.
16-inch MacBook Pro (Late 2019) 2.6GHz 6-Core Core i7
1059
5442
13.3-inch MacBook Pro (Mid-2015)
661
1420
Mac mini (Late 2018) 8GB 3GHz 6-Core Intel Core i5
973
4469
iPod touch (6th Gen)
661
1420
The best comparison is the 5th Generation iPad Pro and the Mac mini that I have. The reason this is best is because they are both an M1 with 8GB of RAM. The only difference is that the 5th Generation iPad has more storage. Outside of that, all of the other specifications are the same between the two devices.
It is quite interesting to see how the Intel Macs compare to the M1. As I said in my review of the M1 Mac mini "In Single Core performance, the M1 mac mini is 8.4% faster than my iPhone 12 Pro Max, 54% faster than my iPad Pro, and a whopping 62.8% faster than my 2017 iMac. Even crazier though, is the multi-core benchmarks. The M1 Mac mini is 57.4% faster than my iPad Pro, 68.2% faster than my 2017 iMac, and 71.4% faster than my iPhone 12 Pro Max. This difference is absolutely noticeable." This is still accurate. Every time I use my Mac mini I notice the difference with the iMac.
While the scores that were recorded on the 5th generation iPad Pro are a bit lower, therefore the percentages are a bit lower, there is still a significant performance difference between the two devices.
CoreML Scores
Geekbench has a newer app strictly testing machine learning. The settings used for the results below are TensorFlow Lite and using Core ML.
Device
CoreML
CPU
GPU
12.9-inch iPad Pro (5th Gen)
2609
1018
2841
iPhone 12 Pro Max
1939
719
1389
12.9-inch iPad Pro (3rd Gen)
1349
692
1906
iPhone 7 Plus
411
407
707
iPod touch (7th Gen)
295
337
555
Geekbench ML is only available for iOS and not yet available on macOS, so the results are strictly for those supported iOS devices.
Closing Thoughts
If you have 3rd generation, and particularly a 4th generation 12.9-inch iPad Pro, the upgrade may not be worthwhile, depending on your needs. The biggest reason to upgrade to the 5th Generation 12.9-inch iPad Pro, at least at this time, would be for the screen. However, if you have a 2nd generation iPad Pro, or even the original iPad Pro, this would be a fantastic upgrade, even just for the speed increases alone.
The fact that the 5th Generation 12.9-inch iPad Pro now an M1 processor is a huge step because this is the same processor that is in latest Macs. The iPad is an ideal device to use the processor, given that the iM1 is a power efficient processor that is capable of handling much more than the previous iPad Pro.
While the M1 processor may be the biggest change, it is not the only change to the 5th generation iPad Pro. There is an entirely new screen system. The new screen is a mini-LED. Mini-LED technology provides a lot more dimmable zones, 2,596 as compared to the 72 on the previous model. This means that the 12.9-inch iPad can more accurately make certain areas of the screen brighter than others. This results in darker areas being darker and lighter areas being lighter. The screen makes watching High Dynamic Range movies a better experience.
Beyond the screen, there are some additional hardware changes including an updated Thunderbolt/USB 4 connector, so you can connect thunderbolt devices directly to your iPad Pro. For many, this will not be all that useful, but for those who do need it, it can be a lifesaver.
While most may not use thunderbolt, it is possible that they will need to connect while on the go. If you need to connect while out and about, you can use cellular data, if you purchase a cellular model of the iPad. If you do opt for the iPad Pro Wi-Fi + Cellular model, it will have 5G connectivity.
As mentioned above, it not necessarily wise to purchase a device for its possible future uses, however, it is more prudent to buy a device for what it can do today. As I write this, Apple’s World Wide Developer Conference 21 is just over a week away, and it is likely that there will be some improvement to iPadOS, even if it is not exclusive to the 5th Generation 12.9-inch iPad Pro, there will likely be something that the next version of iPadOS will bring to the iPad.
If you are looking to get a 12.9-inch iPad Pro, there will be a bit of a wait. As of this writing there is a six to eight week wait to receive a 5th Generation 12.9-inch iPad Pro. If you really need one sooner, you can try looking at a local Apple Store, or even a an Apple authorized third-party reseller. If you opt for one, I doubt you will be disappointed regardless of which model you purchase.
In today’s modern world there are infinite ways of spending free time. You can go for a walk, bike ride, take a hike, or play a sport. If you are more inclined towards a more laid back experience idea you can spend your time chatting via social media using sites like Facebook, Instagram, TikTok, Snapchat, Clubhouse, and Twitter. Alternatively, you can play games on your iPhone, iPad, or a dedicated gaming console like the Xbox, Playstation, or Nintendo Switch.
Each of the activities listed above is one that typically requires active participation. In today’s “go go go” world, there is the need to take a more passive approach. For these times, you sit down watch a movie or tv show.
There are a number of different methods of doing just that. While you could use an iPhone or iPad, and many people do, yet there are those times when you want to minimize digital distractions and just focus on the show or movie.
Almost every television sold today is a Smart TV and in this case “smart” means that it is capable of running applications. For most people, this is an adequate solution. However, there may be those who want a bit more of a nice experience. For those individuals, there are dedicated devices. These can include a Roku Box, an Amazon Fire Stick, or a Google Chromecast stick. Apple has its own solution for this called the Apple TV.
History of Apple TV
Back in September of 2006, at its iPod event Apple provided a preview of a brand new product code-named iTV. This product was a modified Mac mini that ran an Intel processor and had an HDMI output as well as component cables. This Mac mini ran a modified version of macOS, at the time named Mac OS X. Having had one of these it did do what it was intended do. When it was introduced, in February of 2007, it was officially named the Apple TV.
The fact that the original Apple TV was introduced at the iPod event was quite appropriate. The original Apple TV was effectively a large iPod. The device had a 4200 RPM hard drive that came in 40GB or 160GB options. Given that the Apple TV was effectively a giant iPod, it was handled just like an iPod. You would connect it to iTunes on your Mac, or PC, and you could then watch your movies and TV shows.
No streaming box is complete without a way of controlling the device. The original Apple TV included a white infrared remote, the same one that was included with the Macs. This remote included a volume up, volume down, fast forward, rewind, a play/pause, in a d-pad configuration, and a menu button directly below that. The remote layout was very reminiscent of the iPod click wheel, although there was no touch surface on it.
The original Apple TV was not a one and done product, it has definitely had some successors.
2nd Generation Apple TV
It was approximately three years after the release of the original Apple TV when Apple released a new and improved Apple TV, the 2nd Generation Apple TV. This would be a compete rethinking of not only the hardware, but the software.
The biggest change was that you no longer synchronize media. Instead all media would be streamed. This could be streamed from a computer, or using one of the apps. The operating system also changed from running a version of macOS to running a custom operating system, called Apple TV Software.
The 2nd generation Apple TV switched from the Intel Pentium M processor to a custom Apple processor, the same one that was in the original iPad, the A4. This processor changed a few other things. The size of the Apple TV box shrank from 7.7 inches square, and 1.1 inches high, to 3.9 inches square and 0.9 inches tall. The physical size change required a change from a standard hard drive to a solid state drive.
The second generation Apple TV was a vast improvement over the first generation and set the stage for future Apple TVs. The remote that came with the 2nd Generation Apple TV also changed. It was very similar to the white remote, but it was made of aluminum. It was a bit taller, yet still very functional.
3rd Generation Apple TV
The 3rd Generation Apple TV was released in 2012, approximately two years after the release of the 2nd generation. The 3rd generation Apple TV was a slight improvement over the previous model. Hardware wise, the processor was swapped to a single-core A5 and twice as much RAM at 512MB. The other change for the hardware was that it supported 1080p, whereas the previous models supported 720p.The physical size of the box remained the same, at 3.9 inches square by 0.9 inches high. The aluminum remote was included with the 3rd generation Apple TV.
4th Generation Apple TV
In 2015, Apple unveiled the 4th Generation Apple TV was a major shift in not only hardware, but also in software. Let us start with the hardware.
The first change is the physical size. The Apple TV remained 3.9 inches square, but it was a bit taller, half an inch to be exact, to 1.4 inches high. The internals also changed to use an Apple A8 processor. The A8 process provided a significant improvement over the A5.
Sometimes it is easier to let benchmarks provide the data. The data is from Geekbench 3:
A5
A8
Single Core
218
1623
Multi-Core
415
2910
AES Single Core
14,800 Mbps
993,000 mbps
Overall
784
1678
The processor, as well as the solid state storage, was needed to be able to run the software for the device. It was not the standard Apple TV software, it was a new operating system that Apple calls tvOS.
tvOS
Previous versions of the Apple TV software was somewhat limited. Not necessarily in its capabilities, but in the fact that the entire experience was controlled by Apple. New apps could not be installed by end users and instead were pushed by Apple. This approach made it a bit easier to add new services as they became available, because it could be pushed form Apple’s servers. The downside to this though, is that there was no control by end users, nor any way for third-parties to add new services.
tvOS changed all of this. Built with the knowledge Apple gained over the years of building iOS, Apple was able to take this knowledge and put all of it into an operating system designed for the largest screen in most homes.
tvOS is capable of running applications, just like on iOS and watchOS, but these apps are designed to provide games, video service, or other application. The first version of tVOS, tvOS 9, provided an opportunity for third-party application developers to provide their own applications.
Apps are not the only function that the Apple TV with tvOS is capable of doing.
Home Hub
With so much power in the Apple TV, there may be some extra power available for other tasks. One of these is that the Apple TV can do is be a Home Hub. A Home Hub is a home-based device that can control your HomeKit-enabled devices. The Apple TV is able to function a a central spot for controlling all of your HomeKit devices. The purpose of a HomeKit hub is to make controlling your Smart devices faster.
In order to control the Apple TV you need some sort of way to control the Apple TV. Apple did not include the standard remote with the Apple TV, at least in most markets. Instead, this new Apple TV required a new remote. Apple called this new remote the Siri Remote.
Siri Remote
The Siri Remote is a remote that is more than just a standard remote. The top third of the Siri Remote is a touch pad, below this are the buttons. There are six, the Menu button, a TV button, a microphone button, a play/pause button, volume up, and volume down.
The Microphone button is a dedicated button for Siri. Given that tvOS is built on iOS, that means that tvOS has access to Siri. This means that you can ask Siri questions, to find movies or tv shows, and even to control aspects of the Apple TV, like jumping ahead or backwards, or even control your HomeKit-enabled devices.
The 4th Generation Apple TV was not the last Apple TV model.
Apple TV 4K (5th Generation)
The 4th Generation Apple TV is a decent set of hardware. However, there was one feature that many users would really like, and that was the ability to watch 4K movies and 4K TV shows. The 5th Generation Apple TV did just this, and Apple named the product the Apple TV 4K.
The Apple TV 4K was released in September of 2017, just a couple of years after the release of the 4th generation Apple TV. In order to be able to display 4K properly, the processor was upgraded to the A10 Fusion processor. While this did not provide as much of an improvement as from the 3rd generation to the 4th generation, it was still an improvement.
When the Apple TV 4K was released, the 4th Generation Apple TV remained on sale. This model was retroactively renamed to be the Apple TV HD. This was done in order to more easily differentiate the two models.
Users of the Apple TV HD did have some issues with the Siri Remote. One of the bigger complaints was that the remote was not able to be easily recognize the orientation. In order to help users easily identify the orientation, Apple added a white ring around the Menu button. While this would help, in some respects, it did not appease all users.
At the April 2021 “Spring Loaded” Apple unveiled a new Apple TV 4K, let us look at that now.
Apple TV 4K (6th Generation)
The 6th Generation Apple TV 4K improves upon the 5th generation Apple TV. The 6th Generation Apple TV is a minor update, compared to the previous upgrade. The Apple TV 4K keeps the same physical size of 3.7 inches square, by 1.4 inches high.
What has changed is the internals. The Apple TV 4K now has an A12 Bionic processor. While it may seem as though a jump of two processor generations, the improvement is quite a bit. For starters the A12 has a total of six cores, two performance cores and four high efficiency cores. This is an increase of two efficiency cores over the A10 Fusion.
While the processor is a significant improvement, that is not the only aspect that has seen improvement. There has also been an improvement to the wireless chipset. Specifically, the new Apple TV 4K supports W-Fi 6, also known as 802.11AX. Wi-Fi 6 can provide even faster connectivity for devices, provided your network is compatible. Even if you do not have a Wi-Fi 6 network, the Apple TV 4K will still be able to connect to other 802.11 networks.
HomeKit Hub
One of the functions of the Apple TV is to act as a HomeKit Hub. As with any new technology, there come competing standards. Some of these are Zigbee and Z-Wave. These two standards each have their own positives and negatives. One of the requirements of Zigbee and Z-wave is that require a hub in order to communicate with devices. These hubs are needed to connect between a network and the devices. Typically, this is done with a hard-wired ethernet connection.
There is a newer smart device standard that is implemented in the Apple TV 4K, called “Thread”.
Thread
Thread is a mesh-based protocol that allows for direct connections between the Thread Hub, in this case the Apple TV 4K, to the end devices. This eliminates the need for a second hub, like those you would see with the Hue lights. This will not only free up spots in a power strip, but it will also allow a wider range of devices. With Thread, no longer will you need to worry about which protocol a device uses.
Beyond this, Thread also has an additional benefit, it uses a mesh network for connecting all of the devices. This allows the devices to connect to each other, meaning that if one device cannot be found, other devices can pick up the slack and take over and relay communications, if necessary.
Having Thread embedded right in the Apple TV should make connecting smart home devices even easier than before. Yet, this is not the last of the hardware changes within the new Apple TV 4K.
The Apple TV 4K also includes support for HDMI 2.1. In most cases, this will not have much of an impact. However, HDMI 2.1 is needed for a new feature called High Frame Rate High Dynamic Range.
High Frame Rate High Dynamic Range
High Frame Rate High Dynamic Range, or High Frame Rate HDR, is a technology that will allow playback of video at 60 frames per second, for video that includes High Dynamic Range. There are not many videos that shot in 60 frames per second with High Dynamic Range. If you have a capable iPhone you can watch any of your 60 frame per second videos with high dynamic range.
High Dynamic Range HDR should make any video that you watch even better. Beyond fast-moving video, this should also help with things like gaming.
Gaming on the Apple TV
On the topic of gaming, the Apple TV 4K also supports game controllers, like the Playstation 5 controller as well as the Xbox Series X|S controller. For those who want to play games with a controller, this is great addition.
Since the release of the 4th generation Apple TV in 2015, Apple has positioned the Apple TV hardware as a viable gaming box. When the Apple TV was first released, Apple had a requirement that all games support the Siri Remote, but could also support a gaming controller.
It did not take long before Apple changed this requirement. The reason this was changed is because not all games can be played effectively with only the Siri Remote.
However, controllers are not the only way to control items on the new Apple TV 4K. There is another way, and the one that is primarily used, the Siri Remote. With the 6th Generation Apple TV this has received a huge change, a complete redesign.
Siri Remote (2nd Generation)
As mentioned above, each Apple TV included a remote. The original had the white Apple remote, while the second and third generation Apple TVs included the aluminum remote. The fourth generation had the original Siri Remote, and the fifth generation Apple TV included the Siri Remote with the white ring around the menu button.
When the Siri Remote first got into people’s hands, it quickly became divisive. Some people, like myself, do not have any problem with the Siri Remote. Yes, it did take some time to get accustom to, but eventually got used to using the remote and navigating the tvOS interface with the touch sensitive remote.
Even though some had no problem with the remote, there is a contingent of users who do not think the Siri Remote is a good remote and that the remote was a mistake. Many expected Apple to change up the Siri Remote with the Apple TV 4K, but they only did a minor upgrade. With the 6th Generation Apple TV 4K, there is a new Siri Remote.
The 2nd Generation Siri Remote is a complete redesign of the Siri Remote. The remote harkens back to 2nd generation Apple TV remote in that it is aluminum. The 2nd Generation Siri Remote is a different size than the first Siri Remote.
However, the differences are only slight. The height of the Siri Remote is 5.44 inches, or 136mm, the width is 1.4 inches, or 35mm. The first generation Siri Remote was 4.88 inches, or 124mm, in height and 1.5 inches, or 38mm, wide. These are slight differences, but noticeable.
Button Layout
The biggest change to the Siri remote, besides the build materials, is the button layout. There are seven buttons and a five way touch surface. There are still a volume up and volume down button, as well as the TV button and the play/pause button.
There are a couple of new buttons though. The “Menu” button has been placed by a left arrow button. This button still behaves the same as the Menu button, but better represents its overall function. The Back button functions the exact same way as the Menu button did. The back button is concave, which should help you orient the remote when you pick it up.. This covers the existing buttons. However, this is only five buttons, which means that there are two new buttons.
The two new buttons are ones that will make many users very happy. These are a dedicated mute/unmute button and a dedicated power button.
The mute/unmute button is a great addition because there are those times when you want to be able to mute the audio but not necessarily pause what is playing; which was the behavior with the first generation Siri remote, but no longer.
Power Button
There is a similar thing when it comes to powering off the Apple TV. With the 1st generation Siri Remote the way that you would power off the Apple TV would be to hold down the TV button to bring up the Sidebar, and then scroll down to the Sleep button to put the Apple TV into sleep mode.
With the 2nd Generation Siri Remote you now hold down the power button to turn off the Apple TV, as well as your TV, provided your TV supports HDMI Consumer Electronics Control, or HDMI-CEC. Now, with the dedicated power button you are able to turn off both your television as well as the Apple TV all with one button. This is a huge improvement and a much welcome one.
Five-Way Directional Pad
The last change is that the top of the Siri remote it is that the top of the Siri remote has changed. With the previous Siri Remote, the entire top portion was a touch surface. This is no longer the case. In place of the touch surface is five-way directional pad that has a touch surface.
The directional pad has four directional buttons, up, left, down, and right. The directional pad is circular and with the entire directional pad supporting touch means that you can use the outside ring as a jog wheel.
With the outside circle you can quickly scrub through video, or to move between items on the screen. Additionally, you can use the button clicks to quickly move jump forward and backward.
Siri
In order for the Siri Remote to live up to its name, it needs to be able to access Siri. On the 2nd Generation Siri Remote there is a dedicated button, like on the previous version. However, the placement of the button has moved. Instead of being on the face of the remote, it is now on the side. You can bring up Siri just like you would on an iPhone. You can simply hold down the Siri button and it will appear on the Apple TV as you would expect.
Now that we have covered all of the new buttons, let us see which devices the 2nd Generation Siri Remote is compatible with.
Compatibility
Typically, when you have a new accessory it is only compatible with the device that it comes with, or new devices. However, that is not the case with the 2nd Generation Siri Remote. In fact, it is actually compatible with both the 4th Generation Apple TV as well as the 5th Generation Apple TV. This means that you can create a consistent experience between all of your Apple TVs.
Weight and Feel
Every generation of a device is likely to have different characteristics from the generation before. The Siri Remote is no exception. The 2nd generation Siri Remote is actually heavier than the 1st generation. In some respects this makes sense, given that the entire 2nd generation remote is made of aluminum.
Even though the Siri remote is heavier, it still has a good feel to it. When you are holding the remote, it has a natural fit in your hand. The slightly rounded back feels a bit more natural than the straight back of the previous generation of Siri Remote.
Missing Features and Issues
It should be noted that the Siri Remote does not have a U1 chip. The U1 chip is used to help you locate the exact position of a device. It seems a bit strange that the 2nd Generation Siri remote does not have at least some method of being able to locate the remote. While it is possible that some do not lose their remotes, there are probably more than a few who will lose one from time to time. There are various reasons why a Siri remote may go missing, but the remote being misplaced by someone, including kids, is quite possible.
I would hope that there might eventually be a revision of the Siri Remote to include at least a speaker that can be used to have the remote make noise so it can be found. However, if there is going to be a revision, a U1 chip, as well as a speaker, similar to an AirTag. This would allow a user to use an iPhone to locate the Siri Remote.
I did run into an issue while using the Siri Remote. This is not an issue with the remote itself, per se. The issue I ran into was the fact that I kept hitting the mute button instead of the play/pause button. This is because the mute button is in the same place as the previous play/pause button. I am sure it will take some time to retrain my brain, and muscle memory, but eventually I should stop hitting the mute button instead of play/pause, but even a week on, it is still a problem.
I have a 5th generation Apple TV 4K, and I have not had any issues going between the two Siri Remotes. I know there are some that have opted to replace all of their Apple TV remote with the 2nd generation Siri Remote. I have not ruled out doing this in the future, but I have not ordered any additional Siri Remotes yet.
Apple TV and Siri Remote Pricing
The 6th Generation Apple TV is available in two different storage sizes, 32GB and 64GB. The 32GB model is $179, and the 64GB model is $199. Both of these are available to order today, and ship within a week or so.
The Siri Remote is available on its own for $59. It is available to order today. This also has the same shipping time frame of a week or so for shipping, at least as of this writing.
Closing Thoughts
The 6th Generation Apple TV 4K is not a huge change, externally, there are no changes at all. Instead, all of the changes have been made on the internals. There is a new processor, the A12, which is the same processor that is in the iPhone XS. This is a two generation jump from the previous A10. The A12 processor provides the ability to display High Frame Rate video. High Frame Rate Video is 60 frame per second video that has High Dynamic Range.
The biggest change with the new Apple TV 4K is the 2nd Generation Siri Remote. The new Siri Remote is a complete redesign of the remote. The new remote is aluminum and the top portion is no longer a full touchpad. Instead, there is a circular touch pad, with directional buttons. The directional pad allows you to navigate up, down, left, or right. The ring around the touch pad will allow you to navigate as well as scrub video, or navigate through the interface.
The 2nd Generation Siri Remote is a big heavier than the 1st generation model, but I suspect that many people will prefer the newer remote over the older one. Even if you do not purchase a new Apple TV 4K, you can use the Siri Remote with the 5th Generation Apple TV, as well as the 4th Generation Apple TV. it may take some adjustment given the difference in the button layouts as compared to the previous Siri Remote, but the second generation is a significant improvement.
Both the new Apple TV 4K and the Siri Remote are both available today. The Apple TV 4K is available in two sizes, 32GB and 64GB. These cost $179 and $199 respectively. The Siri Remote is available for $59.
If you have a 4K TV and you want a standalone box from Apple, you cannot go wrong with the Apple TV 4K.
Despite what one might think, it is not often that Apple introduces a whole new product line. As early as 2019 there were rumors that Apple was working on their own item tracking service. Apple did not say anything about any type of service or possible product. Apple has never been a company to announce future products. However, they did just that in September of 2017 with the pre-announcement of AirPower; a product which would ultimately never see the light of day and would be officially cancelled in March of 2019.
I think the sting of having publicly announcing a product that never ended up coming to fruition contributed to Apple not wanting to unveil a product before it was ready.
There were some speculations with the announcement of iOS 13 that Apple was working on a new product category, an item tracker. The first of these was when Apple combined two apps, “Find My Phone” and “Find My Friends” into a single app, called “Find My”.
Even though Apple never announced anything, there were some indications throughout the betas of iOS 13 and iOS 14 that Apple was looking to expand the Find My app to track more than your iOS devices and friends. With the release of iOS 14.5, Apple is finally releasing this into the world. Specifically, you are able to track items with a new product called AirTag.
AirTag
An AirTag is used to keep track of items such as wallets, keys, laptop bags, or various other items.
You can purcahse an AirTag as either a single AirTag or in a 4-pack. A single AirTag costs $29 and a 4-pack is $99. You can customize your AirTag with characters or emoji. You can also order an AirTag, or the four pack, without any engraving.
AirTag is not physically large. In fact, they are 1.26 inches, or 31.9mm high and the same size wide. The reason that these are not large is so that they will fit in small items. Each AirTag is actually two pieces, a top piece, which is white, and the cover metal cover.
Much to the surprise of many, AirTag has a replaceable battery. You might expect that it would be a proprietary battery, but they are a standard CR2032 battery, like the ones that you can buy at almost any store, including many convenience stores.
Replacing a Battery
As mentioned above, AirTag has a replaceable battery. Replacing the battery is not something that you will need to do that often. According to Apple, the AirTag battery should last about a year, so you should not need to replace the battery for a while.
When you do go to replace the battery is a somewhat straight-forward process. To replace an AirTag battery perform the following steps:
Hold the AirTag with the metal cover facing you, with the Apple Logo facing up.
Press on the left and right sides of the AirTag, you should feel the edges depress a bit.
With the edges pressed down, twist the edges so the metal cover turns.
Remove the metal cover.
Take out the CR2032 battery.
Place the new CR2032 battery with the positive side, the side with the +, face up.
Place the metal cover back on the AirTag.
Twist the cover until it sticks.
Here is a video of how to replace the battery:
You have now replaced the AirTag battery. There is one additional way to be sure that the AirTag’s battery is working. When you replace the battery the AirTag will make noise. This is possible because the AIrTag has a speaker in it.
Speaker
As noted earlier, the AirTag is quite small and due to the limited space the speaker cannot be that big. Even though, the AirTag is not very big, and the speaker is not large, the sound coming out of the AirTag is still noticeable.
Even though the speaker will make noise when you replace the battery, the primary purpose of the speaker is to help you find your items. However, in order to find an item, you need to add them to your iCloud account. Let us look at how to do that next.
Adding an AirTag to your iCloud Account
Each AirTag comes wrapped in a plastic wrapper, much like Apple’s other devices. A slight different aspect for the AirTag is that there is a pull tab that needs to be pulled to activate the battery. If you do not remove the wrapper, the AirTag will not function.
After you have removed the wrapper, place the AirTag near your iPhone. When you do this, a popup will appear, just like if you were to be connecting AirPods.
Next, you can choose a name. There is a set of pre-configured names. This includes:
Camera
Handbag
Headphones
Jacket
Keys
Luggage
Umbrella
Wallet
If none of the pre-configured names matches what you are looking for, there is one last option, “Custom Name”. If you choose Custom Name the next screen will allow you to enter in a custom name.
After you have selected the name you will be able to select the Emoji that will represent the item. You are able to use any available Emoji using the Emoji picker.
Once you have selected the emoji, you will get a confirmation screen to verify that you want to register your AirTag with your Apple ID. Your avatar, Apple ID, and phone number will be shown to verify that you want to register it with that information.
That is all that is required to register an AirTag with your iCloud account. When you register an AirTag with your iCloud account, it cannot be registered with another iCloud account. There is a limit to the number of AirTags that can be registered with an iCloud account. That total is 16. 16 may seem like an odd number, but you can purchase AirTags in single packs or a 4-pack, so 16 would be 4 packs of 4 AirTags.
Having an AirTag registered on your iCloud account is great, but next let us look at how to find an item.
Finding an Item
Now that you have registered your AirTags with your iCloud account, the item, or items, will appear in the Item tab of your Find My app. Under the Items tab all of your registered AirTags will appear. Each item has its own row, with its last known location. If the item is nearby, it will also indicate that it the item is “with you”.
When you tap on the item, it will provide you with some actions. This information page provides two ways to find items that are “with you”. These are “Play Sound” and “Find”.
The entire purpose of having an AirTag on an item is being able to locate an item should it go missing. There are two possible scenarios for missing items. The first is when they are missing in your home. The AirTag is equipped with bluetooth as well as Apple’s U1 chip.
Bluetooth is needed to be able to find the item within a small area. Bluetooth has a range of approximately 30 feet. As is the case with all radio-based technologies, this is in ideal conditions. For many houses, you may not be able get nearly as much range, particularly if you have stucco or metal or wire lathe in the walls and ceiling.
Play Sound
The “Play Sound” option will, as the name states, play a sound through the speaker on the AirTag. The AirTag is a small device, so you might think that the speaker will not be that loud. However, it is quite the opposite. The sound is quite audible, even if the AirTag is in a drawer or somewhere hidden. Playing a sound is only one way of locating an item. The second is with the “Find” option.
Find
The “Find” option will use Bluetooth, and the U1 chip, to try and help you locate the AirTag. This is done by looking for the signal of AirTag. Once it has located it, it will give you a distance of approximately how far away the AirTag is from your device. On the Find screen, there is a speaker icon which will allow you to play sound. As you get closer, or further away, to your AirTag the distance will change. Once you get within approximately 15 feet, a slightly different feature will take over, called “Precision Finding”.
Precision Finding utilizes the the U1 chip to be able to find exactly where the AirTag is located. Once Precision Finding has taken over, the background of the Find screen will change to be a green color and the circle that was there will change to an arrow to provide you a direction to move. As you get even closer your iPhone will begin to vibrate faster as you get closer.
Setting an AirTag as Lost
AirTags are one of those items that you hope to never end up having to use. What I mean by this is that you hope to never lose the items that your AirTag is attached to, but it possible that it may happen. If you do happen to lose an item somewhere you are able to indicate to others that your item is lost. In order to set an item as lost, perform the following steps:
Open the “Find My” app
Tap on “Items” to bring up the Item list.
Tap on the item that you need to set as lost.
Swipe up to show all of the options.
Under “Lost Mode” tap on “Enable”. A “Lost Mode” screen will appear.
On the “Lost Mode” screen, tap on the “Continue” button.
Enter in the Phone Number where you want to be contacted if your item is found.
Tap on the “Next” button in the upper corner. This will bring up the confirmation screen.
Tap on the “Activate” button in the upper corner to enable Lost Mode.
When you go to activate Lost Mode, there is an option “Notify When Found”. This option is only available if the item with the AirTag has not been with you for at least two minutes. Enabling this option will send you a notification that your item has been found. The notification will provide an address near where the item was located.
Disabling Lost Mode
If you no longer need to have Lost Mode enabled on an AirTag you can disable it. To disable Lost Mode follow these steps:
Open the Find My app.
Tap on “Items” to bring up the item list.
Tap on the item that you want to disable Lost Mode on.
Tap on “Turn Off Lost Mode”. An alert will appear.
Tap on “Turn Off” to confirm that you want to turn off Lost Mode.
Once you have tapped on “Turn Off” Lost Mode will be disabled on the specified AirTag.
Identifying a Lost Item That is Not Yours
Even though you may not lose anything, it is possible that someone else might and while you are out and about you may come across an item with an AIrTag. If you do happen to come across an AIrTag follow these steps to indicate that an item has been found.
Open the Find My app.
Tap on “Items” to bring up the item list.
Tap on the “Identify a lost item” at the bottom of the page. This will bring up the “Searching for Items” screen.
Once the “Searching for Items” page appears, hold the found AirTag near the top of your iPhone. If a match is found, a website notification will appear.
Tap on the notification to bring up the “found.apple.com” website.
On the found.apple.com website, information about the AirTag will be shown including the phone number to contact
AirTag and Privacy
As much as we would like to think that everyone is admirable in their intentions. However, that is not the case.. There are many cases where individuals need to be wary of others. This could be because the individuals have stalkers, could be in a problematic living situation, or another similar situation. With the AirTag being so small you might think that someone could slip an AirTag into a bag, purse, pocket, or another place.
Apple has taken these type of scenarios into account with the AirTag. As an example, if your iPhone detects an AirTag that is not registered with your iCloud account, you will get a notification indicating that an unknown AirTag has been found.
Additionally, if you find an AirTag in Lost Mode, there is a link at the bottom of the page that shows you how to disable the AirTag; specifically how to remove the battery. This information is available at https://found.apple.com/airtag/disable. (As a note, this link does not have a serial number specified).
AirTag Accessories
AirTags themselves cannot be stored on a keychain, without a holder. As you might expect, Apple has a variety of first-party holders for the AirTag. Apple has two different types of holders, the AirTag Loop, and the Key Chain. Besides Apple, third-party companies are able to create their own accessories. In addition to selling its own accessories, Apple does sell two Belkin accessories, the “Secure Holder with Strap” and “Secure Holder with Key Ring”.
I purchased a 4-pack of AirTags and I needed enough holders for all of them. The accessories that I purchased are two AirTag Leather Key Rings, one AirTag Loop, and one Belkin Secure Holder with Key Ring. The reason I purchased three accessories with key rings is because I put three of my AirTags on each of the key rings that I have. The fourth AirTag is one that I am using for testing on another account. I may eventually put it on or in something, but I have not yet done so. Now let us look at each of the accessories that I have purchased.
AirTag Leather Key Ring
When I ordered my AirTags I knew I was going to put them on my keys, so the purchasing the Apple Leather Key Rings made sense. I could have gone with the same type for each key ring, but I opted to go with different colors. Specifically, I purchased one AirTag Leather Key Ring in in Baltic Blue and another one in Saddle Brown.
The Apple Leather Key Ring is made of two parts, the holder and the key ring. The holder has a metal clasp that holds the AirTag as well as the key ring. The actual key ring portion can be removed and replaced with another key ring, should the included one not work well with your existing key ring.
There is one issue that I have seen with the AirTag Leather Key Ring. The actual AirTag holder does not fully seal around the AirTag. The clasp does stay in place, but it seems as though the leather of the AirTag holder is not the same dimensions as the AirTag itself.
AirTag Loop
The Airtag Loop is a single piece that, as the name suggests, can create a loop. This is done with a slot on the top of the Airtag Loop that you use to slip the AirTag holder into, in order to create the loop.
This type of AirTag holder would be useful when you want to attach an AIrTag, but do not necessarily need to use a key ring. For instance, this could be used on the outside of a bag, or even the inside of a bag, should you want to attach an AirTag securely.
You could, in theory, attach the Airtag Loop to a keychain, it would be secure enough. However, the Airtag Loop would hang down quite a bit from the keychain and could cause issues removing it from a pocket. However, I could see this working really well for a bag, suitcase, laptop bag, or other similar device.
The Airtag Loop suffers from the same issue as the AirTag Key Chain, in that the clasp does not fully enclose all of the AirTag.
Belkin Secure Holder with Key Ring
You might think that Apple would be the only company to create accessories for the AirTag, it is not. There are a variety of companies that have created accessories. Apple has partnered with Belkin to provide some additional accessories that are sold both in stores as well as the online Apple Store.
Belkin has two accessories, the “Secure Holder with Strap” and the “Secure Holder with Key Ring”. Knowing that I was going to put the AirTags on my keys, I ordered the Belkin Secure Holder with Key Ring.
The Belkin Secure Holder with Key Ring is a two piece plastic holder. The two pieces are designed to snap together and then the two pieces are designed to twist together so that the key ring holes line up. Once these are lined up the key ring is connected to secure the two pieces together and keep the secure holder closed. With the twisting of the two pieces, the holder will stay secure The hard plastic should provide some protection for the AirTag.
All of Apple’s AIrTag holders actually cost the same, if not more, than an AirTag itself. While many can afford the extra cost, many cannot. The Belkin accessories are about $13 each, as compared to the Apple Accessories.
Closing Thoughts
The AirTag is the type of accessory that you hope to never use. However, if you are ever in a situation where you managed to lose something, you have the option to enable “Lost Mode” on an AirTag. When you do this, you can provide your contact information in the event that someone comes across your lost item, they are able to contact you to inform you that your item has been found.
If you need to find an item that is somewhat near by you can play a sound to help find the item’s general location. Once you get close enough “Precision Finding” will take over and provide directions to exactly where the item with the AirTag is located.
With hundreds of millions of iOS users in the world, it is possible that you may come across an item with an AirTag attached. f you do find yourself in this situation, you are able to identify the item. The owner likely put the item into Lost Mode and with Lost mode they provided their contact info so you can return their item.
There are those who may be concerned about unknown AirTags being placed into their bag, coat, purse, or other item. Apple has taken this into account by notifying you if an unknown AirTag is near you for an extended time. If you do find an AirTag that is not associated with your iCloud account. If you do feel as though you are being tracked, you can remove the battery
AirTag can be customized in a couple of different ways. You are able to engrave an AirTag with up to four characters or emoji. This has to be done when ordering the AirTag. The second way to customize an AirTag is with one of the available accessories. This includes Apple’s Leather Key Ring, AirTag Loop, or the AirTag Leather Loop. Alternatively, you can use one of the Belkin AirTag accessories, or one of the other third-party accessories.
Attaching an AirTag to an item can be helpful should you ever lose an item. AirTags are more of an insurance policy than anything else, but should you really want to be able to find something that could get lost, it is an inexpensive solution to do just that.
There are some things that I purchase on a regular basis. Among these are groceries, gifts, and other various things. In terms of technology the chief among these is purchasing a new iPhone, iPad, and Apple Watch. I have purchased an iPhone and an Apple Watch each year since their respective introductions. I have purchased a number of iPads, but I have not purchased a new one every time one has been released. One type of device that I have not purchased on a regular basis is a computer, in particular Macs.
In my lifetime, I have purchased a total of five different Macs, three of these have been and two of these have been laptops. The first Mac that I purchased was a 20-inch 2.16GHz Core 2 Duo iMac that I purchased in March of 2007. The reason I ended up with a Mac was because I had nothing but issues with Microsoft Vista. I got tired of dealing with the constant crashing of the video drivers, even 6 weeks after its release, I opted to buy a Mac. This was in March of 2007, so it was after the transition from PowerPC to Intel. Here is the list of the other devices that I have purchased:
2017 – 27-inch – 4.2 GHz Quad-Core Core i7 with 24GB RAM, 3TB Fusion Drive HD
All of these devices have one thing in common, they are all Intel-based devices.
Apple announced that they would be transitioning away from Intel processors to their own Apple Silicon. This announcement was made at their 2020 World Wide Developer Conference. At the announcement Apple indicated that the first machines would be released this year and that the entire transition would take approximately two years. While many suspected that Apple would announce a laptop, they announced more than just a single device.
Apple announced two laptops, that had Apple Silicon chips in them. These are the 13-inch MacBook Air and the 13-inch MacBook Pro. As a surprise, Apple announced a desktop machine would have Apple Silicon in it as well, the Mac mini. All of these machines have the first Apple Silicon chip, which Apple has called the M1, inside them. Let us discuss a bit about the M1.
Apple's M1
Computers, for most of their history, have been comprised of distinct chips. Some of these include the processor, the system memory, the graphics chip, and storage. As time has gone on, some of these items have been integrated onto a single board. Most commonly the processor and graphics. Many computers these days also have their system memory soldered in, so that this cannot be expanded. This is quite common with laptops and less common with desktop machines. This type of configuration is consistent between both Intel-based and AMD-based systems. Apple’s M1 takes a different approach.
The M1 is not just a processor. Instead it is a System on a Chip, or SoC. The M1 is not Apple’s first custom SoC. In fact all iPhone, iPad, and iPod Touch devices that have been equipped with an Apple A-series chip have been an SoC. This is also the case for the Apple Watch, Apple TV, and HomePods.
For the M1, the SoC consists of more than just the central processor. In fact it includes the processor, graphics, and a 16-core Neural Engine. Along with this, comes the Unified Memory Architecture, or UMA. In traditional computer configurations, you have memory that is a separated from the rest of the system and on their own dedicated chips that connect to the system on the motherboard. A Unified Memory Architecture is one where the the processor, graphics, and in Apple’s case, neural engine, all share the same memory.
In a traditional computer, each subsystem would have its own memory. For instance, there is the main system memory, which is accessed by the central processing unit, or CPU. The graphical processing unit, or GPU, has its own dedicated memory. There are some tasks that are better suited for a graphics chip while others that are better suited for the CPU. In order to be the most efficient and process things most efficiently, different segments of the memory need to be transferred between the two processors. This transfer, while it takes very little time in reality, it can still take some time.
With the M1, this processor, graphics processor, and neural engine all share the same memory pool. What this means is that there is no delay in switching between using the CPU, GPU, and Neural Engine. This results in the system processing items significantly faster.
The M1 chip is an 8-core chip, with four performance cores and four high efficiency cores. When you do not need top performance the efficiency cores will be utilized. However, when you need speed those processors will be used. This is beneficial for all Macs running the M1, but there is a specific benefit for portable systems. Significantly increased battery life. In particular, for the MacBook Air, you can get up to 50% more battery power, which is a significant increase, and a very welcome one.
The shared memory pool, for the current machines, all come with 8GB standard. These machines are configurable for up to 16GB of memory. While this seems like a small amount, the machines that have been released are not aimed at those who need significant amounts of memory. Instead, they are aimed at the general consumer. This is most apparent with the fact that the 13-inch MacBook Pro and Mac mini still have Intel models that can be configured for higher specifications available to order, should users need the extra memory.
The M1 Macs are based on the same technology that is used within Apple’s other devices. This has a side benefit, the ability to run iOS and iPadOS apps natively, right on the Mac. It is up to the developer of the app to determine if their app is available on the M1 Macs or not.
If you look at the machines I have purchased, I end up purchasing a new Mac desktop every four years, and a new laptop every 8 years, although with two data points I doubt that this will be the case. There is one more computer to add to that list, the M1 Mac mini.
M1 Mac Mini
Initially, I had not planned on buying an M1 Mac, at least not right away. My 2017 iMac works quite well and in reality my MacBook Pro needs to be replaced first, since it is older. I kept going back and forth on which configuration to get. Do I need the MacBook Pro, or would the MacBook Air suffice? I was not sure if I wanted to get the first-generation machines. Not because I think there would be any issues, but because I would want something with more than 16GB of RAM, and since I was looking at replacing my MacBook Pro, I wanted something with more than 2 ports. None of the devices that were released has more than two ports, so I was planning on waiting until the higher-end models were available.
Things came to a head when I asked a friend, who did get an M1 MacBook Pro, to try my app on the M1. He was able to install and most everything worked. Except there were a couple of things that ended up crashing. I could have attempted to trouble-shoot them, but that is not easy to do without being able to debug as you co.
Because of this, I had to order an M1 Mac. I decided to get the base model Mac mini, which comes with 256GB of storage and 8GB of ram. I opted to get the base model Mac mini for two reasons. The first is because it was the cheapest and second it was able to shipped right away. I ended up just getting the base model, because I primarily need it for development and since it will be a dedicated development machine, and not my main machine, I did not need it to be completely upgraded. In some respects, I wish I had upgraded it, but that is for discussion later.
I was able to figure out the issues that were crashing the app. The problem was not with the M1 specifically, instead the issue that my friend was experiencing turned out to be a server-side issue. I ordered the M1 Mac mini in late November, and doing so extended the return window to be in early January. I have not returned the Mac mini yet. I do not think I will. In fact, I had not purchased Apple Care initially with the Mac mini, but I did just purchase Apple Care for my M1 Mac mini.
Overall Thoughts
The M1 Mac mini is fast. When I am using it, I can generally use it without any issues, slowdowns, or performance losses; most of the time anyway. Even though the model I have only has 8GB of RAM, this seems to be enough, and the 256GB of storage should be plenty since I am not using it as my primary machine.
The M1 Mac mini is the same physical form factor as the previous Mac mini, albeit in silver instead of Space Gray. The fact that it is the same form factor means that it includes a spinning fan. In the time that I have had the Mac mini I have not heard it spin up, even when performing system updates. This is not the experience that I have had with the 16-inch MacBook Pro. The fans on that will spin at full speed while updating. So, this is a nice departure. As a side note, the M1 MacBook Air does not have a fan, so you will never hear the fan on that machine ever.
The M1 Mac Mini does not have the same port configuration as the previous models. The M1 Mac mini has 2 USB-A ports, 2 Thunderbolt/USB 4 ports, a gigabit ethernet jack, and an HDMI 2.0 port. For most users this port configuration is plenty. I know it is more than I need. The Intel model has the option of configuring the ethernet port to 10 gigabits per second and includes four Thunderbolt/USB-C ports.
The M1 Mac mini includes Bluetooth 5.0 and a 3.5mm headphone jack. This is the same as on the Intel-based Mac mini. There is one last difference, and that is in wireless connectivity. The M1 Mac mini supports 802.11ax, also known as WiFi-6. If you have an 802.11ax router, you should see significantly faster speeds, when going between other 802.11ax devices.
The M1 Mac Mini is capable of supporting two monitors, including Apple’s Pro Display XDR, as well as a 4K monitor. You can also use the USB-C ports for a display, along with the standard HDMI port.
Upgradeability
This should be a pretty quick section, as there is no way to upgrade the internals. The memory and storage are soldered onto the board, so nothing can be upgraded. Any storage upgrades would have to be external. There are not even any pins on the board to even begin to connect something internally.
Intel-based Apps
One of the benefits of the M1 is that you are able to run both Apple Silicon-based apps and Intel-based apps on the same machine. The ability to run Intel-based apps on the M1 is done through Apple's translation layer, called Rosetta 2.
I have only used one app that has been Intel-based on the M1 Mac mini and I have not experienced any issues with that app. It is likely that you will not experience any issues with Intel-based apps on an M1 Mac, but it is possible that some issues might exist depending on the app, but most should work without any issues. There might be some performance issues, but they should be minimal.
Having articulate the speed difference with the M1 Mac mini as compared to other devices. So, I opted to use unarchiving the Xcode 12.3 beta. Let us now look at quantifying the speed increases, with some benchmarks. What would a review be without them?
Obligatory Benchmarks
I was trying to find a way to be able to articulate just how fast a Mac running an M1 really is. I decided to unzip the Xcode 12.3 beta on a number of different devices that I have access to, and here are the results from slowest to fastest, formatted in minutes and seconds:
2018 Mac mini (3.0GHz 6-core 8th-generation Intel Core i5, 8GB):
9:05
2020 Developer Transition Kit (A12Z, 16GB):
8:29
2020 M1 Mac mini (8GB):
5:00
As you can see, the M1 Mac mini is blazingly faster when it comes to unzipping a 11.2GB xip file to its full 27.2GB size. This is just part of the speed that the M1 offers.
Any time you use a newer machine, whether you replace an older machine or just add another machine to your existing computers, you expect the machine to be faster. This is definitely the case with the Mac mini. It is not faster just in Geekbench benchmarks, it is, see the chart above, but just in the general feel it seems faster. I am sure part of this is the fact that it is an SSD only machine, as well as not having all of my usual apps on the machine, and the fact that it is a new machine.
However, the actual difference is borne out through the benchmarks that have been done using Geekbench 5.
Device
Single Core
Multi Core
iPod touch (6th Gen)
258
528
iPod touch (7th Gen)
553
1077
iPhone 7 Plus
740
1355
Early 2015 13.3-inch MacBook Pro
746
1652
Late 2018 Mac mini
992
4442
Mid-2017 27-inch iMac
1068
4377
12.9-inch iPad Pro (3rd Gen)
1124
4680
Late 2019 16-inch MacBook Pro
1170
5391
iPhone 11 Pro Max
1328
3252
iPhone 12 Pro Max
1604
4297
M1 Mac Mini
1739
7366
In Single Core performance, the M1 mac mini is 8.4% faster than my iPhone 12 Pro Max, 54% faster than my iPad Pro, and a whopping 62.8% faster than my 2017 iMac. Even crazier though, is the multi-core benchmarks. The M1 Mac mini is 57.4% faster than my iPad Pro, 68.2% faster than my 2017 iMac, and 71.4% faster than my iPhone 12 Pro Max. This difference is absolutely noticeable.
The biggest speed improvements that I have seen are actually while I have been doing development.
Developing on an M1 Mac mini
As mentioned earlier, the primary reason that I bought an M1 Mac mini was that my app was crashing on a friend's M1 Mac. Although, the issue ended up being on the server-side, and not the app itself, I have done quite a bit of development using the M1 Mac mini. I have some things that I have noticed along the way, so let us look at some of those now, starting with the screen.
Screen, or lack there of
One of the possible downsides of the Mac mini is that it does not include a screen. While I can purchase a monitor, including a 4K or 5K monitor, it is not likely to be a P3 color gamut monitor, and since the Mac mini is not my primary machine, I do not want to invest too much into it. I do have a 27-inch 1090p monitor that I purchased earlier this year, and have been using that.
Using this setup is definitely not ideal and is a significant departure from what I am used to with my 27-inch iMac. The difference is not only in the color, but also in the amount of screen real estate. On my iMac I use a scaled resolution, to provide me more usable space. This does result in smaller font, which I have no problem seeing, for the most part.
However, with the Mac mini and a 1080p monitor, I am limited in the amount of space that I have available to me, so I have to do some juggling in order to be the most efficient. Sometimes I have multiple windows open, one for the current file I am looking at and another for the simulator that I have running. With the amount of space on the iMac, I am able to position all of the windows to be able to see everything at once. That is just not possible on the 1080p monitor I have. It is situations like this where I wish Apple had continued to sell a stand alone monitor. I understand that it is a very small market, but having quality monitors that work well with Apple’s hardware would be ideal.
Even though I have to do some juggling, I am able to get some development done. I do not necessarily need to use the Xcode simulator all the time. This is because I have begun using a slightly different way of doing development.
Most general computing tasks do not process things using more than a single core. Yes, there are a number of applications that are specifically designed to utilize all of the cores of a machine, but most do not necessarily utilize these to their fullest extent.
One area that can utilize the multiple cores simultaneously is when you are building an app. The reason that this is possible is because the compiler is able to handle multiple tasks at once. This is most noticeable when using a specific feature of Apple’s Xcode app, called SwiftUI Previews.
SwiftUI Previews
Despite having a 27-inch iMac, which should be able to handle most development tasks, there are some things that it is not able to do. Most notably, it is not able to use SwiftUI Previews. SwiftUI Previews is a technology built into Xcode that allows you, as the name states, preview SwiftUI views. SwiftUI is a user interface that takes the core aspects of the Swift language and builds a series of user interface elements on top of the language. When you create SwiftUI Previews, they are in almost real-time. This is possible because when you use SwiftUI Previews, your screen is divided in half. On the left side you see your code and on the right side you see the SwiftUI Preview. With this arrangement, when you make a change it should be instantly reflected in the preview. This has been my experience on the Mac mini, and is the intended experience for anyone using SwiftUI Previews.
The way that this works is by constantly re-building your app. If you have done development for any amount of time you likely realize that this seems like it would be a constant drain on the system. In most cases, it would be. However, Swift is able to recompile only the parts of the app that need to be recompiled, and this technique allows SwiftUI previews to work.
My initial thought is that the reason SwiftUI Previews has not worked on my iMac is because it has a fusion drive, where a majority of the drive is a traditional spinning hard drive and a smaller portion is an SSD. So, I thought I would try SwiftUI Previews on my 2015 MacBook Pro, which is a pure SSD. However, I never ever been able to satisfactorily use them either. I have a 16-inch late 2019 MacBook Pro for work, and while SwiftUI can work on this, there are times that it even has issues with SwiftUI Previews.
That is not the case on the M1 Mac mini. I am able to use SwiftUI Previews without any issues, including the near real-time recompiling of my app. Changes that I make are reflected in the previews, and that is previews plural. With SwiftUI Previews you are able to have multiple devices show in the preview canvas simultaneously. This can allow you to easily see how an app will look at various screen sizes.
Each of these previews is its own simulator. Any simulator requires some memory, and if you have a large number of SwiftUI previews, even for a single SwiftUI View, they can use significant amounts of memory. This can be problematic in some situations. On the topic of memory, let us look at that next.
Memory Usage
Throughout most of the time I spent working on my app on the M1 Mac mini I did not experience that many issues. However, it seems as though Xcode will use as much memory as it can. At one point I started running into some performance issues and realized that Xcode was using 10.2 GB of memory, the LLVM process was using nearly 3GB of memory on its own. The amount of swap being used was 6.3GB.
This resulted in the Mac mini needing to use some swap, which I never experienced on my iMac. The reason for this is because my iMac has 24GB of memory in it The 8GB that came with it, and the 16GB of memory that I added after the fact. The 2017 iMac still has an access door for being able to add memory.
As you might expect, once I quit Xcode and waited for all of the processes to close and then restarted Xcode, I was back to having my regular performance. I guess that proves that sometimes it is best to just quit the app and restart it. However, the 8GB of memory does seem to be a bit of a bottle neck. This is most noticeable if I am working on SwiftUI Previews while also having simulators running at the same time.
Just as is the case with a tradition architecture, if the memory that is being used is full, anything not being used is swapped to the SSD. The speed of the SSD is fast enough where you will not likely notice the memory being swapped. However, as I experienced, there is a limit. Even though the memory swapped very fast, and I did not even notice it being done, it can have a slight performance impact.
One of the benefits to the M1 Macs is that users can run iOS apps natively, provided a developer opts in. Now, as a developer this has a benefit for you as well. You are able to test your iOS apps natively, including all of the features that are supported, such as handoff. This means that if you have an M1 Mac and an iPhone, you are able to do full handoff testing to verify that everything will work as expected without needing to have multiple iOS devices. Granted, this is provided that you are not offering a native macOS app, but only offering your iOS app for use on the M1 Macs.
Even though the M1 Mac improves your experience with macOS, and development using some of Apple's most intensive development tools, it has not been entirely smooth sailing. So let us dive into some of the issues that I have experienced.
Problems
As much as we would like it to be the case, nothing is perfect. To quote John Siracusa, "Nothing is so perfect that it can't be complained about." I have actually experienced a few different issues with the M1 Mac mini. The first of these, and the most annoying as well as most prevalent, is with an item I use all the time, the Magic Mouse.
Magic Mouse
I use a Magic Mouse 2, and a Magic Keyboard, with my Mac mini. I did not buy these new when I got ordered the Mac mini. The whole idea of the Mac mini is to be able to use your existing Keyboard, Video, and Mouse, which is what I did. Most of the time these just work, however, the Magic Mouse seems to randomly disconnect. This happens right in the middle of me using it. Sometimes I am pasting text and other times I am simply scrolling. There is no rhyme or reason as to why it happens that I have been able to ascertain, yet.
Once the mouse disconnects, it will reconnect, then immediately disconnect again, and then reconnect again. Again, this is not consistent. There are times when the disconnect and reconnect only occurs once, sometimes it is twice, and yet on a few occasions it has been three times. Sometimes, the mouse will work after it reconnects, but sometimes it does not. I have tried manually disconnecting and then reconnect the mouse, and it will work again for a while. This could be a half hour, an hour, or even longer, but it will inevitably happen again.
At first, I thought it could be an issue with macOS Big Sur 11.0.1. It was the first release of macOS Big Sur after the M1 Mac launched. While using the Mac mini macOS Big Sur 11.1 was released. I, of course, updated to this version. I updated not just because of this issue, but because I prefer to stay on the latest version of macOS. After installing the update, the issue continues. So that did not fix it.
The next thing I tried was a different Magic Mouse, a first generation one, that requires batteries and is not rechargeable with a lightning cable. Unfortunately, this did not fix the issue either. While it seemed that the issue happened less often with the first generation Magic Mouse, it did still happen. The issue is transient and does not happen consistently enough for me to be able to identify a pattern. I will continue to see if I can identify what is causing the issue. I have not experienced any issues with the Magic Keyboard disconnected, that I know of, so I think the issue may be isolated to the Magic Mouse.
I am beginning to suspect that the issue is entirely related to Xcode. I have used the mouse quite extensively while browsing the web and other tasks on the Mac mini and they did not happen when I was doing that, so it seems like it might be an Xcode-specific bug. This is still problematic because I am intending to use the Mac mini as a development machine, so Xcode is pretty important.
The issue with the Magic Mouse has not been the only issue I have experienced. I have encountered some issues while doing development.
Problems with Development
The second issue is one that I have only experienced twice, and may only be due to the 8GB of memory on the machine. I was working on my app and I came across an error, while using Xcode, that states:
The current system settings are not sufficient to allow booting additional simulators: maxFiles: 1288, openFiles: 1163, enforcedFilesBuffer: 1868. Please see Simulator help for information on adjusting resource limits.
I have never seen this error before, or anything even like it. Even with my usual build and run cycle on my iMac I have never come across this, or anything similar. Now, when I saw this error I was a bit confused because I was not trying to actually boot a simulator. I was actually in the middle of coding and just trying to build the app. I am sure that the reason that I got this error was because I have been using SwiftUI Previews. SwiftUI Previews can have multiple previews and each preview can rebuild the current view in an incremental manner. This results in quick builds and I suspect that there were just too many preview windows that ended up using up the available resources.
Furthermore, I am thinking that the fact that I only have 8 GB of memory in the Mac mini is part of the cause. It could be that I have not experienced this on my iMac because it has 24GB of memory, therefore it has enough resources to handle this. Additionally, as mentioned earlier, SwiftUI Previews has never worked properly on my iMac. Therefore, it could be a combination of me not using and it not working properly on my iMac as the reason I have never experienced this.
The fix was quite simple and an easy one. I simply closed Xcode and made sure the simulator, and all of its associated processes were closed. After restarting Xcode, I was back in business. I have not experienced this issue again, but who is to say that I will not again in the future.
LSBundleWrapper
I did get another issue, one that is not related to memory, but what seems like a compiler bug. This is the error I received:
Please try again later. Failed to finalize LSBundleWrapper mutator instance for [bundle identifier]
One of the things that you can do with an M1 Mac is run iOS apps. In addition to this, you can run your iPad app right on your M1 Mac. In order to do this, you select the build target of "“My Mac (Designed for iPad)”" in Xcode. Each time you successfully run a build using this target, your iOS is wrapped in a bundle and copied to your debug folder. As is the case with other apps, if there is already an existing app with the same name the app is incremented. For instance, for my app wwriteLite, the first build would be "wwriteLite", the next would be "wwriteLite 2", the third "wwriteLite 3", etc.
At first, I thought that I ran into the issue because the Mac mini has a limit on the number of builds allowed in the directory, but I do not think that is the case. I attempted to replicate the issue by purposely building and running, but I could not replicate the issue.
When this happened, I tried the first step in any troubleshooting, I tried quitting Xcode and re-opening it, but that did not fix the issue. I then decided to google the issue. The only result that I could find indicated that you needed to enable Mac Catalyst, build the app, and then disable it. To me, this does not seem like an appropriate solution because I was not building a Mac Catalyst app, and I did not want to deal with any possible problems that might arise from doing that.
At this point I opted to do the equivalent of nuke and pave for development: Clean the build folder and build the app again. Guess what, this fixed the issue. So, if you run into issues sometimes just doing a clean build folder and rebuilding the app fixes it. It the development equivalent of “quit and relaunch”.
There is yet another last issue I ran into, and this was also related to compiling.
Compiling Issue/Resource Utilization issue
A few times while I was compiling my app, I have had the entire system just stop responding. The mouse was able to move but that was it. Ironic, I know that the mouse, which has been causing other issues would continue to work, but I could not click on anything, I could not hit command-tab to switch to another app, nor could I bring up any windows. When this did happen, I let it sit and it would eventually catch up. Of course any actions that I had performed would replay. Obviously something locked up the system, but I am not sure what it was.
Read Only File System?
The last weird error that I have encountered while using the M1 Mac mini is an error that stated:
You can't save the file 'About.swift' because the volume "Macintosh HD" is read only.
Now, when I got this message I was definitely confused, because I had been using the system, and therefore it the volume that the app is on is definitely "read only". I do not use iCloud Document and Desktop syncing for my development iCloud account, because I do not need the feature since I do not have more than one machine dedicated for development. Even if I did, all of my code is source controlled, so I can just pull from source control.
As has been the case with many of the issues, quitting Xcode and restarting it fixed the issue. I have not experienced the same issue again. It is possible that I happen to try and save the file when the file system was taking a local Time Machine snapshot, but if so, then that was some really good timing on my part.
Closing Thoughts
The M1 Mac mini is fast, even in its base configuration. The M1 Mac Mini is speedy with everything it does, from just interacting with Finder, to building the incremental SwiftUI previews, and even building an app from start to finish.
If you are a developer, I recommend getting an Apple Silicon Mac as your next development Mac. This is particularly true if you plan on supporting your iOS to run on the M1 Macs, but a necessity if you have a native Mac app. If you do need one, you do not need to break the bank to get a great machine. However, you may want to wait for larger memory configurations.
The speed of the Mac mini alone is worth it. This is particularly true if you use SwiftUI and utilize SwiftUI Previews. The Mac mini is able to render these in near-real time is quite nice. Furthermore, the speed of the Mac mini allows you to be more productive. The fact that the system can compile builds, and incremental builds, so quickly means that you will spend less time waiting for the system and more time actually developing.
One thing I would recommend would be to get at least 16GB of RAM. At the time of this writing, the maximum you can get is 16GB, and I would definitely recommend it. I am sure that some of the issues that I have experienced have been due the fact that the Mac mini I purchased only has 8 GB of memory and not 16GB. In some ways, I regret not ordering a machine with 16GB of RAM, and time will tell if this was ultimately the wrong decision.
On a similar note, since I am only using the Mac mini as a development machine, the 256GB of storage should be sufficient, but I will not really know until I have used the machine for a bit longer. The reason that I say this is because half of the space is already used up, and I do not have a lot on the device. I have Apple’s built-in apps, Xcode, BBEdit, and a couple of other small applications. I do not have much else on the machine. As any developer knows, Xcode and its associated files do take up a lot of space. I wish Apple would have some sort Xcode cleanup utility, or have ways of cleaning up some of the excess Xcode files.
While I think 256GB should be enough for this device, for my needs. If this was my main machine, it would definitely not be enough storage space. So, take that into consideration if you do decide to purchase an M1 Mac. Even thought I have experienced some issues, I can still recommend getting an M1 Mac, even if you are not a developer.
I am not the first one to say this, but it does need to be said, these are the SLOWEST Apple Silicon Macs we will ever see, and these are already super fast. I do not expect to see the same type of speed increases in the future, but this is a great baseline to compare to with future M1 Macs. These machines absolutely blow away all Intel machines, and even most of Apple’s other Apple Silicon-based devices, like in the iPad and iPhone.
Ultimately, I may end up getting a different Apple Silicon-based Mac in the not too distant future, depending on what Apple releases. Even if I do end up buying another Apple Silicon Mac and using that for development instead, the current Mac mini can be used for a number of different things, like a server. If used as a server, the limitations of the smaller internal storage and 8GB of memory would not necessarily be limiting factors in that, since storage can be external, and while possible, it is hard to see 8GB of memory not being enough, for a server.
Here is one last thing to keep in mind. Even if you are not planning on getting a Mac mini, because you would prefer a laptop, everything I have written also applies to those machines as well. This is because all of the M1 Macs are using the same processor. Therefore, regardless of M1 Mac that you get, you should see significant improvements. Furthermore, even if you are not a developer and just need a new Mac, I recommend getting an M1 Mac, it should be able to serve your needs for many years to come. Now, if Apple would only release a standalone 5K monitor, but again, that is a whole other story.
If you were to ask anybody if they play games, you will very likely get an affirmative answer. Everybody has played at least one game in their lives. It may not be a video game, but it is a game of some sort. Gamers are simultaneously the same and unique. We are all the same because we have all had triumphs and heartbreaks, while playing a game. We have all felt the anticipation of a new game, and the let down when a game did not live up to our expectations. We have all been frustrated and elated all while playing games.
Even though we have all felt those experiences, none of us have had the exact same overall experiences when it comes to games. We all have different favorite types of games, games we have played, and even when, where, and what games we had access to and played.
I have played games on a range of devices and consoles. Over my life I have played games on a wide variety of devices, ranging from the Apple II/e to the Xbox Series X. The entire list includes:
Nintendo Entertainment System (NES)
Sega Genesis
Sega Game Gear
Nintendo 64
Sony Playstation 2
Microsoft Xbox
Nintendo Game Cube
Nintendo Wii
Microsoft Xbox 360
Sony Playstation 3
Xbox One
Sony Playstation 4
Nintendo Switch
Xbox Series X
I have also played games on Microsoft DOS, Microsoft Windows 95, 98, 2000, XP, and even on the Mac, iPhone and iPad. The games that I remember most will always be ones that I enjoy playing. These games are ones that I have undoubtedly purchased multiple times. Some of these include Super Mario Bros 1, 2, and 3, Sonic the Hedgehog 1, 2, and Sonic & Knuckles, Wolfenstein 3D, Doom, Quake, the entire Half-Life series, Duke Nukem 3D, and a bunch of other games.
I have purchased a new iPhone each year since its original introduction in 2007. Having purchased a new iPhone each year, I have been able to figure out what areas I need to cover in each review that I post about the phones.
Having owned an iPhone for so long I have played a bunch of games on the iPhone, as well as the iPad. While I do not play that many new games on the iPhone, there are four games that I play almost daily. Given that I spend so much time with my iPhone, you would think I would spend more time playing games on there, but I do not. For the last seven years worth of iPhones, I written a review.
Even though I have played many games, across the various consoles, I have never actually written a review of a gaming console, as far as I can tell. So, this is somewhat of a first for me. I have written about the Xbox One and Playstation 4 in two separate e-books, but never a full review.. But I will give it a go. With that, let us dive into various aspects and my thoughts on the latest Microsoft console, the Xbox Series X, starting with a bit of history of gaming.
Brief History of Gaming
When you look at the tech industry in general, you will see a new phone being released at least every month, sometimes even every week, and that is just from a single manufacturer. There are some manufacturers, like Apple, who release their new phones only once a year. There is one industry that makes even Apple look like speed demons when it comes to releasing new products. There are some types of devices that do not get new releases every year, or even every few years. One type of device that meets this definition is. gaming console.
When new phones are released, they are typically generally incremental changes from the previous versions. That is not to say that they do not make leaps from time to time, they certainly do, but they are just not nearly as significant of shifts.
The same cannot be said for gaming consoles. Typically, console manufacturers tend to release new console generations every five to seven years. The primary reason for such a long time span between console generations is due to development times. One of the factors that contribute to the time is that the entire platform may change. This has happened more than once in recent history. Another factor is that console manufacturers must get game developers on board and developing for the new system in order to have titles available at the launch of the new console.
While console manufacturers release new console generations in longer spans, there are typically incremental versions of the console that are released at some point between the generations. Typically, these incremental versions include additional storage, smaller designs, and other internal refinements. Some of the recent incremental consoles include the Xbox One S, the Xbox One X, the Sony Playstation 4 slim, and the Playstation 4 Pro. The question becomes, what defines a “console generation”?
Console Generations
Depending on whom you ask, a console generation can be defined in a number of different ways. However, there has been some consensus of what each console generation is. The early console generations were marked by significant advances and included things like hardware changes. For instance, in the first five generations we go from the original Pong machine, all the way to the Sony Playstation 1. These generations include going from 4-bit consoles, to 8-bit to 16-bit, or 32-bit to 64-bit consoles. This also includes going from 2D graphics to 3D animated graphics. The first five console generations spanned from 1972 to 1999, while the sixth to 9th generations span from 2000 to now.
Each console generation has its own iconic consoles, below are the big names for each generation.
1st Generation
Original Pong
2nd Generation
Atari 2600
Intellivision
ColecoVision
3rd Generation
Nintendo Entertainment System (NES)
Commodore 64 Gaming System
Sega Master System
4th Generation
TurboGrafx-16
Sega Genesis
Super Nintendo Entertainment System (SNES)
5th Generation
Sega Saturn
Nintendo 64
Sony Playstation 1
6th Generation
Microsoft Xbox
Nintendo GameCube
Sega Dreamcast
Sony Playstation 2
7th Generation
Microsoft Xbox 360
Nintendo Wii
Sony Playstation 3
8th Generation
Microsoft Xbox One
Nintendo Switch
Nintendo Wii U
Sony Playstation 4
9th Generation (Current)
Microsoft Xbox Series X|S
Sony Playstation 5
As time has gone on, the number of distinct consoles being manufactured has been dropping to only a few manufacturers. The first generation saw 888 different consoles, whereas the last four generations have only had three or four consoles being released.
The reason for such a precipitous drop is that a change happened with the second console generation. Instead of having a device being dedicated to a single game, the consoles become platforms with the ability to play multiple games. A significant number of consoles utilized cartridges. These hard plastic cartridges were durable and allowed you to use swap them out easily.
Stating with fifth generation, games began switching from cartridges to using CDs, or DVDs for their games. The reason for this was storage density and the need to be able to store more information than a standard cartridge could hold.
Another shift happened with the seventh generation of consoles. That change was the ability to download games to your console and not need a physical item to be able to play your game. This had the advantage of allowing you to re-download your games again, as well as allowing updates to games.
Nintendo has typically done its own thing, and continues to do so by going back to using cartridges for their Nintendo Switch system. There are two reasons for this shift. The first is that the Switch is meant to be portable, so having a spinning drive is not possible. Secondly, the storage space available on cartridges has increased to the point where they can put games on cartridges. The Nintendo Switch does support digital downloads, so you do not need to use a cartridge, but you can if you would like.
As you can see there have been three major manufacturers, Microsoft, Nintendo, and Sony, for the lsat three generations. Each of these manufacturers have their own line of consoles. It is possible that another console manufacturer will enter into the market, however, it does not seem likely.
As mentioned above, gaming consoles are not released every year, there are typically refinements released at about half-way through a console generation’s lifetime. This has been true with the release of smaller versions of each of the most recent consoles. When there is a revision released, it is typically smaller, or in the case of Nintendo, a bit more powerful, or a different form factor.
When it comes to console gaming, I primarily play games on the Xbox. I do have a Playstation 4 and a Nintendo Switch, so I can play games on those as well. I typically only play console-exclusive games on those devices.
Because I primarily game on the Xbox, I was excited to hear that Microsoft was releasing a new console this holiday season. Unlike so many others, I was able to get a console for launch day, although I did have some trouble. You can read about the problems I had here.
Now, that we have covered some history, let us get to the review of the Xbox Series X by starting with the unboxing.
Unboxing
There are a slew of different unboxing videos of the Xbox Series X available. Like this one from What’s Good Games, but here are some pictures of the unboxing of my Xbox Series X.
I have watched a few different unboxing videos, so I knew what to expect. When you open the The Xbox Series X packaging, you are presented with the Xbox console right up front. It is nicely wrapped in a soft wrap to protect the console.
Behind the console is a box that contains the power cord, an HDMI cable, and the included controller. In order to setup the console you need to take it out of the box. The Xbox Series X console is HEAVY, at 9.8 pounds or 4.45 kilograms.. The console is not unwieldy, but it is dense and would be problematic to cart around. So, it is a good thing that it is designed to be stationary. This compares to the Xbox One, which was 7.7 pounds, or 3.5 kilograms. Therefore, this newer console is 27% heavier than the original Xbox One.
The Xbox Series X has a number of ports on the back of the console. The ports include:
Two USB 3.1 gen 1 ports, using the USB-A style connector.
One gigabit ethernet port
One power cord plug
One HDMI out
One dedicated proprietary storage expansion port.
One Kensington lock port
The layout of the ports for the Xbox Series X are pretty good. Each port has its own shape, so they are easily identifiable by sight. There is a nice touch that many users may not need, but it can be vital for a certain segment of the population. There are unique bumps beneath each of the ports. This is designed for those who may have visual issues and need to identify a port by touch.
The USB ports have 3 single dots on them. The ethernet port has two dots, the power port has a single dot, the HDMI out port has a long bar, and the storage expansion port has four dots beneath it. These will allow you to easily identify the ports should you need to be able to identify the ports without looking at them.
As mentioned above, the Xbox Series X includes a gigabit Ethernet port. While some will end up using this port, many will likely use the wireless connection instead. The included wireless is dual-band the 802.11ac. This means that it can support 802.11b,g,n,a, and AC, at 2.4GHz and 5GHz frequencies. This all sounds like a bunch of mumbo jumbo, and unless you are steeped in wireless connectivity it may not mean much. To make things easier the Wi-Fi working group has retroactively re-named some of these using straight numbers. The Xbox Series X supports Wifi 5, 4, 3, 2, and 1. It does not support Wifi 6, which would be 802.11ax. Even though it does not support the latest wireless connectivity, 802.11ac should be sufficient for most everyone.
All of these ports are on the back, now let us flip it around and look at the front. There is one port on the front as well, another USB 3.1 gen 1 port that uses the USB-A style plug. There are three buttons on the front of the Xbox. There is the disc eject button to remove physical discs. Close to the disc eject button is the Power button. In the opposite corner from the power button is the controller synchronization button.
Outside of the console, you also receive the power cable, a controller (more on that in a bit), and an HDMI 2.1 cable. This cable is a “Ultra High-Speed” cable because it needs to be able to deliver all of the data to your TV, again more on some of the new technology in a bit. Now that we have covered what is in the box, let us look at the internals for the design of the Xbox Series X.
Design
The Xbox Series X console is a rectangular device, that is 5.94 inches wide by 5.94 inches deep, by 11.85 inches high. When consoles are released there are generally designed to lay flat. Technically, the previous Xbox consoles, except for the original Xbox, can be placed on their side, but it is likely that many use it while laying flat.
The Xbox Series X is designed to be used in either orientation. I typically use my Xboxes with the disc drive being horizontal, where the top of the disc will be towards the top of the console. This is because it makes it much easier for me to know which way the disc is supposed to be inserted. I still buy most of my games in physical format, because I can do what I would like with the physical disc afterwards. That is not to say that I have not purchased digital games, I have, but I just prefer to get the physical games.
Modern gaming consoles are very much like PCs, and contain many of the same type of components. What separates gaming consoles from standard PCs is that gaming console hardware is typically static and highly customized, meaning that they do not typically use off the shelf components.
The Xbox Series X is designed to have the air flow through the core of the console. In order to facilitate this, on the bottom of the console there is a foot that will allow the console to sit slightly above the surface it is placed on. This foot is on the console in order to allow enough to flow over the internals. In order to get enough airflow and to keep the console cool enough, some of the internals have been specifically designed. The biggest example of this is the motherboard.
The motherboard of the Xbox Series X is actually a unique design with two individual boards. One of the boards has the processor, graphics, and memory on it. The second board has all of the input and output, like the wireless, USB ports, HDMI port, and disc drive. The two boards are attach to a metal chassis, which lines up the boards and allows them to interconnect so everything works well together.
This is very reminiscent of the 2013 Mac Pro, in that it has a unique layout, and the design of the Mac Pro had air flow over the internal core. One of the issues with the 2013 Mac Pro was that it was very limited in terms of thermals, which limited its upgradeability. Luckily, that is not likely to be a problem with the Xbox Series X, because it is not designed to be upgradeable in anyway, and typically game console generations do not change significantly, except in their size.
On the motherboards you will find an 8-core 3.8GHz custom processor and a GPU that is capable of running at 12 teraflops, or 12 trillion operations per second. To complement this is 16GB of system memory. This memory has two different speeds, there is ten gigabytes of memory that runs at 560 gigabits per second, and six gigabytes of memory that runs at 336 gigabits per second. The reason that there are two different types of memory is for throughput. Some tasks need to be able to read and write memory as fast as possible, so it would use the ten gigabyte block of memory. Whereas memory that does not necessarily need to be that fast can use the six gigabyte block of memory.
The types of items that may be stored in memory are loaded from the permanent storage, or non-volatile memory. The Xbox Series X has 1 terabyte of custom storage. This uses the Non-Volatile Memory Express, or NVME, protocol. This protocol is designed to connect directly to the CPU. This connection means that the CPU will be able to access the memory faster than going through traditional buses. This should provide faster speeds.
While the Xbox Series X comes with 1 terabyte by default, you can expand the storage in two ways, using the dedicated expansion port, or USB 3.1. Each option has its own trade-offs.
If you use the dedicated expansion port, you will have to get the custom Seagate Storage Expansion Card. Using this expansion card allows you to use the storage just as if it were internal storage. This would increase your overall storage to 2 terabytes. The downside to this is that it is not cheap. As of this writing, the expansion card has a retail price of $219.99, but it does match the internal storage exactly.
If you opt to go with the USB 3.1 external drive route, you can get much larger storage sizes, upwards of 8 terabytes. While these are typically cheaper, particular for a 1, 2, or 4 terabyte drive, you are not able to use these type of drives for playing games directly off of. Instead, you would need to copy the games from this drive to the internal storage. While this would be significantly faster than re-downloading a game from the xbox servers, or re-installing from disc and then updating the game, it will still take some time. Furthermore, it will take some manual management of your games.
All of these internals support the whole reason you are using the Xbox, to play games. In order to be able to see what you are doing, you need to have some graphics. The Xbox Series X can output games at true 4K, meaning a resolution of 3840 pixels wide x 2160 pixels tall, provided you have a 4K television. The Xbox Series X is capable of handling high-dynamic range, or HDR, content.
HDR is a technology that allows more vibrant colors. For instance, lighter colors will be brighter, while darker colors will be richer. This can add more contrast to a game and can enhance your overall game play. If you have a capable television, or monitor, you can even play games at 120 frames per second. This would allow the game play to be even smoother than playing at 60 frames per second.
There are a few different types of HDR standards. These include HDR10, HDR10+, HLG, Dolby Vision, and Advanced HDR. The Xbox Series X supports HDR10, HDR10+, and Dolby Vision. These are the most common types, so it is good to have these supported.
While not all monitors can display content at every refresh rate, described using frames per second, or fps, many monitors can support multiple refresh rates. The Xbox Series X can handle the following refresh rates, 24 frames per second, 30 fps, 60 fps, and 120 fps. The various refresh rates can be used within a single game, depending on the content. For instance, if there is a video cut scene that plays at 24fps, while most of the remaining gameplay is 60fps, the Xbox Series X can seamlessly switch between the two modes, and if your monitor supports it, can adjust on the fly without you ever noticing.
While video is probably the most important aspect of any media on the Xbox Series X, sound can be just as important in some contexts. The Xbox Series X is capable of handling Dolby Digital 5.1 sound, DTS 5.1, Dolby True HD with Atmos, up to 7.1. This is all provided that you have the proper sound setup in order to support the sound.
With all of this technology in such a dense package, it is time to actually get to to playing some games, so now that the technology has been covered, let us move onto to actually setting up the Xbox Series X.
Setup
When I first turned on the Xbox, as you might expect, there was a day one firmware update. This patch was only about 800 megabytes, so not terribly large, particularly as compared to some day 1 game updates. Yes, I am looking at you Call of Duty and your 135GB of downloads, but that is a different story. This was actually smaller than I had expected, but I did expect an update to be needed. Just about every modern devices will need to be updated as soon as they are plugged in and powered on, it is just the modern way of technology.
It has been quite a long time since I had to set up an Xbox. There are a few different ways to setup an Xbox console. The first is to use the on screen guide, which will walk you through step by step. The second option is to use the Xbox app to help set up your Xbox. I opted to use the Xbox app on my phone. The reason I opted for this was because I have a complicated password for my xbox account and trying to enter this via the controller would be a pain to do. Combine this with two factor authentication and it would probably take 10 minutes to get past the login screen.
When you setup and Xbox, you have an option to transfer the settings from an existing Xbox, or to set up the Xbox as a new console. I opted to transfer my settings. This took a lot less time that I expected. The amount of time was short because the transfer was only for the settings and account information. It did not transfer game data, like I had initially thought. Of course, this was my own ignorance.
The Xbox app will walk you through all of the steps needed. This includes updating the console, selecting power options (energy saving or instant on), setting up automatic updates, enabling remote features, naming the console, and then finally copying the settings from another Xbox.
There was one last thing that happened after I finished the setup. My Xbox Series X controller needed to be updated. Which is not a new thing, since my previous Xbox controllers needed updates from time to time, but I was a bit surprised to see that was immediately after finishing setup.
There was one last thing that happened after I finished the setup. My Xbox Series X controller needed to be updated. Which is not a new thing, since my previous Xbox controllers needed updates from time to time, but I was a bit surprised to see that was immediately after finishing setup.
After the setup comes installing games onto the console. Let us move to that for a bit.
Installing Games
After you have setup an xbox, you do have the option of transferring over game data after the fact. This is done via the settings. After I had finished my setup I contemplated transferring over the game installation data. However, I opted to not do this because there is a new feature for this generation of Xbox consoles.
The Xbox Series X, as well as its cousin the Xbox Series S, have a feature called “Smart Delivery”. Smart Delivery will only download the assets that are necessary for that console. Let us say for instance that you have an Xbox Series S. The maximum resolution for the console is 1440p. This means that you will not need the full 4K resolution images. Similarly, if you have an Xbox Series X, you will not need to download the 1440p assets. This means that you should be able to save some space on your console. If you have an Xbox Series S, you will save more space than the Xbox Series X, but both consoles should save some space.
Since I was going from a non 4K gaming device, the Xbox One S, to a 4K one, the Xbox Series X, I opted to get the optimized versions of the game data delivered so that I could experience the games I chose to install in their full 4K resolution.
There are two downsides to this technology. The first is that the game developer has to support this technology. I honestly do not know what it takes to support Smart Delivery. It might be as simple as tagging different assets for which console or indicating its maximum size. If a game supports Smart delivery it should indicate “Smart Delivery” on the game’s information on the Xbox console or xbox.com. Similarly, if you purchase a physical game, it will have the wording “Series X” on the front cover of the case.
The second downside is that it will take time to download the optimized version. Game assets that use 4K will take up more storage space, so they will take longer to download, even if they are compressed. This is due to having significantly more resolution, and therefore being of larger size, than standard 1080p or 1440p assets.
On the topic of software, let us move onto the Xbox dashboard software.
Xbox Dashboard
One of the benefits of software is that you can update, change, and adapt software over time. The software that is used to handle the non-gaming interface of the Xbox is the Xbox dashboard software. If you upgraded from an Xbox One to the Xbox Series X you should notice absolutely no difference between the dashboard of the two consoles.
Where you would notice some differences is with the capabilities of the console. There are a couple of new options for the Xbox Series X that were not in the Xbox One S, which is what I upgraded from. These include some HDR options, which are outlined above, and another new feature supported by the Xbox Series X.
Game Play
My old Xbox was an Xbox One S. I got this from my brother after he upgraded to a different Xbox One model. The Xbox One S had a 500GB spinning hard drive that ran at 5400RPM. The fact that it was a 5400 RPM hard drive did mean that things were going to take a bit longer, but should be sufficient for game play. The Xbox One S does support 4K Blu-Ray playback, but not 4K gaming. Even the Xbox One S was an upgrade from the original Xbox One that I purchased back in 2013, because that did not include any 4K capabilities at all.
The first thing I noticed with the Xbox Series X is how fast games load. This was most notable when comparing the load times on Watch Dogs: Legion. On the Xbox One S I could get up, go and grab something to drink and come back and still not have the game be loaded. With the Xbox Series X it would take approximately 15 seconds to load, which was a significant improvement.
There are two factors that allow this. The first is that there is an SSD on the Xbox Series X, and the second is the NVME storage, given that it is significantly faster than a spinning hard drive. Solid State drives, by their nature, are faster than any spinning hard drive. This is because solid state drives can read random parts of the drive, where as a spinning hard drive must seek out a specific spot and may need to make a few revolutions before finding the particular sector.
Now, let us switch to a whole new feature for the Xbox Series X, one that will make aspects of game play a bit richer. That feature is called Ray Tracing.
Ray Tracing
Ray Tracing is a newer technique that allows more accurate shadows and lighting around objects. Say for instance you have a. Desk with a light shining on it. In the past it would take a lot to render the exact lighting that would move while a character moves. You would not always be able to take into account how a player would move. Therefore, you would be more likely to render consistent lighting, so that you could have a predictable result.
However, with todays technology this information can be computed and rendered in near-real time. This technique will allow for even better game play experiences. Here are two examples from Microsoft’s game, Minecraft. The first one does not have Ray Tracing enabled, while the second one does hav Ray Tracing enabled.
Not every game supports Ray Tracing, but for the ones that do, there may be an option to turn off Ray Tracing within the settings of the game. This is the case for Call of Duty Black Ops: Cold War. Since Ray Tracing is still new to the Xbox, it may not be optimized and may have issues. If you do experience any, it might be best to turn it off until the issues can be rectified. I have not experienced any issues specifically related to Ray Tracing, that I know of, but that is not to say that there have not been any.
Now that we have finished with the game play, let us switch to how you play games, using the controller.
Xbox Series X Controller
The way that you control a game depends on the platform. For desktops and laptops, you may be able to use a keyboard, mouse, joystick, or another input device. Remember the old ThrustMaster racing wheels? There are some consoles, like the Nintendo Wii and Nintendo Switch that have their own unique controllers, like the Wii Remotes, and the Joycons on the Nintendo Switch. Even though the Switch and Wii have their own unique controllers, there is another controller available, the Pro controller, which has a controller that is more akin to traditional console controllers.
Some gamers are not able to use traditional controllers and instead need to be able to adapt a controller to their needs. For these gamers, there is the Microsoft Adaptive Controller. While it is not covered in this review, it is available for those gamers who need it.
If you were to just make a quick glance between an Xbox One controller and the Xbox Series X controller you might not think there is any difference between the two. However, there are some differences, but they are subtle.
All Xbox controllers, excluding the Xbox Adaptive Controller, have a number of items on the front of the controller. These items are:
Two joysticks, one on the upper left, and one on the right side towards the bottom.
A directional pad on the left button side.
Four buttons in a diamond pattern, from top going clockwise you have Y, B, A, and X.
An options button on the left.
A start button on the right..
In the middle at the top is the controller power button.
The buttons and joysticks on the front are not the only buttons. There are some along the back as well. These are:
Two bumper buttons on the shoulders of the controller, one on the left and one on the right.
Two trigger buttons on the back, again one on the left and one on the right.
A power port between the bumpers.
A pairing button to the left of the power port.
There is one last port on the bottom of the controller, an accessory port. This is used to connect additional items like headsets. The Xbox Series X controller also has one additional button, that is in between the options and start buttons, and that is a dedicated share button.
The function of the Share Button can be customized through the Settings on the Xbox Dashboard. You have a few different options. This can be “Record what happened”, “Take Screenshot” or “Start/Stop recording’. Now, the “Record What Happened” option depends on your default capture settings. For 4K game captures you can capture the last 30 seconds, for 1080p, it is 1 to 2 minute, 720p is up to 3 minutes. The screenshots will be in 4K. The option for "Start/Stop Recording" will begin a record when you press it, and then stop the recording. This allows for a more customized length of video, which can save time in editing later. Even if that editing is just trimming the beginning and the end, it is still time saved.
Besides the power port, the directional pad has changed. The directional pad on the Xbox One controller is designed to allow you to more easily hit the up, right, down, and left arrows. These sit at 90 degree angles to each other. The modification with the Xbox Series X controller is that it is much easier to hit the diagonals, or 45 degrees from the standard directional buttons. This configuration can provide for more control during a game, particularly puzzle games or any other game where exact controllers or small adjustments in those specific directions are needed. This is not the first controller to have this type of configuration. The Xbox Elite Controllers have had this type of directional pad.
Having these additional directional options make playing some type of games a bit better and can make some actions a lot easier. Along with the directional pad there are some other changes, most notably to the back of the controller. This change can also allow for a better overall experience.
Increased Grip
The original Xbox One controller took the shape of the Xbox 360 controller and refined it. One of the aspects of the original Xbox One controller was that the area where you wrap your fingers around the back were smooth. While this felt nice, and provided a uniform feel across the entire controller, it could be a bit problematic.
Imagine if you will, you are heavy into a gaming session, fighting the last boss of a game, you are low on health and barely surviving. Or maybe you are in a multiplayer match, and you are on a hot streak, going 10 and 0, and you need to keep going, or maybe you are playing a Dance Dance Revolution game and you are hitting every single beat perfectly. Because everything is a bit stressful your palms begin to sweat and with the controller being smooth it may be a bit difficult to hold onto the controller and you may end up dying or failing to hit that button at right the right moment.
Microsoft took the feedback about this and with the Xbox One S controllers, as well as the Xbox Elite Controllers, and added some gripping material to the back of the controllers. This would help during those intense gaming sessions and would allow air to flow through the bumps on the controller.
The Xbox Series X controller take this a bit further and adds just a bit more grip material. When I compare the Xbox One S controller and the new Xbox Series X controller, the Xbox Series X controller does seem to have additional grip material on it. I will concede that it is possible that the grip material on the Xbox One S controller has been worn away over time and it might have the same amount of grip material when it was new. Regardless, it does have more grip material than the original Xbox One controller, which did not have any grip material at all.
There is one last item to discuss about the controller itself, and that is the port on the controller.
USB-C
It is likely that many players use their Xbox controllers wirelessly, but that is not the only method. You can also used them wired to your Xbox as well. If you use rechargeable batteries, or the charge kit, you will need to plug in your controller from time to time. The primary purpose of these ports is to allow the controllers to be connected via a cable.
The Xbox series of consoles have all had Universal Service Bus, or USB, ports included in them. USB is designed to allow a standard physical interface between devices. At this point USB is considered an "old" technology. It is not outdated, but it has been around a long time. USB was finalized in 1996, with the first devices coming out later in the same year. USB really is universal. While it is being replaced by new ports, it is still in use today on a large number of products, including newly introduced ones.
The original Xbox had a proprietary USB connection that was used for the controllers. Since the Xbox 360, the Xbox consoles have all had standard USB ports, available to the end user. These have been USB-A ports.
The Xbox Series X continues to have USB-A ports on the console. There are two ports on the back of the console and one on the front. However, what has not remained the same is the type of connection on the controller. The Xbox 360 had a proprietary connector that would allow even a wireless controller to connect to the Xbox 360, and would charge the controller if you had rechargeable batteries in the controller.
While the ports are used primarily used to connect controllers, there have been some other accessories that have also used USB ports. This includes the Kinect, controllers like guitars and drums for rhythm games, and hard drives for storage. These are just a few of the many other accessories that have been available over the years.
With the introduction of the Xbox One in 2013, the port included on the controllers was a standard one, a Micro-USB port. Unlike other systems, these ports are standards compliant. Changing to a standard port would allow gamers to purchase any USB-A to Micro-USB cable to be able to connect their controller to their console. One of the downsides of the Micro-USB port is that you need to plug in the cable in a specific direction.
With the Xbox Series X, the port has changed again, but only on the controller. It is no longer Micro USB port as it was on previous controllers, but has been replaced. With a USB-C port. The fact that it is a USB-C connection is actually a good thing, for a couple of reasons. First, you longer need to worry about plugging in the power cable incorrectly. This is because USB-C is designed to be reversible. Secondly, USB-C is quickly becoming the de-facto standard for connecting most peripherals. Furthermore, if you have another USB-C cable, you can use that to charge your controller.
The thing that I am confused about is why there is not at least one USB-C port on the Xbox Series X console. I can understand needing to retain one or two USB-A ports, given that many users have existing accessories that will work on their Xbox Series X, but not having a USB-C port on the console itself does seem a bit strange. As mentioned earlier, USB-C is quickly becoming the go to standard for not just accessories, but for all other types of devices, like phones, laptops, tablets, and other gaming consoles.
I would hope that when the next revision of the Xbox Series X comes about, if tradition holds in about in 3 to 4 years, that it would have at least one USB-C port on it, if not having all of the ports being USB-C. While it is a minor issue, it does seem a bit odd to not have a single USB-C port on the console, particularly considering that USB-C has been around long enough where there would have been time to change one or two ports to USB-C. There one last thing to mention related to the bundled-in controller and USB-C, and that is the cable.
USB-C Cable
As mentioned above the Xbox One controller used Micro-USB for its connection to the Xbox One and to charge. The cables included with these controllers were somewhat unique in that they included a light to indicate the current charging status of the controller. If this indicator was orange the controller was charging and if the light was white the controller was fully charged.
The USB-C cable bundled with the controller does include this indicator. The controller will vibrate when you plug it in, so there is some feedback regarding the controller. However, there is no easy way to see on the cable, or the controller, the current charge status. You can use the Xbox dashboard to see the current charge status, but this does require you to turn on the Xbox in order to see the information.
The USB-C cable does have another difference, compared to the Micro-USB cable provided with the Xbox One. It is much thicker. One thing I did notice over the years of using the Xbox One, and the Xbox One S, is that the Micro USB cable would eventually fray and need to be replaced. I have owned three “Plug and Charge Kits” for the Xbox One. I would either buy a new one because the rechargeable battery would not hold a charge long enough or because the cable frayed. Since Micro USB is a standard I could have just purchased or used a standard cable, but the cables included in the “Plug and Charge Kit” was always a longer one, so I could, as the name suggests, plug in the controller and charge it simultaneously. Furthermore, it had the indicator light. So both of these items kept me purchasing the cords. The good thing about having purchased so many is that I now have a number of rechargeable batteries that can be used.
The thicker USB-C cable should provide a bit more reliability and the cable should not wear out as quickly. At least that is my hope. Again, since it is not a cable with any additional features, should it happen to break in the future, I can just order a new cable in the length I would like so that I will be able to continue charging the controller while playing. It would be nice to see Microsoft come out with a USB-C cable with a charging indicator. It was a nice feature to be able to easily see the charging status.
Even though the controller has USB-C, the console only has USB-A ports. There might be another reason why there are so many USB-A ports on the Xbox Series X, and that is backward compatibility.
Backward Compatibility
When gaming consoles first came to market, you would not have any expectation of being able to play games from another console on the current one, even if the consoles were from the same manufacturer. This was the way that gaming worked until approximately 20 years ago, when the Playstation 2 was released. The Playstation 2 allowed you to play games from the original Playstation. Microsoft did not have its own gaming console until November of 2001 with the introduction of the original Xbox, so it did not have to worry about supporting older games..
If Microsoft had been releasing its second console in 2001 instead of its first, they might not have included support for the original Xbox, and some may have been okay with that.. However, Microsoft’s second console did support backward compatibility.
Being able to support older console games is not as simple as snapping your fingers and having it function properly. Each game console is its own platform, has its own specifications and idiosyncrasies. Another reason this is not simple is due to the underlying platforms possibly being significantly different between console generations.
For instance, the original Xbox console was built with parts that were similar to standard PCs. This was chosen because Microsoft knew PC parts quite well having worked on various operating systems that support the PC market for 15 years at that point. Whereas the Xbox 360 used an entirely different architecture. The Xbox 360 used an IBM Power-PC architecture. You would not be able to play games from the original Xbox on the Xbox 360, at least not without some additional work being done to support the functionality.
When the Xbox 360 was released it was announced that it would support some original Xbox games. This was possible due to technological advances that were made in the four years between the release of the original Xbox and the Xbox 360. In order to be able to run original Xbox games, the Xbox 360 would need to emulate the original Xbox’s software.
When you do any sort of emulation, you will invariable see a loss of performance. Luckily, the Xbox 360 had enough power to be able to play the original Xbox games fast enough, even through emulation, that most users likely did not notice a difference.
When the Xbox One console was released in 2013, Microsoft had made some additional changes. Amongst these was the switch back to more standard PC-like hardware. This would allow the Xbox One to more easily emulate the original Xbox games, but with the different architecture would make it a bit more difficult. This is where the second change coms into play. That change was the way that the underlying Xbox operating system architecture had been changed.
In the intervening eight years between the release of the Xbox 360, in 2005, and the Xbox One, in 2013, a new type of technology became more viable as a solution. That technology is what is called a hypervisor. A hypervisor allows you to run multiple operating systems simultaneously. If you have ever used some like VirtualBox, Parallels, or Microsoft’s Hyper-V, you are well aware of how you can run multiple operating systems on the same machine at the same time. This is how the Xbox One console functioned. The Xbox Dashboard was run in one virtual machine, while games were run in another. In fact, the Xbox 360 operating system would effectively virtualized, albeit with modifications, to allow the Xbox 360 games to run, even though the underlying architecture were different. The same approach continues to be the case with the Xbox Series X.
These two changes, back to PC-like hardware and the transition to using a modified version of Microsoft’s Hyper-V, allowed backward compatibility to thrive. Since the architectures between the Xbox One and the original Xbox were similar, being able to run the original Xbox games would be expected. However, since the architectures differed between the Xbox One and the Xbox 360 so much, you might expect backward compatibility for those games to not be present.
This is where the hypervisor comes in as well as the length of time between console releases. With the eight year difference the capabilities of the hardware improved significantly. Much like the Xbox 360, the Xbox One had enough spare processing power to be able to play the Xbox 360 games without much difference being noticed by the gamer, even when emulated. All of the Xbox 360 games that I have played on the Xbox One worked flawlessly and felt just as though they wee running on the Xbox 360.
Providing compatibility for software is core to Microsoft. However, the Xbox Series X introduces a new type of compatibility, and that is with some hardware. So, let us look at that compatibility next.
Hardware Backwards Compatibility
Gaming is neither strictly personal nor strictly communal. It can be either one, or both at the same time. It is likely that you will end up playing a game with others from around the world, however your setup will likely be unique to you. One way that you can make gaming your own is by finding just the right controller. This could be a standard Xbox controller, or possibly even one from the Xbox Design Labs, or even a third-party controller. When you find the right controller you will likely want to be able to keep using it. Unfortunately, this has not been possible with previous generation changes.
When you think of Microsoft, you may think about their operating system, Windows, even though the have de-emphasized Windows in recent years, it still may come to mind. When you think about Microsoft Windows you might think about “backward compatibility”. If Windows has anything going for it, it is that it is highly backward compatible. As an example, if you installed Windows 7 in 2009, you could run software that was originally built for Windows 3.1, or even DOS. This type of compatibility is highly unusual.It appears that the desire for hardware backward compatibility has migrated to the Xbox Series X.
Typically when you buy a new gaming console you will get a new controller to go along with it, so you can play right out of the box. However, you may have to buy an additional controller, as well as all new accessories. While some may be compatible, it is possible that some will not. As was mentioned earlier, each time an Xbox console was introduced the previous generation’s controllers would not be compatible. What this would mean is that you would have to buy all new controllers and accessories. This is not necessarily the case if you were to upgrade to an Xbox Series X, or Xbox Series S, at least for controllers.
That is right, you are able to use your Xbox One controllers with the Xbox Series X. This is easy enough to do. It is as simple as pairing any other controller. You simply perform the following steps:
On the Xbox Series X console, press the controller pairing button, which is on the front near the USB port. The on/off button of the Xbox Series X console should begin blinking.
On the controller tap the pairing button on the top of the controller. This is next to the power port. The one/off button on the Xbox One Controller should begin blinking.
The two devices should begin pairing and once they have paired both on/off buttons will stop blinking and become solid. Once the devices have been paired, you can begin using your Xbox One controller with the Xbox Series X console. The controllers that you can pair are not just the Xbox One S controllers, or Xbox One X controllers,, but you can even pair an original Xbox One controller. This includes any of the stock controllers, Xbox Design Lab controllers, or even the Xbox Adaptive Controller.
There is one additional benefit that this ability has. Say that you are having a gaming party, but you do not have enough controllers. Now, with backward compatibility, you can ask your friends to bring their own Xbox One controllers so you can all play with a familiar controller.
The fact that all Xbox One controllers will work with the Xbox Series X is a great change to see. This is particularly true given that some users have already purchased some expensive controllers and want to keep using them. Let us now power on through to another accessory for the controllers.
Xbox Rechargeable Battery
Controllers since the Xbox 360 have had the ability to be used wirelessly. Even though the controllers can be wireless they need to be powered. This is possible by either using two standard AA batteries, or by using some rechargeable batteries. Microsoft does sell a rechargeable battery with an appropriate charging cable. They call this the Xbox Rechargeable battery.
The kit for the Xbox Series X contains a rechargeable battery, which fits nicely inside the Xbox Series X controller as well as a USB-A to USB-C cable, so you can use the battery in your Xbox Series X controller . You do not need to use this specific set for the newer controllers. You can use the older version of this set, called the “Xbox One Plug and Charge Kit”.
I like the Rechargeable Battery kits because they can charge while you play, provided you plug in the controller while the rechargeable battery is inserted into the controller. All batteries will degrade over time, so it is likely that you will need to replace the battery in a couple of years in order to be able to get the same amount of gameplay as when it was new.
Battery Life of the Controller
The battery life on the Xbox Rechargeable battery is quite amazing. I have had the Xbox Series X for about a month now and I have only had to charge the controller twice in that time. That means that I get approximately ten days to two weeks of game play time before needing to recharge. I do not always play the same amount of time eery day, it varies as you might expect. This is likely due to the rechargeable battery being new, but it is nice to not have to charge the controller every few days.
My experience with Xbox Series X has not been all fun and games, although it has been mostly that. I have run into some issues while using the console.
Problems
As is the case with just about anything these days, I have experienced problems with the Xbox Series X. The biggest problems that I have experienced, has been the Xbox Series X freezing. And when it does freeze, the entire console just shuts down. Basically, it is a hard crash. This has happened in with more than one game, therefore it is not necessarily game-specific. I have even had this happen while scrolling through the user interface. I hope this is a transient issue that is fixed with a future update.
I have not been the only one to experience this issue, there are others that have. Some indicate it is due to ray tracing, but that is game specific setting. I suspect it is actually due to airflow problems. I set my Xbox Series X on its side with the disc drive at the top of the, and with what I thought was enough airflow around the console. However, after I moved the Xbox into an area with a bit more airflow the issue has not re-arisen, at least as of this writing.
I have also experienced crashes of games. For one game it would crash and when I realized it had crashed I would try to go back to the Xbox dashboard, but the Xbox dashboard would end up freezing. Eventually the game would actually crash and allow me to start it up again. Typically, the game took a minute or two to actually crash.
I know that this issue was not related to airflow, because I have experienced this after moving the Xbox. I do have automatic updates enabled for both game and system updates, so it is possible that these have already been fixed, and that they may not re-occur.
I know that developing software is not an easy task, and that any piece of software is going to have bugs. Sometimes these bugs do not manifest themselves until they are in the hands of users. Hopefully, no major issues come up during my usage of the console and I hope that these issues were just software related and not an issue with the hardware.
Closing Thoughts
When you unbox the Xbox Series X you will notice notice that it is indeed heavy for a gaming console. It comes in at 9.8 pounds, or 4.45 kilograms and it is rectangular in shape. Inside the box are the split motherboards, central cooling. Powering all of this is custom CPUs and custom GPUs that are capable of handling 12 trillion processes per second. To help handle the gaming, you get two different speeds of memory, 10 gigabytes of faster memory and 6 gigabytes of slower memory.
In order to store your games and media you get 1 terabyte of storage standard on the Xbox Series X. This storage is a powerful custom solid-state drive. This SSD is faster than a standard hard drive, but also due to the speed of the SSD, which uses the Non-Volatile Memory Express, or NVME, memory. This memory allows the console to be fast not only for launching titles, but also allows for faster load times while playing games. It will be interesting to see if Microsoft introduces even larger storage options for the Xbox Series X in the future, which could add to the longevity of the console.
Once you get past the initial setup and update, you can then begin playing. When you do begin playing you can play the most current games, like Watch Dogs: Legion, Assassin’s Creed: Valhalla, or even NBA 2K21. While at the same time, due to backward compatibility, you can play games from previous Xbox generations, including some games that were only available on the original Xbox console. It is still mind boggling to be able to play games that were released nearly 20 years ago, all as if it were on the original console.
If you are upgrading from an Xbox One, you may get the game data that is optimized for your console. This is known as Smart Delivery and can allow you to save some space by not downloading unneeded data. Once you do upgrade, for newer games, there may be some new technologies that enhance the game. If the game supports Ray Tracing, you may be able to have even better game play with improved shadows including very realistic rendering of the shadows in real-time. If you have the proper television setup this can make for more immersive games.
You will most likely be playing with a controller. You can use the included Xbox Series X controller or you can use any Xbox One controller. This backward compatibility with hardware is a great addition that can protect your existing investment in Xbox One accessories. So if you really like that Xbox One Elite controller, you can use still use it with your new console.
Overall, I like the Xbox Series X thus far. In most cases, it is not easy to spot any difference between playing on my old Xbox One S and the Xbox Series X. The place I notice the most change is with the amount of time that it takes for some games to load. It is noticeably faster than the older consoles, particularly if you are coming from a console that has a 5400RPM spinning hard drive.
The Xbox Series X is a great platform for gamers. The inclusion of full 4K gaming allows the highest quality of gaming. Once you add High Dynamic Range, or HDR, in with the games you will have the latest and greatest technology available and this will provide you with the best gaming experience that you can get today.
As of this writing it is difficult to get an Xbox Series X, but availability should improve over the next few months. If you are looking to either get into the Xbox, or upgrade an existing Xbox One, you cannot go wrong with the Xbox Series X. It should prove to be a great console for years to come.
There are a variety of different types of games available. Some of these are puzzle games, others are action games, and some are classic card games. Bringing any game to market, no matter how big or small, is a major undertaking. Sometimes the game becomes a hit, sometimes it flops.
When you have a hit, there is a possibility that it will allow further games. In some cases, the entire story is a one-off and does not warrant a sequel, but sometimes you get a new series of games. No matter if it is a new intellectual property or another game in an existing franchise every game has a lifecycle to it. It goes from concept, to prototype, to active development, to actual release, or maintenance.
If a game sells well enough there may be a sequel, once you have at least two games you have a franchise. The first game in a series was released in 2014 called Watch Dogs. Watch Dogs was highly anticipated titled and I think it lived up to the hype.
Watch_Dogs
In Watch Dogs, you play as Aiden Pearce, a brilliant hacker and former thug, whose criminal past led to a violent family tragedy. Now on the hunt for those who hurt your family, you'll be able to monitor and hack all who surround you by manipulating everything connected to the city’s network. Access omnipresent security cameras, download personal information to locate a target, control traffic lights and public transportation to stop the enemy... and more.
Watch Dogs 2
Watch Dogs was not the last in the series. In 2016 the sequel, Watch Dogs 2, was released. In Watch Dogs 2, it’s 2016, ctOS 2.0, an advanced operating system networking city infrastructure, was implemented in several US cities to create a safer, more efficient metropolis. Play as Marcus Holloway, a brilliant young hacker living in the birthplace of the tech revolution, the San Francisco Bay Area. Team up with Dedsec, a notorious group of hackers, and expose the hidden dangers of ctOS 2.0, which, in the hands of corrupt corporations, is being wrongfully used to monitor and manipulate citizens on a massive scale.
I wrote up a review of Watch Dogs 2 in 2016, so be sure to check that out. Now, four years after the release of Watch Dogs 2 comes the third in the series, Watch Dogs: Legion, which is the topic of this review and provides some twists from what was in Watch Dogs and Watch Dogs 2.
Watch Dogs: Legion
Watch Dogs: Legion goes across the pond from the United States and places you in London, England. "London's facing its downfall courtesy of state surveillance, private military, and organized crime. Recruit a well-rounded resistance to overthrow the wankers ruining this once-great city. The fate of London lies with you."
Basic Story
The game starts off with you playing as Dolton Wolfe who is working with London’s branch of DedSec. DedSec finds that there are explosives set to go off at multiple places in London, including the Houses of Parliament. Wolfe tries to disable the bombs that are set to go off, Guy Fawkes style, and discovers that those trying to set off the bombs are part of a group calling themselves “Zero Day”.
Due to these bombs, the British government allows a company called Albion to take over and restore order to the streets of London. DedSec are being blamed and held responsible for the bombings, and therefore they are being targeted. It is your job to rebuild DedSec and help the city rise up against Albion, the criminals, and the government, and take back the streets of London.
Team
When you start a Watch Dogs: Legion, you are able to pick your character from a selection of characters. Along with this you also get to choose a mask. The mask is what the character will don when they are either in a restricted area or in a fight.
The original Watch Dogs game allowed you to hack anybody to obtain information about them and steal their money. This was not nearly as prevalent in Watch Dogs 2, but has made its way back to Watch Dogs: Legion, but with a twist. Instead of hacking someone to steal their money, you hack someone to see if they might be useful for your team. Each individual that you hack has some abilities, some may be good for your team, while others may not be as useful.
For instance, a character that I had allowed uniform access to Albion sites. This is great, except he would get hiccups, so this made him a bit more noticeable by others. Similarly, there are some characters who have gambling addictions and may randomly gamble ETO. ETO is money in Watch Dogs: Legion. Yet, other characters may be public figures so they will be noticed in public. There are even characters who will randomly die. I am not sure what happens if you have perma-death enabled, because I did not play with perma-death enabled, but more on that in a minute.
Along with being able to find people throughout the city, some may be recommended recruits. When someone is recommended it is because you may be able to use them in an upcoming mission, or they may have one aspect that can help the team overall. This may be something like faster healing or reduced jail time.
Because you are able to recruit just about anyone, no two people will ever be able to play the exact same game. Yes, the missions may be the same, but the experiences will never be the exact same between two people due to the variety of teams, the team's talents, and the approach they take to the game overall. There is one setting that was mentioned earlier that may change your game play experience, and that is a setting called "perma-death".
Perma-Death
When you start the game you have a choice to make besides which character to choose. You have to choose whether or not enable a feature called “perma-death”. When enabled “perma-death” will cause any of your team members who are killed to be dead, permanently. This means that the player cannot be revived and cannot be played again. Once enabled, this cannot be disabled. similarly, once you have chosen to disable it, it cannot be re-enabled later.
Enabling perma-death can add an interesting twist on the game, but since you are able to recruit anybody, you can always recruit additional individuals should one of your characters die. I did not enable perma-death when I played through the game, but if I go through and play again at some point in the future, I may enable it.
Game Mechanics
Watch Dogs Legion has many similarities to the previous games in the series. One aspect of game play that continues within the game is needing to unlock areas by turning electrical lines. This has always been one of my favorite aspects of the Watch Dogs series and it continues in Watch Dogs: Legion. Although, it is not nearly as prevalent as in the previous games, but they still are present.
One detail that you might not think about for a game is the driving. Not that a developer would not take into account such a large aspect of a game, they would, but there has been careful attention paid to driving within Watch Dogs: Legion. Each different type of vehicle has its own driving and handling characteristics. Here is an example of driving a car.
For instance, a motorcycle handles differently than a luxury car, which handles different than the iconic double-decker bus (yes, you can drive one), and all of these handles differently than an Albion police car does. This attention to detail is a nice touch and choosing the right car may be able to to get you out of a sticky situation. Next, let us turn to a large aspect of the game, hacking.
Hacking
The biggest aspect to the Watch Dogs series is the idea of "hacking". What you are hacking depends on the game. The original Watch Dogs game had the ability to hack people for their money, you could hack cameras, cars, and many other elements. The same held true in Watch Dogs 2. However, in Watch Dogs: Legion you are able to hack a lot more within London. You can hack people to recruit them, as mentioned above, however you can also hack other items.
These items include barriers, cars, and drones. There are a variety of different types of drones. The different types include:
Cargo Drones
ctOS Drones
Delivery Drones
Chase Drones
Riot Drones
You can perform a number of tasks on drones, including disabling them, hacking them, or betraying them. Disabling a drone will temporarily stop it from working. Hacking a drone allows you to take over the drone, which can be useful in some situations. When you betray a drone, it will autonomously operate on your behalf. This last option is not available for all drones, but only for those with weapons.
Along with the drones, you are also able to hack cars, causing them to go in a specific direction or just to crash so they are out of your way.
Hacking is still a major part of the game play, but it is not necessarily the primary means of completing the game. This may not be 100% true, because after a while having to hack things just became second nature again and faded into the background and just became habit.
Side Quests
Watch Dogs Legion has a main story line. Along with this, you can perform some side missions in order to obtain more items. These may be used to recruit team members or just to fill in the overall story line.
When you hack a person to see if they might be a good fit for your team, you can save their information to recruit them later. When you recruit a person, you will have to perform a task for them before they will join your team. Some of these tasks are easier than others. Try not to fail when doing these, because the characters may hate you and then you can no longer recruit them. Luckily, since you can recruit just about anybody, you can find another similar character and recruit them instead.
There is one mission within the game that I would totally play an entire set of puzzles that were just flying the mini-drones through different levels.
Collectibles
Many games have different collectibles, and Watch Dogs Legion is no different. There are a few different types of collectibles. These include:
Paste ups
Relics
Text files
Audio files
Tech Points
ETO
Masks
Some of these are out in the open, while others require a bit more ore ingenuity to figure out. Some of these items are also only available while within a mission. None of these items are needed to complete the game, but obtaining some of them, like ETO and Tech Points will allow you to purchase items. Getting things like relics, text files, and audio files will help fill out the entire story. If you collect a relic, text file, or audio file, you can look at it in the menu.
Here is a video of what performing a "Paste Up" looks like. You can also see me do something stupid at the end of the video.
Tips
After you play a game you may find ways that you could have improved your game play. Now that I have finished the game, I have some tips for those who have not yet played it.
Tip 1: Early in the game, use auto drive. One of the things that you can do is grab a car and almost every vehicle has the ability to automatically take you to your destination. I recommend doing this early on so you can become accustomed to not only the layout of the city. Furthermore, when you drive in London, you drive on the left side of the road, not the right side. Therefore, auto drive may help you acclimate to driving on the left side oft the road and learn the rules of the road.
Tip 2: Recruit an Albion character. This will make things a lot easier during the game, particularly since many of the areas that you need to go into can be done stealthily with an Albion character.
Tip 3: Use stealth as much as possible. There are a number of tasks that do not require you to go all “run and gun” and instead, might be better completed by either hacking cameras or using a spider. Use these as much as possible.
Tip 4: Similar to using stealth, also use melee attacks as much as possible. Doing this may allow you to subdue an enemy without other enemies being alerted. Here is a melee video as an example.
Tip 5: There is a mission where you must chase a van, get a tough vehicle, like an Albion Hummer and use that to tip the van. It will make completing the job significantly easier. Also, use the drones that attack during that mission to your advantage.
Tip 6: If the game says “you are no longer online”, quit the game and restart. Anything you do will not be saved and you will be wasting your time.
The last tip brings us to the next section, issues that I ran into while playing.
Problems with the Game
No modern software, let alone a large game, is 100% bug free. Bugs are to be expected. Even so, I ran into some pretty severe problems with the game while playing it.
The first issue that I experienced was the game randomly crashing. The game would just randomly freeze and crash.
Of course, when a game crashed progress that I would have made would not be saved. Sometimes, this was just a minor annoyance, but more often than not, it was a bigger issue.
The biggest issue I ran across was that the game would not save my progress. I do not mean that I would die and would have to go back. What I mean is that I would do a lot of work in the game and the game would crash.
The biggest one of these was when I was working on the last main mission, literally at the end of the game, and the game froze. Not only did it not save that mission, I lost SIX MISSIONS worth of progress. I had to redo six missions to get back to where I was.
THIS IS ABSOLUTELY UNACCEPTABLE. Losing progress for a single mission, or one leg of a mission, is one thing. But having to redo multiple missions is just hostile. Ubisoft needs to have more robust saving system where the game is saved locally and then uploaded to their servers. If this is how it actually works, then it is absolutely broken. If not, then this is how it should work.
Besides the pervasive not saving progress issue, I also ran across some other bugs. For instance, I took down a person who had an access card, but they fell into a column. When this happened, I could not hack the access code, therefore I could not access the area that the card opened up. As proof, here is a photo of the character in the column.
Another example of that is this video where I tossed a spiderbot onto a building and it got stuck.
Another bug that I ran into, literally, is where I tried to turn the corner on the balcony of a building and the only thing that happened is that I was stopped. It was like a barrier extended beyond where it should. Here is the video showing what I experienced.
Here is another bug that I ran across, a missing person that I was supposed to rescue. I was able to rescue them, but it is still odd to not have the character show at all. Here is the video for that.
These last few items were minor annoyances and did not really affect game play all that much. The inability to get the access card did cause me to have to leave the area completely and come back to that spot later on. As you can see from the video, I was able to get around the invisible barrier, but it still should not have been there.
Closing Thoughts
When the original Watch Dogs game as first announced, I was immediately intrigued. Not only because of the unique hacking of the game, which was the primary draw, but also because it was based in Chicago.
When Watch Dogs 2 was announced and released, I knew it was a game I would instantly buy and play, because it continued the same type of game. When I heard that Watch Dogs: Legion was going to be set in London, I knew I would going to buy it, but I was a bit apprehensive because I was unsure about how the “recruit anybody” mechanism would work.
The game is really good. The fact that it is based in London is what really grabbed me. I have only ever visited London once, but I really want to to back. Maybe one day. The Watch Dogs series of games are some of my favorites, not only for the story lines, but for the actual game play.
If you enjoyed the original Watch Dogs or Watch Dogs 2, I would absolutely recommend you pick up Watch Dogs: Legion. The new recruitment within the game is a nice twist on standard game play, as is the ability to do just about anything within the game.
Even though there are issues with the game, like the crashing and lost progress, the game is still worth playing and an enjoyable game. All of this is before the first expansions for the game are available, so even just for the core game, it is one that you should look into getting.
Here is a group of photos taken from within the game.
At their 2017 World Wide Developer Conference, Apple announced a whole new product line. It would be a smart speaker that would not only be your smart assistant but would also be an AirPlay speaker. Even though it was announced in June of 2017, it would be seven and a half months, January 26th of 2018 to be exact, before you would be able to pre-order one. They were released on February 9th, and sold out before they went on sale.
One aspect to the original HomePod that a lot of people questioned was the price. It cost $349 when it was released. Apple is known as having a premium product, and this price was definitely a premium.
It was a mere 14 months after it became available, but Apple reduced the price from $349 to $299, while this made it more affordable, but it was still a bit too much for many to be willing to purchase one. When it was released, I did write up about my thoughts on the HomePod. You can read both part 1 and part 2 of my HomePod review for my thoughts on the product.
Not long after the HomePod was released many wondered if, or when, another HomePod would be released. In particular, they were wondering if Apple would release a smaller HomePod. It would take two and a half years, but Apple finally did release a smaller HomePod, they called it the HomePod mini. Apple announced the HomePod mini at their "Hi, Speed" event on October 13th, 2020.
At the time of its announcement, Apple also announced when it would be available for pre-order. Pre-orders for the HomePod mini went live on November 6th, with the devices beginning to arrive during the week of November 17th. I ordered two HomePod minis.
This review will cover some aspects that are similar to my original HomePod review. These topics include the size, how it sounds, and Siri. There will also be an area covered, which I was not able to cover last time, and that is using the HomePod minis as a stereo pair. Before all of that though, let us start with the internals.
Internals
Both the original HomePod and HomePod mini are powered by Apple's system on a chip. The original HomePod has an A8 system on a chip. The A8 was introduced in 2014 with the iPhone 6 and iPhone 6 Plus. This processor is more than enough to power the original HomePod.
Th HomePod mini also has an Apple system on a chip within it, but it not the A8. Instead it is the same one that is within the Series 5 Apple Watch, which has an S5 within it. The S5 is a more powerful and yet more power-efficient processor than the A8.
Much like the original HomePod, the HomePod mini has a built-in power cord. The end of the power cord is not the same as the original HomePod. Instead, the end is a USB-C plug. Included with the HomePod is Apple's 20-watt power brick. The HomePod mini needs the 20-watt power brick. Using anything less will not work. I tried plugging in a HomePod mini into the USB-C port on my 2017 iMac and all I got was an orange light on the top of the HomePod mini.
I think the reason for this arrangement is so Apple can produce the same HomePod mini and the only difference needed to ship it anywhere is the USB-C power brick, which Apple already produces for usage with other products.
Size
When I received my HomePod minis, my first thought was that they were much smaller than I thought they would have been. They are definitely a lot smaller than the original HomePod.
The size is not only noticeable in the physical size of the HomePod mini, but also in the box. In fact, the HomePod mini is 3.3-inches high by 3.9-inches wide. If you compare this to the original HomePod, which is 6.8 inches high and 5.5 inches wide, the HomePod minis are absolutely diminutive. Here are a few comparisons.
Even though they are of a small size, they are not are not small on sound, which we will cover in a bit. First though, let us look at the setup of the HomePod mini.
Setup
When you first power on a HomePod mini and if your iOS device is in range, you will get a setup prompt, like the one below.
The next steps are to select which room the HomePod mini is in, from the ones available in your Home app. This is followed by whether or not to allow "Personalized Requests", as is shown in the screenshot below.
Here you can either "Use Personal Requests" or "Don't Use Personal Requests". If you opt to use personalized requests, you will then see another screen. This is the "Siri for Everyone" screen, which indicates that you Siri will be able to personalize requests for everyone in the home.
The next screen is the "Transfer Accounts and Settings" screen. This will use the Apple ID that is logged on your iOS device and use that for the HomePod mini. Once you tap on "Transfer Settings", the HomePod mini will continue setting up. It will look like the screen below.
After you have setup an individual HomePod mini, if you happen to setup a second one, as a stereo pair, you will see something a bit different during the setup of the second HomePod mini.
Setting up a Stereo Pair
If you have a second HomePod mini, and you begin setting it up, you will get a different prompt after the initial setup screen. This screen asks if you want to setup the two HomePod minis as a stereo pair. The screen will look like the one below.
You will then be asked which room, as the second step. The third step will now let you select which side of the room the second HomePod mini is on. The screen will look like the one below.
Once you select left or right, you will be able to tap continue on the "Siri for Everyone" screen and then you will transfer the settings again to the second HomePod mini. At this point the HomePod mini stereo pair will be setup and you will see a screen like the one below.
The final screen is the one where the HomePod mini stereo pair completion screen.
Now that we hav the HomePod minis setup, let us look at how they sound.
Sound
When you look at the HomePod mini, you might think that it would have a tinny sound to it, but it does not. While it does not have a much bass as the larger HomePod, it does not, but it does not sound bad at all.
I use the HomePod minis in a stereo pair, we will cover that in a bit, almost exclusively. For the room that they are in, the two smaller HomePod minis as a stereo pair has worked quite well, most of the time anyway.
There have been instances when I am watching something on the Apple TV and the sound will seem to cut out on one of the HomePod minis. It usually only lasts a few seconds, but has been as long as 30 seconds, and then it gets corrected. It has happened over multiple items that I do not think it is a source issue, but I cannot rule it out.
One thing that I have noticed is that using the HomePod minis in a stereo pair, from the Apple TV, the volume has to be set higher than was needed on the original HomePod, in order to get the same volume out of the HomePod minis. The volume does not need to be significantly higher than the original HomePod, but it is definitely higher.
While I use the HomePod minis in a stereo pair most of the time, I have used just one of the HomePod minis on its own. A single HomePod mini on its own sounds decent when listening to music. Again, a single HomePod on its own will not be able to fill up a room, but if you are using one to listen to music while working, it will work quit well.
I do not use the HomePod to listen to podcasts or audiobooks, just music or as an output for the Apple TV, so I do not have any experience on that front. However, I do have experience using two of them as a stereo pair.
Stereo Pair
One of the features of both the original HomePod and the HomePod mini is the ability to use two of them as a stereo pair. However, you cannot mix and match HomePod models. For instance, you cannot have an original HomePod and make a stereo pair with a HomePod mini. This is just not possible.
You can create a stereo pair for two HomePods or two HomePod minis. In fact, if you have one HomePod mini configured in a room and add another, of the same type, the Home app will ask if you want to create a stereo pair automatically.
As you might expect, using a pair of HomePods in a stereo pair. I would have never done this with the original HomePod. Mostly, because I could never justify purchasing a second HomePod for $300 after paying $350 for the first HomePod.
Siri
The HomePod and HomePod minis are designed to be your virtual assistant. Siri works similarly on the HomePod mini as other Apple devices. The HomePod mini can be used as a HomeKit Hub, so you can use it to control all of your HomeKit-enabled devices.
I have not had any issues with Siri, although I do not use Siri all that often. The only issues that I have had are with its inability to turn off a specific light. However, the Home app has issues contacting that particular light every so often, so I do not think it is an issue with the HomePod itself, instead an issue with the light bulb.
Other Items
There are a couple of other items that need to be covered. These are updates, switching positions, and AirPlay. Let us begin with Updates.
Updates
After I did my initial setup of the HomePods, I knew that there was an update available, to HomePod software 14.2. As is the case with the original HomePod, this is done through the Home app. If there is an update, the Home app should inform you. There may be instances when it does not, so you can go and check for an update in the Home app.
Switching Positions
When you have a set of HomePod minis configured, you may end up moving them while re-arranging them. If you need to identify which HomePod is which, you can by performing the following steps:
Open the Home App.
Locate the HomePod mini stereo pair.
Tap and hold on the HomePod mini stereo pair to bring up the now playing information.
Scroll up to bring up the settings.
In the first grouping, tap on "Audio Settings". This will bring up the "Audio Settings" screen.
Tap on one of the HomePod minis to identify it.
If needed, you can tap on the "Swap" button, in the middle of the screen to swap the HomePod minis.
The ability to swap the HomePod minis with the tap of a button can be quite convenient if you need to swap them. Similarly, if you need to identify a HomePod, there is the easy way to identify them.
AirPlay
One thing that you are able to do is just the HomePod mini as an AirPlay destination. If you are using an Apple TV 4K, you can use a HomePod, or a HomePod mini, as the default output for the Apple TV. This is a nice addition that would also be good to have in the Apple TV HD.
Even though you may not be able to set a default audio output on the Apple TV HD, you can still AirPlay from one, as you have been able to in the past. Furthermore, you are able to AirPlay to multiple items simultaneously. While you cannot add a regular HomePod as a stereo pair with a HomePod mini, you are able to AirPlay to both a HomePod mini stereo pair, you can actually use an Apple TV to airplay to both simultaneously. While this is not a true stereo pair, it can be used as pseudo-stereo pair.
Closing Thoughts
Even though they have only been available for approximately two weeks, it is easy to see that the HomePod minis are already super popular. As of this writing the HomePod minis from Apple have a 3 to 4 week shipping range from Apple.
The HomePod mini does not have nearly as much bass as the larger HomePod, but that is to be expected. Even though it is much smaller than the original HomePod, it still has pretty good sound.
If you have multiple HomePod minis you are able to pair them together in a stereo pair. Doing so will provide you with even better sound than a single HomePod mini. This can be beneficial in a larger room. While you can pair multiple HomePod minis together, you cannot put a larger HomePod and a HomePod mini together in a stereo pair.
If you are looking to get a speaker with a virtual assistant in it, you cannot go wrong with the HomePod mini. The $99 price point makes it being 1/3 the cost of the original HomePod, means that you can put them in more rooms throughout your home. With multiple HomePods you can use the new Intercom feature included in the HomePod operating system 14.2.
When I first ordered the HomePod minis, I only ordered two. At the time I thought that would be enough. However, in reality, I should have ordered a third one in order to use while working. This is because my work area is separate from where I use the HomePods as a stereo pair.
If you have been looking to get a HomePod, but have been deterred by the price, I recommend getting the HomePod mini. The price of $99 while not an impulse buy, it more palatable than the original HomePod and although it does not have the same bass and sound as the original HomePod, it is still quite good. Overall, the HomePod mini is well worth the $99 investment, and if you can, get more than one, because using them as a stereo pair is even better than a standalone HomePod mini.
The iPhone 12 line of phone represents the 14th family of iPhones, but it is not the 14th iPhone. In fact, to date there have been 25 different iPhones, across 14 different processor families, introduced prior to this fall's crop of iPhones.
Early in the life of the iPhone, the improvements that one would see from year to year were more significant than they have been lately. However, that is it not to say that any year's iPhone is a dud. There is a segment of users who do upgrade every year, like myself. We are not the norm, and the differences that we see are less pronounced, compared to most iPhone users.
Most people when they get a phone, they will use that phone for multiple years, and sometimes the iPhone that they are using is one that has been used by someone else, prior to them receiving the iPhone. The typical upgrade cycle for most users is around three years. If you were upgrading to one of the iPhone 12 line, your last phone would have possibly been an iPhone 8, iPhone 8 Plus, or even an iPhone X.
This review is going to cover a few different areas and some accessories. These will include, the form-factor, the cameras, 5G, the Silicone Case with MagSafe, and the MagSafe Charger. Let us turn to something a bit more practical, the form-factor of the iPhone 12 Pro Max.
Form Factor
The iPhone has seen a significant change to the way each phone looks. The original iPhone had its own distinct shape, replete with rounded corners and the 3.5-inch screen.
The iPhone 3G and iPhone 3Gs improved upon the original iPhone's design with a more tapered shape. With the release of the iPhone 4 though a whole new design was undertaken, one with squared edges and glass on both the front and back of the phone. The iPhone 4s had the same form factor as the iPhone 4.
The iPhone 5 and iPhone 5s took their cues from the iPhone 4, but instead of a glass back, there was a metal back, but the square corners remained. Furthermore, the iPhone 5 was a slightly taller screen, which was the first change in screen size.
The phones released in 2014 changed everything and was the biggest change to the iPhone. No longer were the older iPhones. The 3.5-inch and 4-inch screen sizes were no more. Now, there were two new sizes, 4.7-inches and 5.5-inches. Along with this screen size differences, the square edges were also gone in favor of rounded edges.
The form-factor of the iPhone 6 and iPhone 6 Plus remained the same for both the iPhone 7 and iPhone 8. The next big change came along with the iPhone 8 with a brand new form factor on a whole new phone, the iPhone X.
The iPhone X introduced a slew of new features, like the removal of the home button and the inclusion of Face ID, in place of Touch ID, and a rounded screen. The rounded screen allowed a whole new interaction mechanism with the home bar at the bottom of the screen and using gestures for navigation instead of relying on the home button.
The entire screen of the iPhone X, through the iPhone 11, had the edges of screen wrap around into the case of the phone. This provided a smooth transition from the screen onto the other portions of the screen. This was particularly useful when you were attempting to use the home bar and sliding up from the bottom of the screen.
The iPhone 12 Pro Max does not follow the same form factor as the other Face ID-enabled devices, insomuch as the outer case is no longer rounded. Instead, it more closely mimics the iPhone 4, iPhone 4s, iPhone 5, and iPhone 5s by using squared edges.
The square edges of the iPhone 12 Pro Max provides a bit more bulk to the iPhone, despite it being 0.7mm or 0.29 inches smaller. The item that adds the bulk is the square corners. This is because with the previous five phones have all had rounded corners.
There is one last item to cover regarding the iPhone 12 Pro Max, The screen size.
Screen Size
I have been fortunate enough to be able to get a new iPhone every year that there has been a new one. At first this was made possible because AT&T was subsidizing the price. I made the decision to no longer be held into a contract and instead starting paying for the phone at its full price. This started with the iPhone 5s.
Having owned an iPhone every year, I have seen a significant number of changes to the iPhone, in particular, the screen size. The first of these was subtle. This was with the iPhone 5, when the screen size went from 3.5-inches to 4-inches. While only a change in the vertical dimension, it was still a noticeable change.
The bigger change came two years later, with the release of the iPhone 6 and iPhone 6 Plus. I purchased the iPhone 6 Plus and it was a huge jump going from a 4-inch screen to a 5.5-inch screen. This change required a different method of holding the iPhone. The additional screen real estate also allowed for a split view when held in landscape, as well as a new "reachability" feature that would slide the entire screen down so you could reach an element in the upper corner.
Even if you did not get the iPhone 6 Plus, and instead opted for the iPhone 6, you would still get a phone with a 4.7-inch screen. This alone was still a 17.5% increase in diagonal screen size. Still a significant difference.
As mentioned earlier, the next big change came in 2017, with the release of the iPhone X. This was the biggest change with the removal of the home button and Touch ID, the inclusion of Face ID, and the most significant change, edge to edge screen. With the screen going edge-to-edge, the physical size of the screen increased to a 5.8-inch screen. Even though the actual difference is only 5.4% different, the entire iPhone being screen does make the screen feel significantly larger than it actually might be.
In 2018, Apple took the iPhone X, introduced just a year earlier, and added a larger version. This larger model created the largest screen for any iPhone, to that point, with a 6.5-inch screen on the iPhone XS Pro Max. The successor to the iPhone XS Max, the iPhone 11 Pro Max, retained this same screen size.
The iPhone 12 Pro Max has now usurped the iPhone XS Max and iPhone 11 Pro Max as the largest iPhone, to date, with a 6.7-inch screen. The screen is now 3% larger. Even though this is the smallest jump from the previous model, it is still a noticeable change.
As has been the case with all of the previous changes in screen size, after a couple of days, picking up the iPhone 11 Pro Max, it now seems a bit small. I am pretty sure that if I had to go back to the smaller phone, I would be able to do so after a few days.
If you are going to go for the iPhone 12 Pro Max, and you have not had a "Max" phone, be prepared for a whole different experience. The larger phone does mean that your thumbs will need to reach even further than before in order to interact with an element on the screen.
Now that we have covered the screen, let us look at an aspect to the phone that is entirely superficial.
Let us start with something that makes no difference in the function of the phone, but is a change, for me anyway.
Pacific Blue
I have purchased an iPhone every year since 2007. While I have not always gotten the phone with the highest amount of storage, I have traditionally gotten the phone which was either space gray, black, or graphite. For the first three iPhones, the original iPhone, iPhone 3G, and iPhone 3GS, the color would not have mattered, as the front glass was black.
Starting with the iPhone 4, through the iPhone 7 Plus, the only way to get the front plate to be a dark color was to get the Space Gray/Black/Graphite iPhone. So, this is what I did. However, since 2017 and the introduction of the iPhone X, there have been no bezels on the front of the phone, so in reality the color would not matter. However, the iPhone X and iPhone XS Max only came in three colors; Gold, Silver, and Space Gray. If I would have ended up with a Silver iPhone X or iPhone XS Max, it probably would not have mattered to me, in the long run. However, I do not like gold, so that would have been a non-starter.
Last year with the iPhone 11 Pro Max, Apple did offer a Midnight Green color. I was tempted to get this color, but I was not sure that the color would be what I wanted. Instead, I went with the Graphite iPhone 11 Pro Max.
This year I did something different. I went with the Pacific Blue iPhone 12 Pro Max. I opted for this color for two reasons. The first is that it is likely that I will only have the phone for a year, so if I did not like the color, I would not have to have it that long. The second reason I went with the Pacific Blue is that the person who is likely to be getting the phone next year indicated that they like the Pacific Blue. Therefore, I opted to go with the Pacific Blue model.
Having had a Space Gray/Black/Graphite phone for so long, I never even really noticed the color on the phones, most of the time. I did notice that the shade of gray was different, but after looking at it it initially, I would not think about it.
Overall, I like the color. The color is diffused on the back, due to the glass that covers it. The stainless steel edges of the iPhone are a different shade of Pacific Blue. The edges match the Apple logo on the back of the phone, which is a nice touch.
The next topic is something that was initially introduced in 2017 with the iPhone X, iPhone 8, and iPhone 8 Plus. That feature is wireless charging.
Wireless Charging
When Apple announced the iPhone 8, iPhone 8 Plus, and iPhone X in 2017, it introduced a new feature, wireless charging. All three of the phones used the standard known as Qi. Any new iPhone that Apple has released since 2017 have all had the ability to charge wirelessly. The iPhone 12 Pro Max is no different. If you have an existing Qi Charger, it will work just as it would with any other Qi-enabled phone.
At the same event where Apple introduced the iPhone X, they also announced another device called AirPower. AirPower was designed to allow you to place your iPhone or Apple Watch anywhere on the AirPower mat and have your device charge. Unfortunately, the product itself was never released. But the idea of charging without wires did not go away.
Even though AirPower never made it to market, you can still use Qi Chargers, however there is a new line of products from Apple called MagSafe.
MagSafe
From time to time Apple has been known to repurpose names of previous products for new products. Sometime the old product and the new product do not have any correlation, as is the case with the original iBook being a laptop, but the name being repurposed for an e-book format, called iBooks.
Apple has done the same thing again, however in this case it is actually a much closer repurposing. At its keynote at MacWorld Expo in January 2006, Apple introduced a new product, the first MacBook Pro with an Intel Processor, specifically the Core Duo. Besides being the first Mac notebook with an Intel processor, it also had a new feature, the MagSafe power connector.
The MagSafe power adapter allowed power to go from a power brick into the MacBook Pro, but the connection was magnetic. This had a significant advantage, if you tripped over the power cord, the power cord would not drag the laptop with the power cord, instead it would separate. This was possible through the magnetic connection between the power cord and the MacBook Pro itself. With the introduction of the MacBook Pro in 2016, the MagSafe power connector was replaced with USB-C connections. This left the ability for Apple to use MagSafe for another product.
Apple has done just that with a new line of accessories, specifically for the iPhone 12. The MagSafe line of accessories is more than just power, but it still uses magnets to connect the accessories to the iPhone.
MagSafe Charger
The line of accessories includes cases, wallets, sleeves, and power adapters. The one that will likely be used by a majority of people is the case, let us look at the Apple Silicone case with MagSafe. One of these is a power adapter specifically designed for cases and sleeves. The MagSafe power adapter takes its cues from its older brethren and uses magnets to secure a connection to case or sleeve and will provide power to the iPhone.
The MagSafe Charger has the MagSafe Charging pad on one end and a USB-C connection on the other. You can use any USB-C power adapter, however, you may not get the fastest charging possible. In order to get this, you will need to use Apple's 20-watt USB-C charger. To provide a way to gauge the size of the MageSafe Charging Pad, here is a comparison of the Mophie Wireless Charging Base, the MagSafe Charging Pad, and the Apple Watch charger.
According to Macworld's testing, when you use the Apple 20-watt charger you will get up to 17 watts of power to charge the phone. During my testing I was never able to get more than 14 watts of charging for my iPhone 12 Pro Max. It is possible that the reporting of my Eve smart switch was not reporting the proper usage.
For most users this is not necessarily a problem, unless you really need to charge quickly. Even when I plugged in directly to the iPhone I only got 18 watts of power to the iPhone. So, that is actually more than Macworld got in their tests.
I also tried using the 18-watt charger. When I used this I only got 14 watts of power, This is approximately 77.7% of the 18-watts that I got with the 20-watt power brick. So this is still quite acceptable.
Just to complete the testing, I also used a 29-watt USB-C charging brick that I have purchased for use with my iPad Pro. The highest it ever got was actually 10-watts, which is most surprising given that it can provide more power.
While the power rating that I saw is less, it makes sense because Apple cannot guarantee the power capabilities of the USB power brick that you use, therefore Apple is capping the amount of power allowed to be pushed to the iPhone. This is designed as a safety measure.
While you may be annoyed that you are not getting the highest throughput, in day to day usage it is not a problem. Any USB-C power adapter that you use will work perfectly well, just at lower speeds. Give that most users charge their phones overnight, this really is not an issue.
I would remiss to not mention that the Apple MagSafe Charger is a standard Qi-compatible charger. This means that you can use it for anything that is compatible with Qi-charging. This includes the AirPods with Wireless Charging Case, any iPhone introduced after 2017, as well as any other Qi-compatible device. This means that even if you do not have an iPhone 12, the MagSafe charger may be a worthwhile investment. Next, let us cover one of the new accessories that works with the MagSafe charger, the silicone case.
Apple Silicone Case with MagSafe
While it likely Apple's intent that people do not use a case on their phones, the fact that a new iPhone is at minimum a few hundred dollars, there are many, myself included, who do not feel comfortable using their iPhone without some sort of case on it.
The success of the iPhone has created a market for third-party cases. It would not surprise anyone if the third-party market for cases vastly outsold Apple's own cases. There are a couple of reasons that this may be the case that come to mind. The first reason being options available. Apple has traditionally only provided a few different types of cases. Typically these have been silicone and leather. There have been Apple cases for each of the iPhone models and sizes.
The second reason that many choose third-party cases is due to price. Apple has not been a company that is afraid of charging a premium for their products, accessories like cases included. Apple has been selling its own cases for almost as long as the iPhone has been around.
I have used a case with each and every iPhone that I have owned. This includes the original, the iPhone 3G, and the iPhone 3GS, which all could have handled not having a case on them. Having spent so much money on them, I wanted to protect them.
Typically Apple releases two different types of cases, leather cases and their silicone cases. Apple has added additional cases over time. Some of these include clear cases, leather folios, and even smart battery cases. Apple has charged $35 or $39 for silicone cases. Meanwhile, they have charged either $45 or $49 for the leather cases.
This year's set of Silicone and Leather cases include a MagSafe charger, therefore the price that Apple is charging has increased. For the silicone cases the new price is $49 and for the leather cases, it is $59.
The case I have purchased has been the official Apple Silicone case, in the same shade as the phone. As mentioned earlier, I have always, until this year, gotten the Space Gray/Black/Graphite case that has gone with the phone. This year Apple has not made a case that exactly matches the color of the Pacific Blue iPhone. Therefore, I got the closest one that I could, and I opted for the Deep Navy Apple Silicone Case with MagSafe. I would have preferred one that matches exactly, but that is not the approach Apple is going with this year. Apple does release new cases quarterly, so maybe they will release one that does match the Pacific Blue color. If they do, I am not sure I would end up buying it, but you never know.
One of the features of the previous iPhone cases, not all of them, but those introduced since the iPhone 6/iPhone 6 Plus, and in particular iPhones with Face ID, is that the Apple cases have not had is a bottom lip on the case. This has been the form-factor on all of Apple's Silicone and Leather cases since they were introduced.
With the iPhone 12 the official Apple Cases have a lip at the bottom. For those who have become acclimated to not having any barrier when swiping up from the bottom of the phone will need to adjust. It is likely that there will be third-party cases which do not have a lip around the entire screen.
I have found that it is strange to have to deal with the lip on the bottom of the case. While it does not affect the functionality, it is a different experience after using cases without the lip.
There are two reasons that I can think of why Apple would make this change. The first is symmetry for the entire case. The second reason may be that having a case cover the entire iPhone will allow the cases to last a bit longer. These are merely speculations, as Apple has not provided a reason for the change.
The Apple Silicone case with MagSafe has, as the name implies, a MageSafe magnet embedded in the case. The MagSafe magnet provides two functions simultaneously. The MagSafe within the case provides a passthrough for charging either via the MagSafe charger or via any Qi-compatible charger.
If you have used any Qi-enabled iPhone at all, undoubtedly you have placed your phone on the charger at night and then when you went to look at it in the morning realized that it had not charged because it was misaligned.
The second function, and the one that is probably most welcome by users, is the fact that the magnets within the case allow you to easily line up the MagSafe Charger with the the case. This will allow optimized charging, which is a common problem when using any Qi-enabled iPhone with a Qi charger.
Given that the third-party case market is a thriving one, Apple is not limiting MagSafe to their own products. Instead, third parties will be able to offer not only their own MagSafe cases, but also their own MagSafe accessories. Companies like Belkin, Otterbox, and Pitaka have already made MagSafe accessories, like cases and chargers. It is only a matter of time before additional companies begin making accessories that will work with MagSafe.
If you plan on using any of the MagSafe accessories by Apple, or third-parties, you will likely want a MagSafe case and while the Apple case does have some tradeoffs, like the increased price and full lip at the bottom of the case, it seems like a pretty good case for use with the iPhone 12 Pro Max. Time will tell if the case holds up or not.
There is another aspect to the MagSafe Charger and Silicone Case that needs to be highlighted. Those items are related to some animations. When you put the iPhone 12 Pro Max into a Silicon MagSafe case, you will see an animation with the color of the case that you have. Similarly, if you place an iPhone 12 Pro Max on a MagSafe charger, you will see an animation of the current battery power, in a circle, that looks a lot the MagSafe charger. While neither of these animations is necessary, it is a nice touch to see both of them work on the iPhone 12 Pro Max.
There is one more thing to mention about the case, but that can be done in the next section, which will be about the Camera.
Cameras
One of the major reasons for anyone to upgrade their iPhone, particularly if they are on an every two or three year upgrade cycle, is the improvements that are made to the camera system. Normally, if you upgrade every year the changes in the camera are not that great. They are undoubtedly better cameras, but they may not be noticeable to most people. That is not necessarily the experience if you were to go from the iPhone 11 Pro Max to the iPhone 12 Pro Max, as I have.
The first thing you will notice you the cameras is how large they are. One easy way to compare the increase in size is by putting the iPhone 11 Pro Max into the case of the iPhone 12 Pro Max. You can clearly see the difference in the sizes of the entire camera module.
The size difference brings the last change about the Silicone case to mention. The Apple Silicone case for the iPhone 12 Pro Max has a hard plastic bumper around the cutout of the iPhone 12 Pro Max camera system. The reason for this is likely to protect the lenses when the iPhone is moved around as well as to prevent scratching should someone place the iPhone on its back.
The iPhone 12 Pro Max has a new feature, a LiDAR sensor, although it is not the first device with this sensor. The 4th generation 12.9-inch iPad Pro, and 2nd Generation 11-inch iPad Pro, both introduced earlier in 2020 received this sensor first.
The LiDAR sensor has a few different applications. The first is that the iPhone 12 Pro Max can be used for augmented reality applications. This could be apps like Wizards Unite or Pokemon Go, or even room mapping applications.
While some augmented reality apps are popular, the second application for the LiDAR sensor is one that users will likely encounter more often, taking photos in low-light environments. The LiDAR sensor will allow objects, specifically people and faces, to be more easily recognized when the amount of light might be limited.
One the topic of low-light, let us look at the changes in the actual lenses. The iPhone 12 Pro Max still has three lenses, a wide angle lens, an ultra-wide lens, and a telephoto lens.
The iPhone Pro Max ultra-wide lens is still a 0.5x zoom lens, while the wide angle lens is still 1x, however the zoom lens is a slightly different than previous models. With the iPhone 11 Pro Max, it was a 2x lens. Now, however, it is a 2.5x zoom. It should be mentioned that all of these are optical zoom, meaning that the lenses themselves will be able to have those particular zoom levels.
With the new optical zoom of 2.5, this means that the maximum digital zoom has been increased from 10x to 12x. While this does not sound like a big jump in actual numbers, you have to realize it is a 20% increase in optical zoom. This should allow you to take even better pictures when you zoom in.
Here is a good comparison between what the iPhone 11 Pro Max vs the iPhone 12 Pro Max. These were taken in low light.
The reason that iPhone 12 Pro Max is able to take even better low-light photos is due to the bigger aperture in the lens. When it comes to low-light pictures, the more light that you can let in, the better the image can be. The iPhone 11 Pro Max improved low light photos by leaps and bounds. Still, the iPhone 12 Pro Max improves upon this.
Here is another comparison of some clouds taken with each phone. If you look carefully, you can see that the iPhone 12 Pro Max represents the colors more accurately than the iPhone 11 Pro Max.
One of the major reasons that I waited for the iPhone 12 Pro Max is the cameras. I use the iPhone as my exclusive camera. It is always with me, or at least not very far. From what I have seen so far, the improved cameras were worth waiting for. Next, let us look at a feature that is new to the iPhone 12 Pro Max, and that is improved cellular connectivity.
5G
One of the most touted features of the iPhone 12 Pro Max, and the other iPhone 12s, is the inclusion of 5G connectivity on the device. I use AT&T for my service, and I have since before the introduction of the iPhone in 2007.
When the original iPhone was introduced I bought one on the second day and immediately signed up for the unlimited plan. I continued to use the same plan since then. AT&T stopped offering unlimited plans in 2010. However, if you had an existing plan you could continue to use it. I, of course, kept using my unlimited data plan.
Over time AT&T had increased the price of the unlimited plan from $30 to $35 in 2015, and then to $40 in 2017, and to $45 in 2018. I continued to dutifully pay the increase prices. I was on a family plan, so switching to either another carrier or to a different plan was not as simple as you might expect.
I called AT&T about changing my plan and they informed me that it would cost me $15 more to switch two phone lines, even though one of them was a flip phone. I was able to move the second line off of my account and then I was able to switch to one of AT&T's newer unlimited plans. I wanted to make the switch in anticipation of getting an iPhone 12 Pro Max, with 5G. And the older AT&T plan that I had would not have provided me with 5G, nor did it allow me to use the hotspot functionality that has been available on AT&T plans for a while, but those latter two are a different story.
Prior to getting my iPhone 12 Pro Max I did look at the AT&T 5G coverage map to see if I would be able to get 5G in my area, and I am able to get 5G coverage. Here are three different comparisons that I did with the iPhone 12 Pro Max using the SpeedTest app. These compare AT&T's LTE, which they label as "5Ge" (do not get me started on that), and true 5G. These results are in Megabit per second, or Mbps.
LTE Download
LTE Upload
Server 1
35.50
1.81
Server 2
5.60
0.44
Server 3
12.50
3.67
5G Download
5G Upload
Server 1
30.90
4.57
Server 2
42.50
2.95
Server 3
36.90
6.50
These tests were all done about the same time. Each of the servers used for each test are the same. Servers 1 and 3 are located in Chicago, while Server 2 was a local server. As you can see in some cases 5G was significantly faster, but in others, LTE was faster. The biggest difference is the difference in upload speed.
One thing mentioned in the iPhone 12 keynote was that macOS Big Sur has a bit more optimized when connecting to a hotspot on an iPhone. I did some testing to see if this was true.
LTE Download
LTE Upload
Server 1
3.79
0.44
Server 2
7.06
0.43
Server 3
19.50
0.27
5G Download
5G Upload
Server 1
40.00
3.35
Server 2
25.30
3.95
Server 3
38.0
4.47
When tethered wirelessly to LTE and 5G, the same general outcome is shown, where 5G was faster, but particularly so with upload speeds. Your experience with 5G is definitely dependent on many things, including current congestion, usage, number of devices on the same cellular tower, the servers you are using, and many more factors.
I have mixed thoughts on 5G for the iPhone 12. On one hand, it is great to see that 5G is available on the iPhone. At the same time, I do not think that most will notice the difference at this point in time. However, in a few years users may actually notice a difference. If you combine this with the fact that many users will hold onto their phones, it may be worthwhile having 5G in the iPhone 12. Furthermore, even after one person has upgraded, their old phone may go to another person and therefore having 5G would be a nice upgrade for them.
One of the benefits to using a standard like 5G is that should there be any improvements that can be made via software, the iPhone 12 Pro Max will get that benefit, through a firmware update. Should there be an improvement that can only be made with hardware, they will not get it, but the likelihood of a change requiring a hardware change is quite low. The last thing that we will tackle is just some benchmark comparisons for various devices.
Benchmarks
Would it really be a full review without some benchmarks? I do not know if it would be. So here are some benchmarks for comparison. These were all run using the Geekbench 5:
Device
Single Core
Multi Core
iPod touch (7th Gen)
553
1077
Early 2015 13.3-inch MacBook Pro
684
1400
Late 2018 Mac mini
992
4442
Mid-2017 27-inch iMac
1068
4377
12.9-inch iPad Pro (3rd Gen)
1124
4680
Late 2019 16-inch MacBook Pro
1170
5391
iPhone 11 Pro Max
1328
3252
iPhone 12 Pro Max
1604
4297
While the iPhone 12 Pro is not the fastest when it comes to Multi-Core performance, it is the fastest when it comes Single Core performance, at least of the devices that I own at this point. The iPhone 12 Pro Max out performs the iPhone 11 Pro Max, quite easily. Benchmarks are only one aspect to overall performance, but they can be useful to give you a comparison to how a particular device might perform, compared to other devices.
Closing Thoughts
The iPhone 12 Pro Max is a large phone. A very large phone. The increased screen size, which is only 0.2 inches or 5.08mm, is still quite noticeable. The width and height have also increased slightly, which accounts for the larger screen. The squared off edges are a nice touch that harkens back to the old iPhone 4, 4s, 5, and 5s form factors. It is good to see the old form factor come back in a new revision of the iPhone.
The Pacific Blue color is a nice color and the fact that stainless steel edges match the Apple Logo on the back is a nice touch. Although, to be honest I probably will not be seeing much of the back or the sides, because I will have a case on the phone. The new Apple Silicone Case with MagSafe is a pretty good case, albeit with an increase in price. The increase in price does include the new MagSafe charging feature.
The MagSafe charger can be used with any Qi-compatible charger, not just the MagSafe Charging pad. However, if you opt to use a standard Qi-compatible charger, you will not get the full fast-charging capabilities that come with the MagSafe charger, but that may be worth the tradeoff. I know for me, I almost always charge overnight, so I do not need the fastest charging possible. Even so, the magnetic aspect of the MagSafe Charging case, and the iPhone 12 Pro Max in general, means that if you do use the MagSafe Charger, you will always have a charged phone. You will no longer need to worry about a misaligned charger and therefore a phone that did not charge overnight.
The addition of 5G, may not make a meaningful difference right now. In the future depending on what applications and use cases arise with having 5G, it may become an absolute necessity at that point. For now though, if you do not have 5G in your area, it is not necessarily a deterrent for not upgrading to the iPhone 12 Pro Max.
As has been the case with previous years. If you have an iPhone 11, iPhone 11 Pro, iPhone 11 Pro Max, iPhone XS Max, then upgrading to the iPhone 12 Pro Max may not make sense. However, if you have an iPhone X, iPhone 8 Plus, or older phone, then upgrading to any of the iPhone 12 Pro Max may be a worthwhile upgrade, but be prepared for a significant jump in physical size and screen size. The larger screen real-estate, combined with the improved cameras may make it an easy choice for some users.
Here are a few more examples of some photos taken with the iPhone 12 Pro Max.\
There has been a trend in the recent years where it seems like new intellectual property titles have not been as numerous as in days past, or maybe it just seems that way. The modern computer-gaming era is now around 40 years old.
One thing in life that is quite powerful is nostalgia, and gaming nostalgia is one of the most powerful pulls.
With so much gaming history, there has been a variety of series that have started on one platform but have made their way to another. Similarly, there are a number of platform-specific games that have been re-issued for a later generation of the same console. Sometimes, there are games that are re-issued even for the same console generation.
I have lost count of the number of times that I have purchased versions of some games. The list that I have lost track of are Wolfenstein 3D, Doom I, Doom II, and Duke Nukem 3D. I would not be surprised if I have purchased versions of all of these games for PC, Xbox 360, and Xbox One. I know I have purchased multiple copies of Wolfenstein 3D just for the PC.
There is one series that fits all three of these instances, at least for some users, and that series is the Mafia series.
A Brief History of the Mafia Series
The first Mafia game was originally released in 2002 for Microsoft Windows and was ported to both the Playstation 2 and the the original Xbox in 2004. I originally played Mafia on the PC.
The sequel, Mafia II, was released in 2010 for the console successors, Playstation 3 and Xbox 360, as well as Windows, and this time on OS X. I played this one on the Xbox 360, and due to backward compatibility it is also available on the Xbox One, in its original Xbox 360 gameplay.
The third in the series, Mafia III, was released in 2016 for the current console generation, the Playstation 4 and Xbox One, as well as Windows. I wrote a review of Mafia III back in 2016. You can read that review at https://www.waynedixon.com/2016/10/30/a-review-of-mafia-iii/.
Reissuing Games
One trend within the gaming industry is that when a game is initially released, it may be just the core game. However, as time progresses additional add-ons are released. After some time, a game may be re-issued. Often, these re-issues include all of the add-ons and purchases.
Typically, when games are re-issued, the story and gameplay do not change. However, that is not necessarily the case with the Mafia series.
Definitive Editions
Each of the three Mafia games now has a version called the “Definitive Edition”. The Definitive Edition, in this context, is more than just a re-issuing of the game. The "Definitive Edition", in this context, means that this is what the developers want to be considered the canonical version.
Definitive editions, and reissues in general, offer players not only an upgraded visual experience, but also an opportunity to get additional gamer score because all of the achievements are new, except in the case of Mafia III. Since Mafia III was released on the Xbox One, the core game is the same, therefore the Mafia III game is the same.
Now, onto the reviews, starting with the first in the series, Mafia. These reviews will be shorter than the full review I did for Mafia III in 2016.
Mafia: Definitive Edition
If you played the original Mafia and you play the Definitive Edition, you will definitely notice some differences in the game. Not just in terms of graphics, because they have been rendered in 4K, but in the actual story. The changes are not that noticeable, but they are there.
Because this is a “definitive edition”, it comes as no surprise that the developers decided to change the story a bit. I am not sure if the changes are good or bad, but they are what they are. I will not spoil the changes, but know that they are there.
I can tell that the developers spent significant time on this game. How can I tell, because I did not have any issues with the game. I do not recall any glitches. No lost audio, no game crashes, or anything like that. Which cannot be said for the other games, but more on that in those sections.
The Story
Mafia is set in the 1930s in a fictional city called Lost Heaven, which is somewhat modeled off of Chicago. This is easily noticed with the "L" trains throughout the city. And no, they are not "El" for elevated trains. They are the "L" trains. But that is a separate rant.
As mentioned earlier, you play as Tommy Angelo, a cab driver just trying to earn a living. One night, while taking a break you run across two mafia members, Paulie and Sam, who compel his assistance with escaping. After a successful escape, Tommy begins working with Paulie and Sam's boss, Mr. Salieri, and everything escalates from there.
Not everything goes well for Tommy though, he starts to do some side jobs, and not all of them sanctioned by the Don. This makes for an interesting story line.
Side Missions
There are many common aspects to a variety of games. One of these items is the idea of side missions. Side missions are not ones that are required to get through the main storyline. One of the side missions that is available within Mafia is the accumulation of cars. These cars can be obtained by finding ringing phone booths throughout Lost Heaven and performing the tasks given to you.
Game Play
Mafia: Definitive Edition changes some aspects of the original game. Most notably, the combat tactics are rebuilt and more like the more modern Mafia III game. This will be helpful for more modern gamers. If you want to relive the original, you can play with the "Classic Difficulty". This will make the game much more like the original.
Here is a video of a car within the game, called the Crazy Horse, doing a jump onto the roof of a building.
Unique Gameplay Mechanics
Mafia is a game that comprises a lot of driving. Sometimes you need to grab a car. In most games there are only two options, the car is already open, or you smash a window. Mafia, and Mafia II, have a different mechanic; that ability to One of the gameplay mechanics in Mafia is the ability to pick locks on cars.
The type of lock depends on the type of car, but the mechanic is all the same. You have to pick each of the lock tumblers. The fancier the car, the more tumblers there are to pick. As is the case, you may get caught by the police and then trouble can begin.
There is a game mode, called "Classic Difficulty" that will allow you to play as the original gameplay. What this means for the police is that they will actually pull you over for everything. This includes speeding, running through lights, hitting pedestrians, hitting cars, and almost any other infraction you can think of.
This can make for some interesting gameplay. In the Definitive Edition, you can select how much you want the police to pay attention.
Closing Thoughts on Mafia: Definitive Edition
Mafia: Definitive Edition stays very true to the original Mafia. Some bits of the story have been changed, but those changes do not detract from the overall game. The uniqueness of the lock picking is a nice touch and does offer a unique aspect to the game.
The upscaling of the graphics to 4K does allow the game to fit nicely into today's modern systems. Given that the game is such a faithful representation of the original, many modern gamers may become annoyed with the more antiquated combat tactics and some of the game play may be a bit "old" in their minds, but only if they play the "Classic Difficulty" mode.
Next, let us move onto the sequel, Mafia II.
Mafia II: Definitive Edition
Mafia II was originally released in 2010 and is set in the 1940s and 1950s, not long after the setting of Mafia. Instead of being in Lost Heaven, this game takes place in Empire Bay. And you do not play as Tommy Angelo, instead you play as Vito Scaletta.
The game starts off in Italy during World War II. During this first level you learn how to play the game, use guns, maneuver, and other aspects. Once you have completed this level, you then have Vito returning home on furlough where he learns that his family is having some issues, specifically that his late father left his family in debt to a loan shark. Now, Vito must help his family repay the debts.
Vito talks to his childhood friend Joe who helps him get some additional cash by getting him in connection with Mike Bruski, who needs particular cars. Eventually, this escalates and Vito begins working with someone Joe knows, Henry, who is part of the Clemente crime family.
The work Vito does with Joe and Henry does get him enough to repay his father's debts, but it only escalates from there.
Side Missions
Mafia II, just like its predecessor, contains the ability to do side missions. The side missions allowed in the game include the ability to deliver cars. Depending on the car, and its destination, you can quickly earn cash. This can be done at almost any time, with some caveats, but only once they are unlocked for you.
One type of side mission that is often available for games is collectibles. Mafia II is no different. You can collect a couple of different collectible things that you can attempt to get. The first of these is a set of playboy magazines. These are scattered throughout Lost Heaven, and some can only be obtained during missions.
The second collectible is Wanted Posters. These are scattered throughout Lost Heaven and are more easily found while roaming around Lost Heaven. There are 189 of these in the definitive edition. This is up from 159 that were included in the standard game.
Some Interesting Experiences
Here are tow examples of some interesting game play. The first one is a car driving along a wall, with the second being a cool explosion.
Game Play Issues
While I was playing the Mafia II: Definitive Edition I had significant issues. The game would constantly crash, resulting in lost progress. Furthermore, audio would just randomly not work, or characters would not trigger their cutscenes. This is quite disappointing given that the game was re-built from the ground up.
Here is an example of one of the many glitches I experienced while playing.
Included Content
The original release of Mafia II had some additional downloadable content released after the original game. The content included the following:
The Betrayal of Jimmy
Jimmy's Vendetta
Joe's Adventures
All three of these are included in the Definitive Edition of Mafia II. Just as is the case with the first Mafia game, Mafia II: Definitive Edition does provide the ability to get additional gamer score, so if you like to get additional score for a game you already know, you cannot go wrong.
Closing Thoughts on Mafia II: Definitive Edition
Mafia II: Definitive Edition is a decent rebuild of the original. Even though it does have significant bugs, it is still worth playing if you have not done so. The storyline is interesting and it does allow you a bit more freedom to do things without being too nagging about the next mission. If you want to get some achievements, then the collectibles will definitely help in this, but be prepared for a slog to find all of the Wanted Posters.
Now, onto Mafia III: Definitive Edition.
Mafia III: Definitive Edition
As mentioned earlier, I already wrote up a review of Mafia III, which you can read at https://www.waynedixon.com/2016/10/30/a-review-of-mafia-iii/. The Definitive Edition of Mafia III does not modify the story like the other two games. However, it is expanded a bit. This expansion is done through the downloadable content, and with the definitive edition it is all in a single package. The base game is the exact same as the one released in 2016, including some of the same problems.
Included Content
As is the case with Mafia II, Mafia III: Definitive Edition is more than just the base game. In fact it includes the following content, in addition to the base game:
Family Kick-Back (Gun Pack)
Judge, Jury & Executioner Weapons Pack (Gun Pack)
Faster, Baby! (Additional missions)
Stones Unturned (Additional missions)
Sign of the Times (Additional missions)
I will admit then when I was playing through the Definitive Edition I thought the game was taking a lot longer than the first time through, and it was. The reason for this is that these additional missions are available where they were not at first. These additional mission packs are nice additions and fit right into the overall narrative quite well.
Game Play Issues
While some of the issues that I experienced during my time playing have been fixed, there are still some issues, even four years later. To me, this is unacceptable. The developer has had four years to fix these issues, but obviously they have not. Just today, as I write this, I had a hard crash of the game where I did a jump off of a ramp, landed, and the game just crashed.
The biggest issues that I have experienced include game crashes, severe slow downs, to the point where the controls stop responding properly. I have also experienced instances where cars get stuck and cannot be moved no matter what. There is even this video where I am driving along and just randomly hit an invisible barrier, when there is not one on the screen.
One issue that seems to be new is that while driving the car will just randomly stop responding to pressing the accelerator. It will just stop dead in the middle of the road and it will not respond at all. I am not sure what is happening in these instances, but it has occurred more than once.
The last issue that I have experienced is that some non-playable characters, who are with you on a job, will just randomly get out of the car. This happened more than once and I was baffled both times.
Closing Thoughts
Overall, the Definitive Editions of the Mafia series are pretty good games, even though a couple of them are full of crashes and weird glitches. If you have played any of them before, and enjoyed them these versions will not only bring you back to when you played them previously.
If you have never played any of the Mafia series, I recommend getting the Trilogy and playing all of them. It is cheaper to get all three of them in the trilogy than it is to purchase them each individually. The entire trilogy is $60, which comes to $20 per game and overall that is a pretty good value. You can view a lot more media at the developer's website, mafiagame.com.


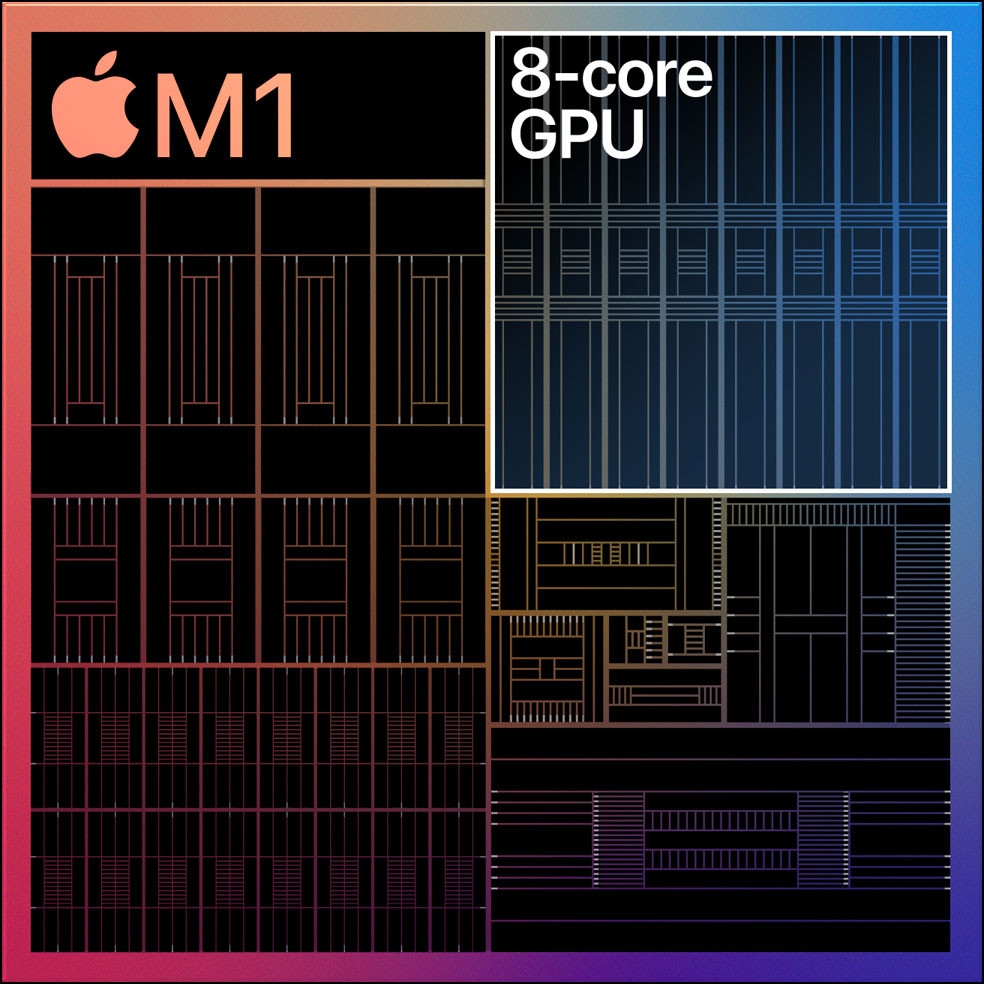


![Xcode error that states "Please try again later. Failed to finalize LSBundleWrapper mutator instance for [bundle identifier]"](https://www.waynedixon.com/wp-content/uploads/2020/12/m1-mac-mini-issue-unable-to-install.png)